Appearance
Twitter Feed Settings
This is your creative control center, where you can design a beautiful and functional feed that perfectly matches your website.
When you first open the editor, you'll see three main tabs at the top of the settings panel on the right:
- General (This Guide): This is the most important tab. It controls what content is shown (your tweets, your profile info, filters) and how the feed functions (the layout, buttons, and links).
- Style: This tab controls the "look and feel"—all the colors, fonts, and borders.
- Connection: This tab is for managing the specific API connection for this template.
This guide will walk you through every single setting in the General tab in a simple, step-by-step way.
What can you build with these settings?
- A "Latest News" Feed: Use the User Account feed type and the Timeline layout to show your newest tweets in a classic, single-column feed.
- A "Brand Mentions" Wall: Use the Search feed type with your brand name (e.g., "WP Social Ninja") to show what people are saying about you.
- A "Hashtag" Campaign Wall: Use the Hashtag feed type and the Masonry layout to create a beautiful wall of all tweets mentioning your event, like
#MyAwesomeConf2025.

General Settings
Here is a detailed breakdown of each section within the General tab.
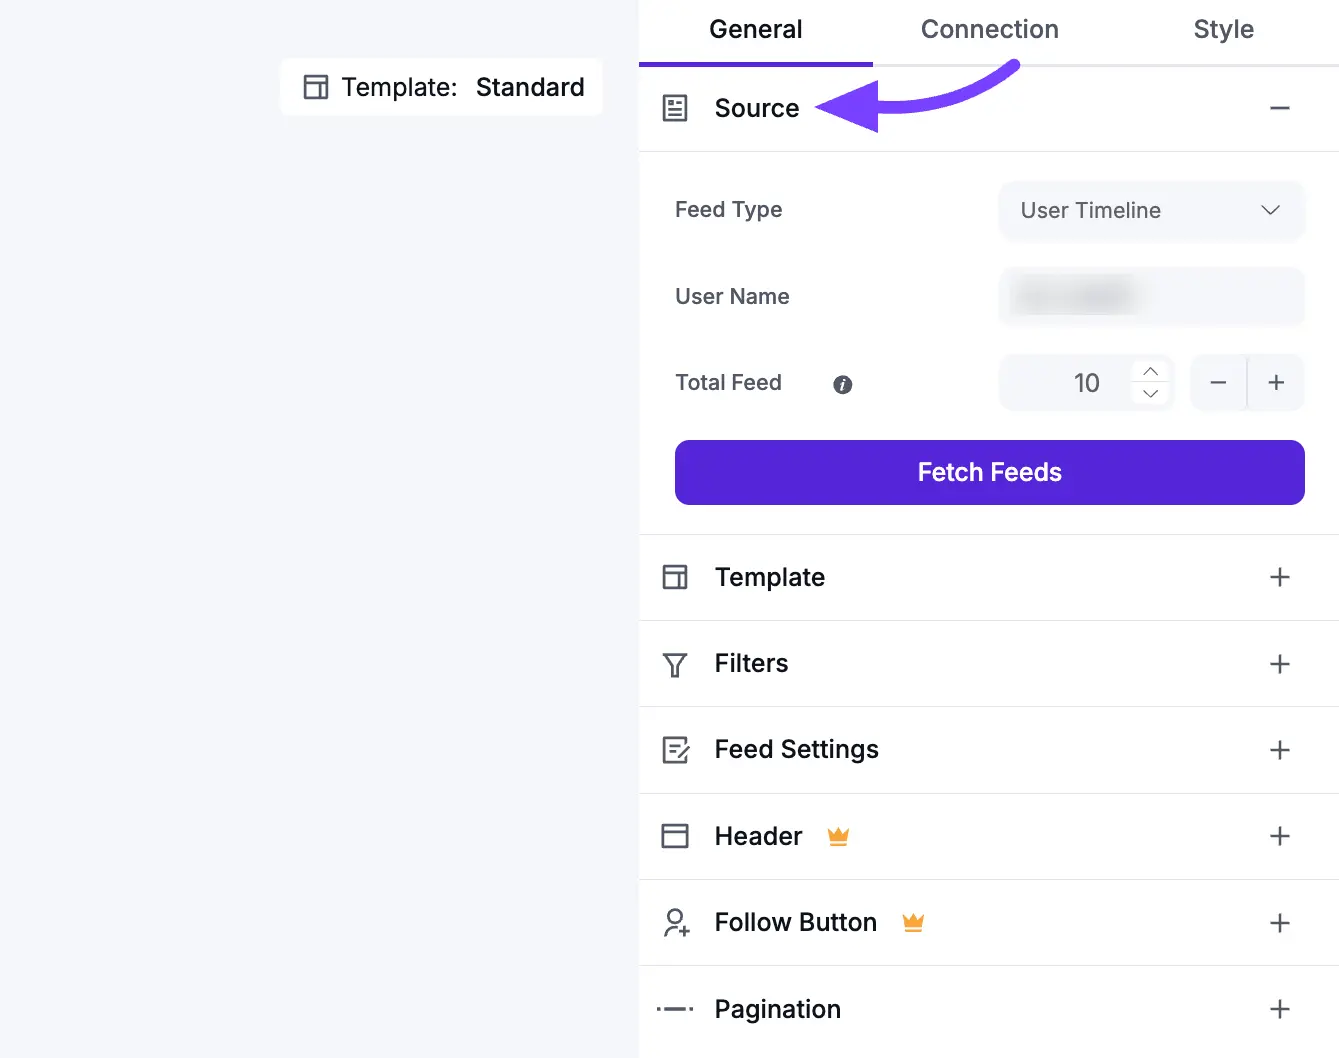
1. Source
This is the very first and most important step. The Source settings tell WP Social Ninja what kind of content to get from X (Twitter) and which account or topic to get it from.
- Feed Type: This is a dropdown menu that lets you choose the kind of feed you want to create. You have three powerful options:
- User Timeline: This is the most common choice. Select this to display the tweets from your own X (Twitter) profile that you have connected to the plugin.
- Hashtag: This feature lets you display public tweets from all over X (Twitter) that use a specific hashtag (e.g.,
#WordPress). - Home Timeline: A home timeline (also called a "home feed") is the main, primary feed you see when you log in to X (Twitter).
- Mention: Shows only mentions feed.
- Username: This will show the X (Twitter) accounts you have connected.
- Total Feed: This number tells WP Social Ninja the maximum number of tweets to fetch (or pull) from X (Twitter) when it checks for new content. It's best to set this to a high number, like 50 or 100, to make sure the plugin has plenty of tweets to work with. (This is not the number of tweets that show up on your page at first; that's controlled by Pagination).
- Fetch Feeds: This is your manual "Refresh" button. If you've just posted a new tweet on X (Twitter) and want to see it in your website preview right now, just click this button. It forces the plugin to check for new content immediately instead of waiting for the next scheduled update.
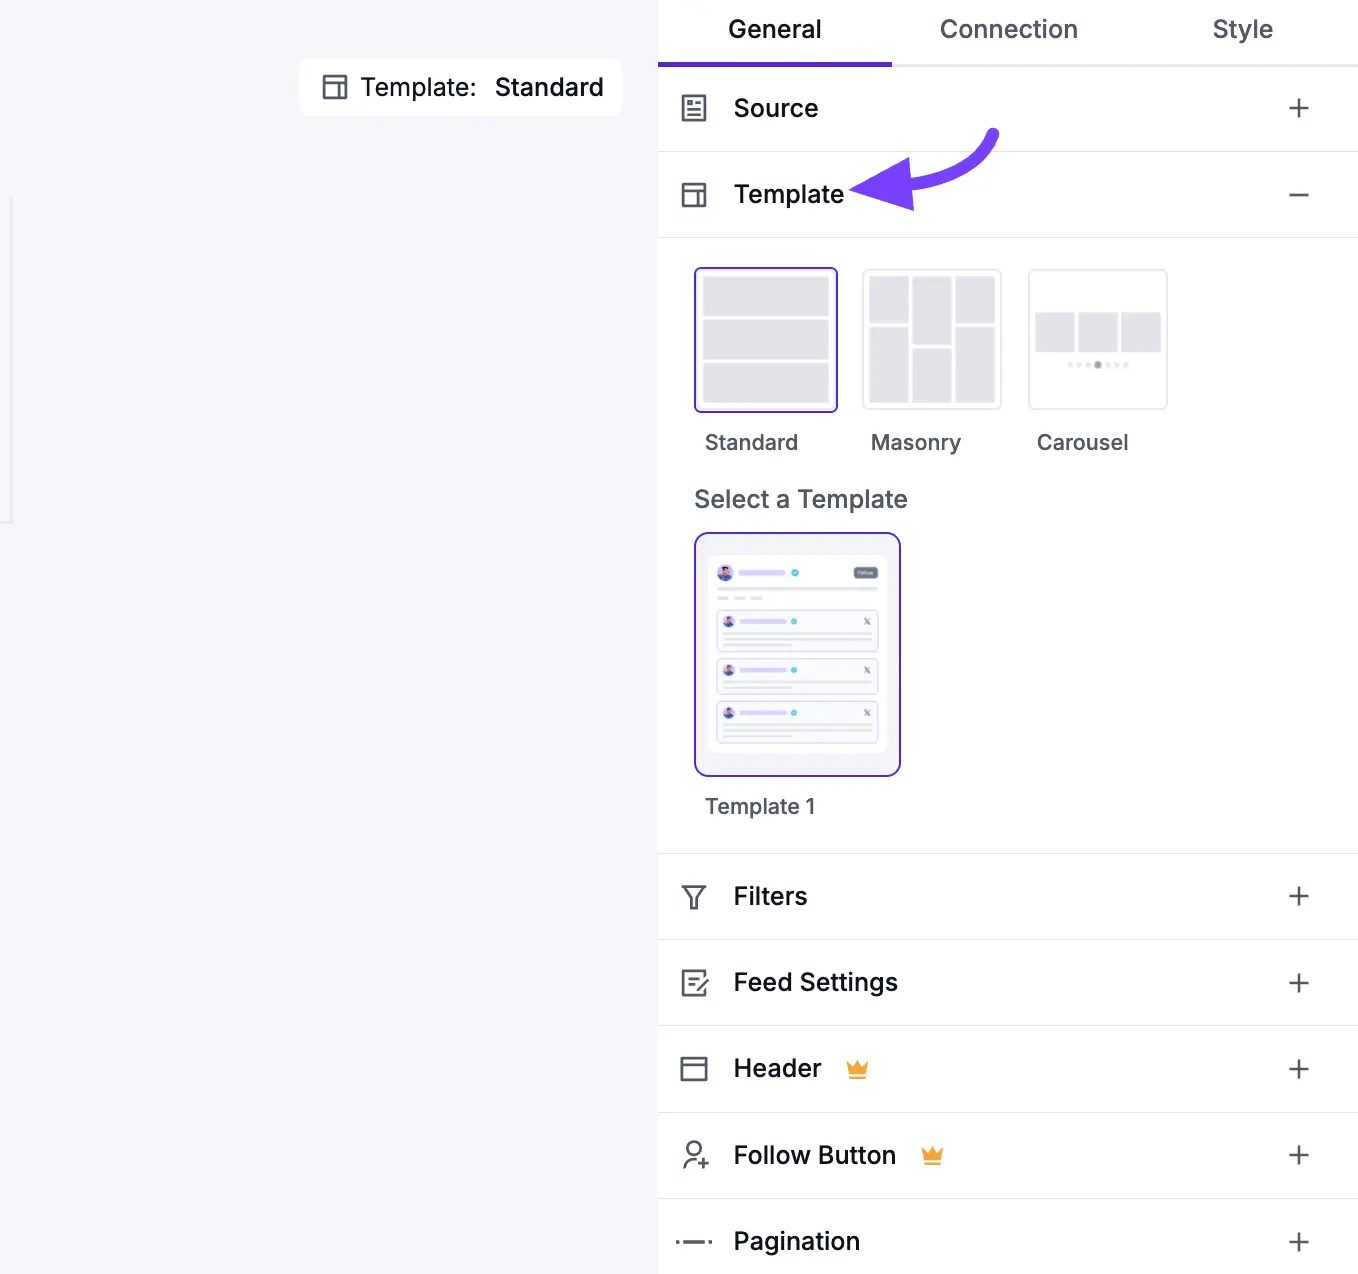
2. Template
This section controls the visual structure and arrangement of your tweets.
- Layout Type: This is the foundational structure of your feed.
- Timeline: This creates a classic, single-column feed that looks similar to the X (Twitter) timeline.
- Grid: This creates a clean, organized, multi-column grid. All tweet boxes are forced to be the same height, which creates a very neat and symmetrical look.
- Carousel: This displays your tweets in a horizontal slider. Visitors can click or swipe through your posts. This is perfect for saving space.
- Masonry: This is a "Pinterest-style" multi-column grid. Tweets will have different heights (based on their text length and images), and the plugin will intelligently fit them together like bricks in a wall.
- Template: These are pre-designed visual "skins" for your feed. Each template (like Polaris, Deneb, etc.) changes the styling of the tweet boxes, fonts, and layout. Click through them to see which one best matches your brand.
- Number of Columns: This is a crucial setting for making your feed look good on all devices. You can set the number of columns you want to show on Desktops, Tablets, and Mobile phones.
- Columns Gap: This controls the amount of empty space (in pixels) between each tweet in your feed.
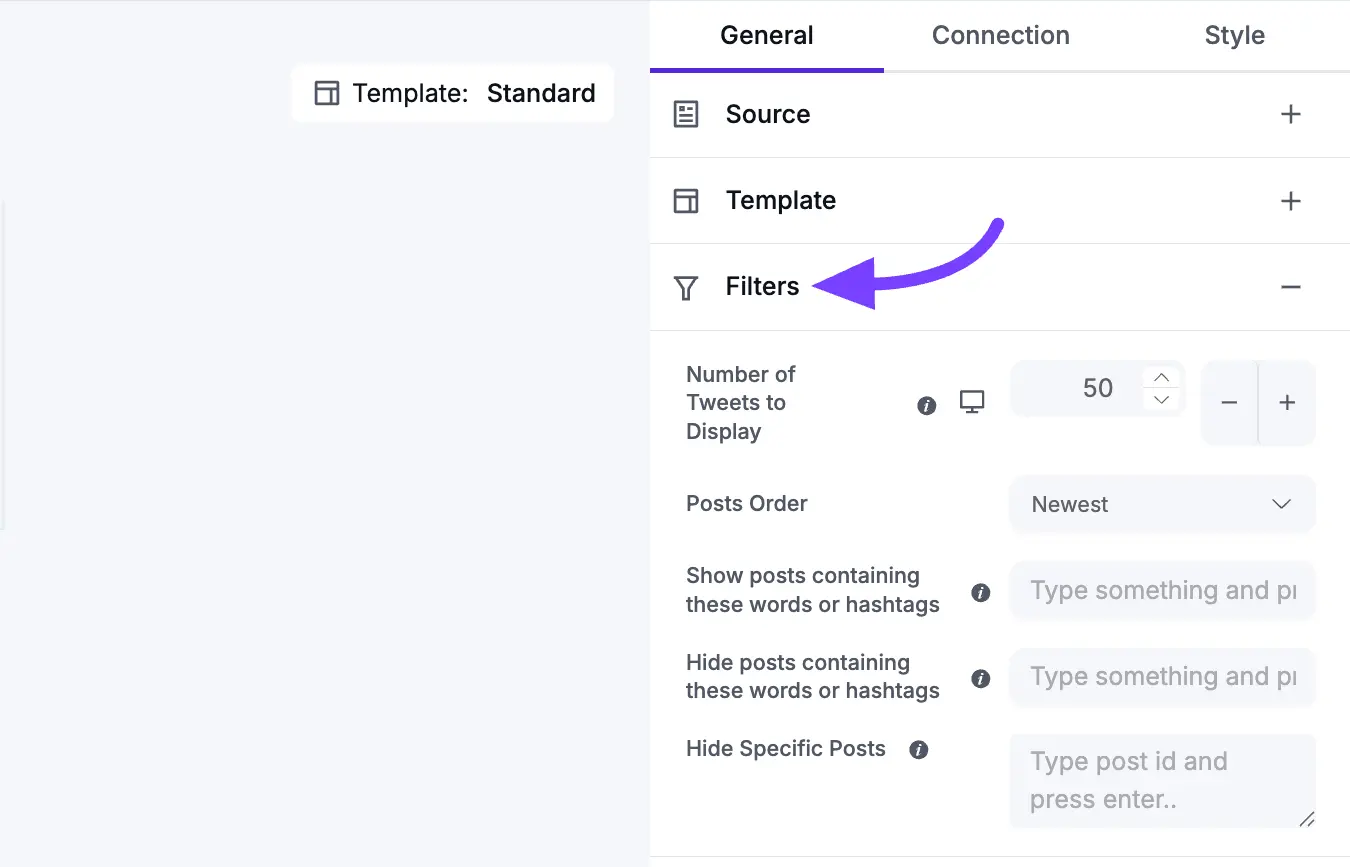
3. Filters
Filters are how you refine your feed to exclude content you don't want or only show content you do.
- Number of Feeds to Display: This is the number of tweets a visitor will see when the page first loads. (More tweets can be loaded later using the Pagination settings).
- Post Order: This lets you sort your tweets.
- Descending: Shows newest tweets first (this is the most common setting).
- Ascending: Shows oldest tweets first.
- Random: Shuffles the tweets in a new order every time the page loads.
- Show/Hide Posts with Keywords/Hashtags: This is a very powerful filter. You can enter a comma-separated list of words or hashtags to either only show tweets with those words, or hide tweets with those words.
- Example: If you want to hide all replies from your feed, you could add the
@symbol to the "Hide" box.
- Example: If you want to hide all replies from your feed, you could add the
- Hide Specific Feeds: This allows you to manually hide one or more specific tweets by pasting in their unique Tweet ID (a long string of numbers you can get from the tweet's URL).
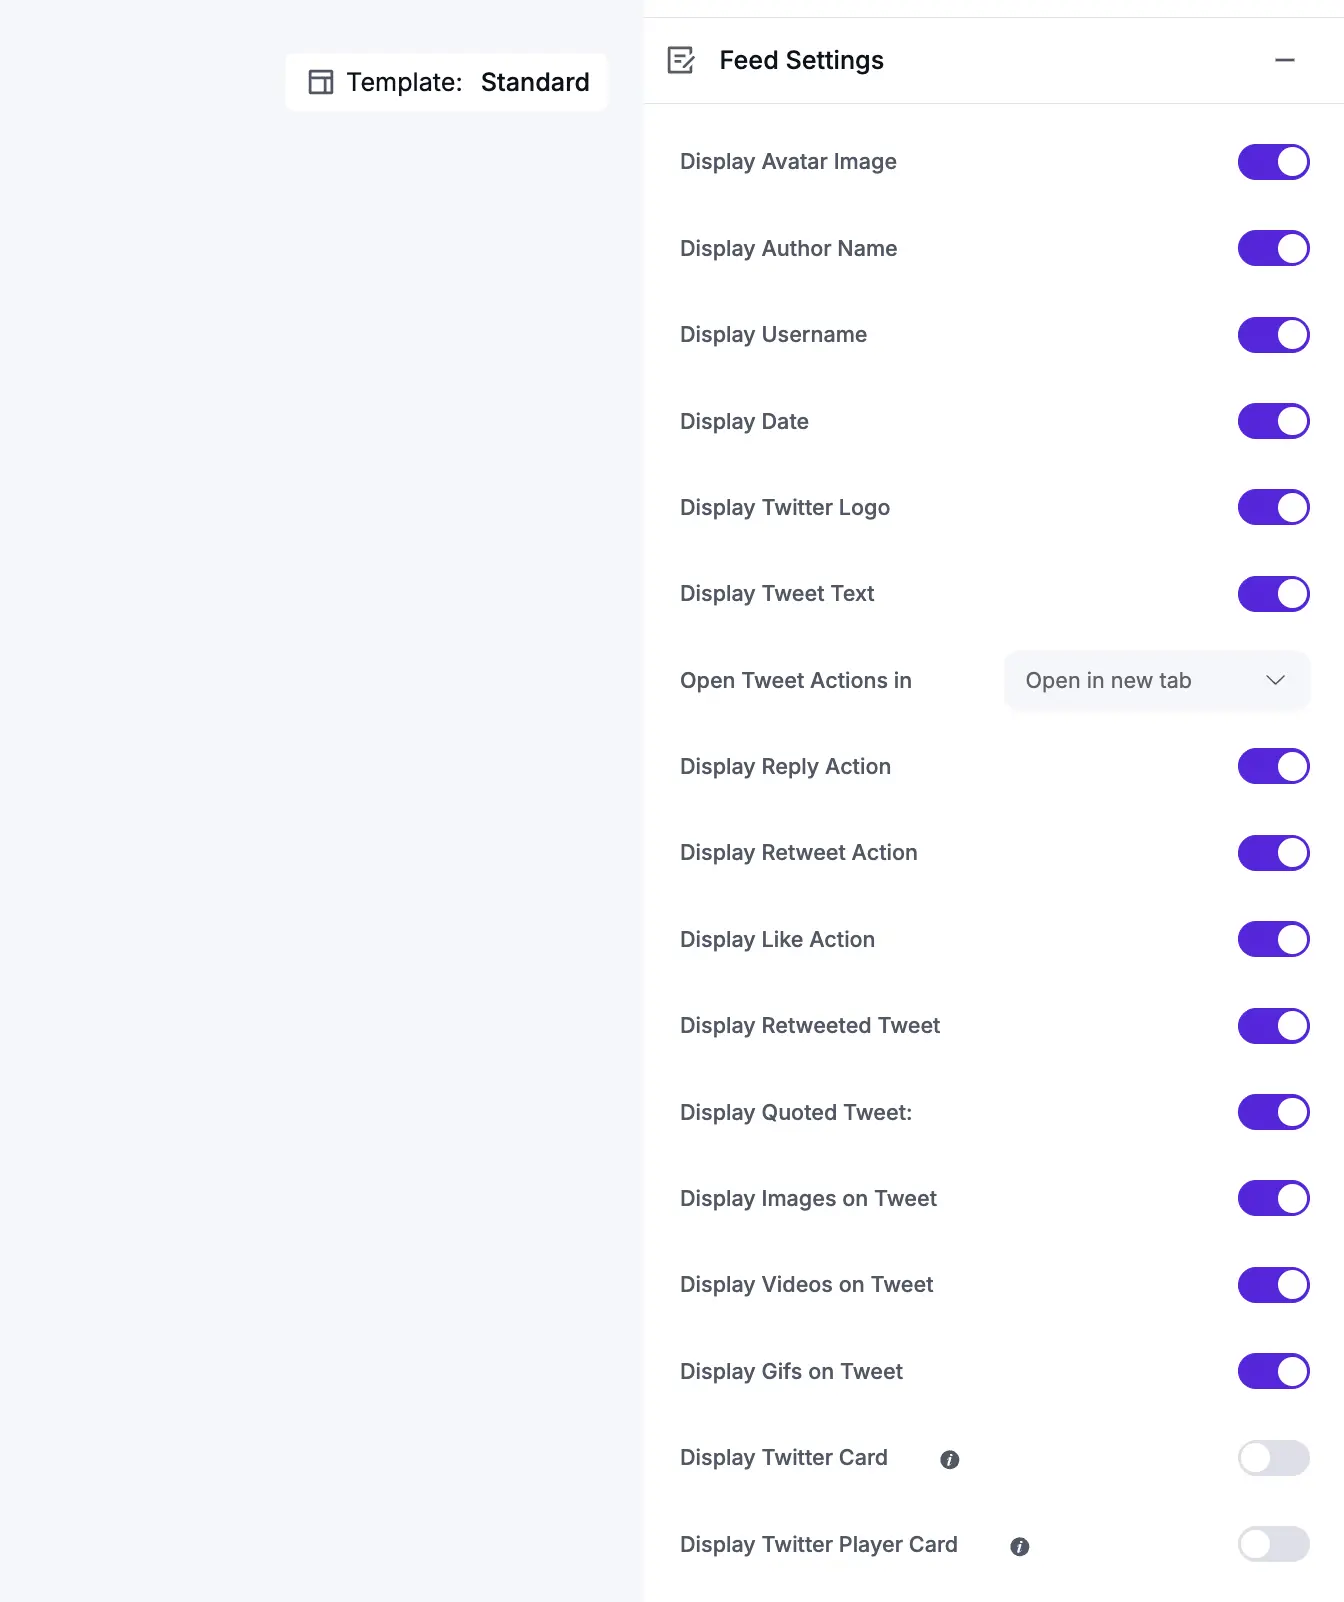
4. Feed
This section controls the content and links inside each individual tweet card.
- Open Post in: This determines what happens when a visitor clicks on a tweet.
- None: The tweet is not clickable. This is for a "display-only" gallery.
- X(Twitter): The visitor will be taken to the original tweet on X.com (Twitter.com) in a new browser tab.
- Popup / Lightbox: This is the best user experience. The tweet and its media will open in a beautiful pop-up box on your own website.
- Display Toggles (On/Off Switches): These let you show or hide all the metadata on a tweet.
- Display Author Photo: Shows the user's small, circular profile picture.
- Display Author Name: Shows the user's name (e.g., "Elon Musk") and handle (e.g.,
@elonmusk). - Display Date: Shows when the tweet was published.
- Display Description: Shows the text content of the tweet.
- Display Platform Icon: Shows a small X (Twitter) icon.
- Display Likes Count: Shows how many likes the tweet has.
- Display Comments Count: Shows how many replies the tweet has.
- Display Retweet Count: Shows how many times the tweet has been retweeted.
- Trim Description Words: This sets a maximum word count for the tweet text. If a tweet is longer than this number, it will be cut off with a "Read More..." link. This is the key to keeping your feed looking clean.
- Equal Height: This toggle is very important for the Grid layout. When toggled on, all tweet boxes are forced to the same height, creating a uniform grid. You should turn this Off if you are using the Masonry layout.
- Display Media: This is the main switch for showing any images or videos attached to the tweet. You will almost always want to keep this on.
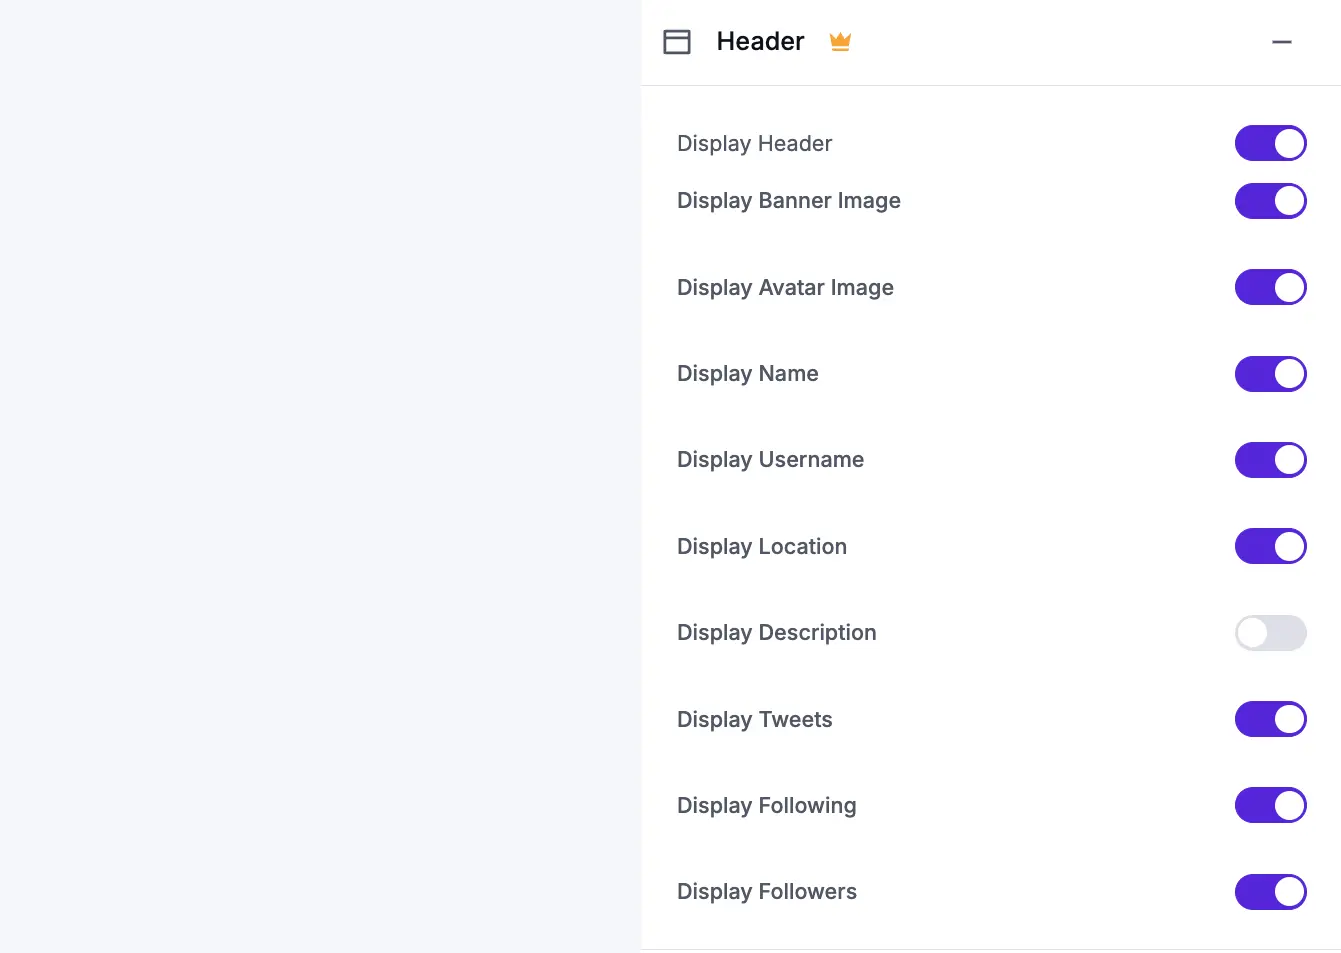
5. Header
This section controls the large banner at the top of your entire feed, which displays your main profile information.
- Display Header: This is the master On/Off switch for the entire header section. Turn it off if you just want to show the tweets.
- Account to Display: If your feed is showing tweets from multiple accounts, this lets you choose which one account's info to show in the header.
- Display Toggles (On/Off Switches): These let you build a "mini-profile" on your website.
- Display Cover Photo (Your main profile banner image)
- Display Profile Photo (Your main profile picture)
- Display User Name (Your @username)
- Display Full Name
- Display Description (Your profile biography)
- Display Website (The link in your profile)
- Display Posts Count (Total tweets you've made)
- Display Followers Count (How many followers you have)
- Display Following Count (How many people you are following)
6. Follow Button
This adds a "Follow" call-to-action button to your feed, helping you get more followers directly from your website visitors.
- Display Follow Button: Toggles the button on or off.
- Follow Button Position: You can place the button in the Header (at the top of the feed) or the Footer (at the bottom, after all the tweets).
- Button Text: You can customize the text on the button (e.g., "Follow Us on X" or "See More on X").
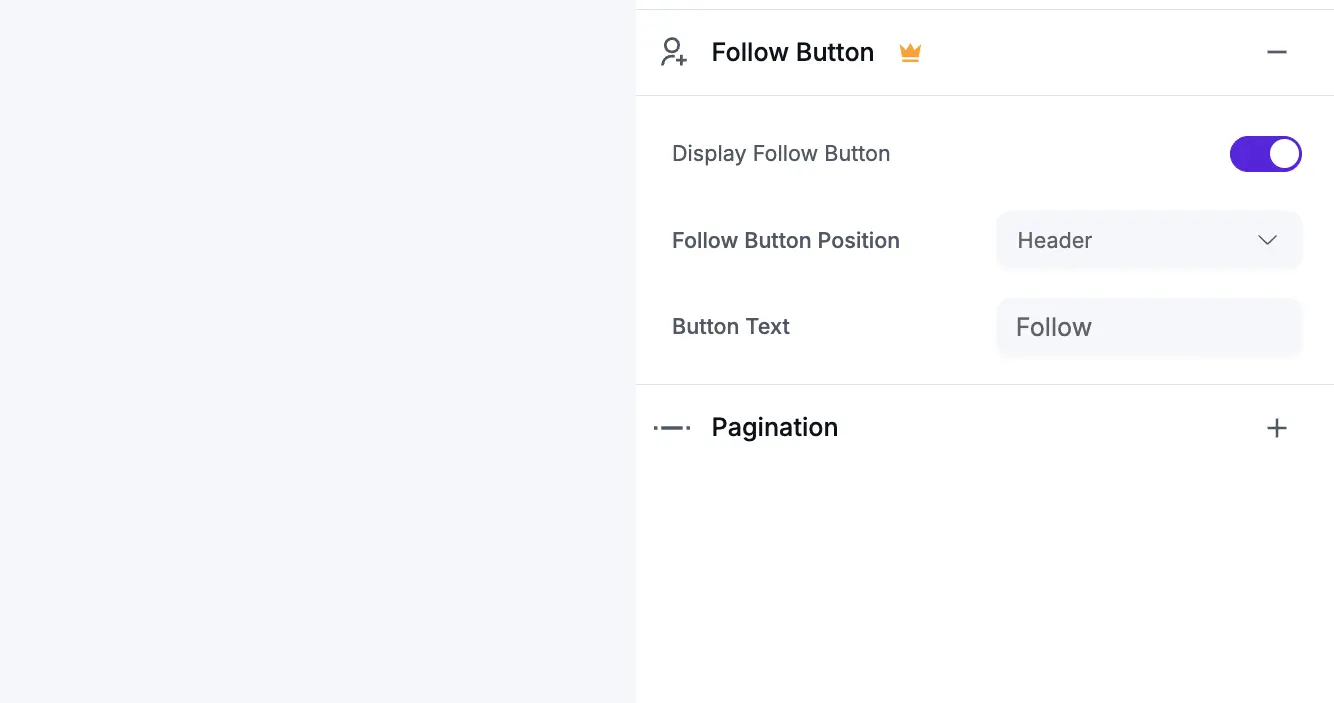
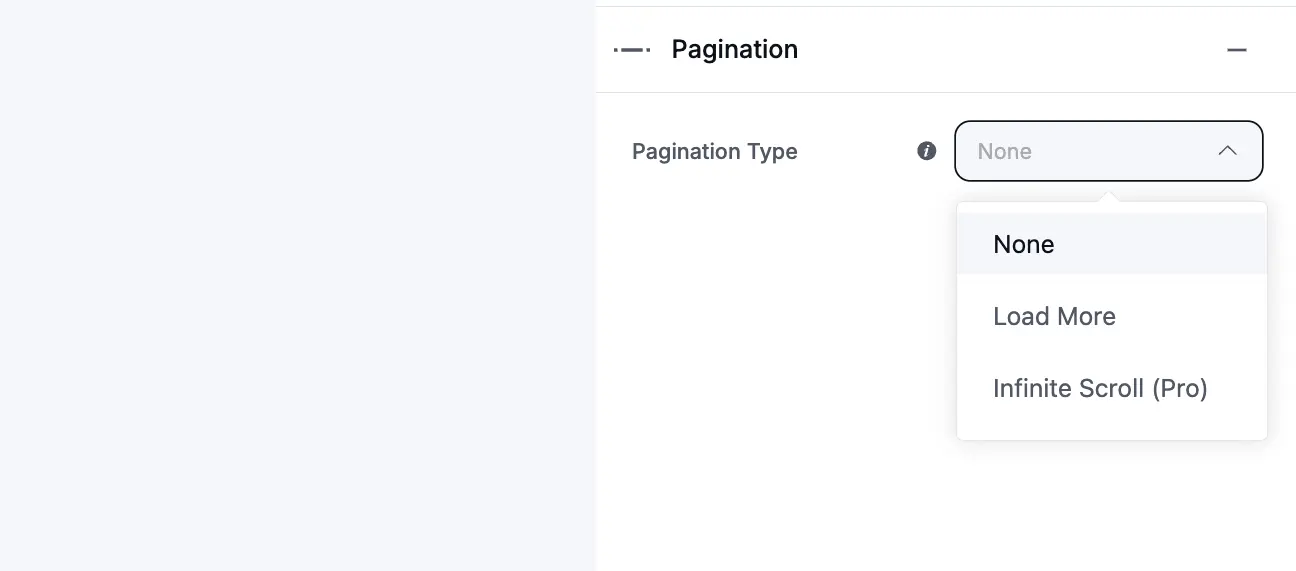
7. Pagination
Pagination controls what happens when a visitor gets to the bottom of the initial set of tweets (which you set in the Filters section).
- Pagination Type: This lets you choose how users load more tweets.
- None: The feed will only show the "Number of Feeds to Display" (from the Filters section) and that's it. There will be no way to load more.
- Load More: This will add a button at the bottom of your feed. When clicked, it will load the next set of tweets. This is the most popular and user-friendly option.
- Load More Button Text: You can change the text from "Load More" to something like "Show More Tweets" or "See More."
- Feeds Per Page: This is very important. This number controls how many new tweets are loaded each time the "Load More" button is clicked.
Next Steps
Now that you have configured all the General settings, your next step is to make your feed beautiful!
Click on the Style tab to customize all the colors, fonts, and borders.
When you are finished, click the Save Template button at the bottom.