Appearance
Social Chat Configuration
Have you ever wanted to add Messenger, WhatsApp, or any other social chat platform directly to your WordPress website? With WP Social Ninja’s Social Chat feature, you can connect multiple chat channels in just a few clicks. It helps you communicate with visitors instantly and improve customer engagement.
This powerful feature allows you to integrate popular chat platforms like Messenger, WhatsApp, Telegram, Instagram, Twitter, Slack, and many more. The setup is secure, privacy-friendly, and designed to keep your communication seamless.
Create a Widget & Add Channels
You can create a widget and add a channel in two ways. Both ways are explained below:
Option 1
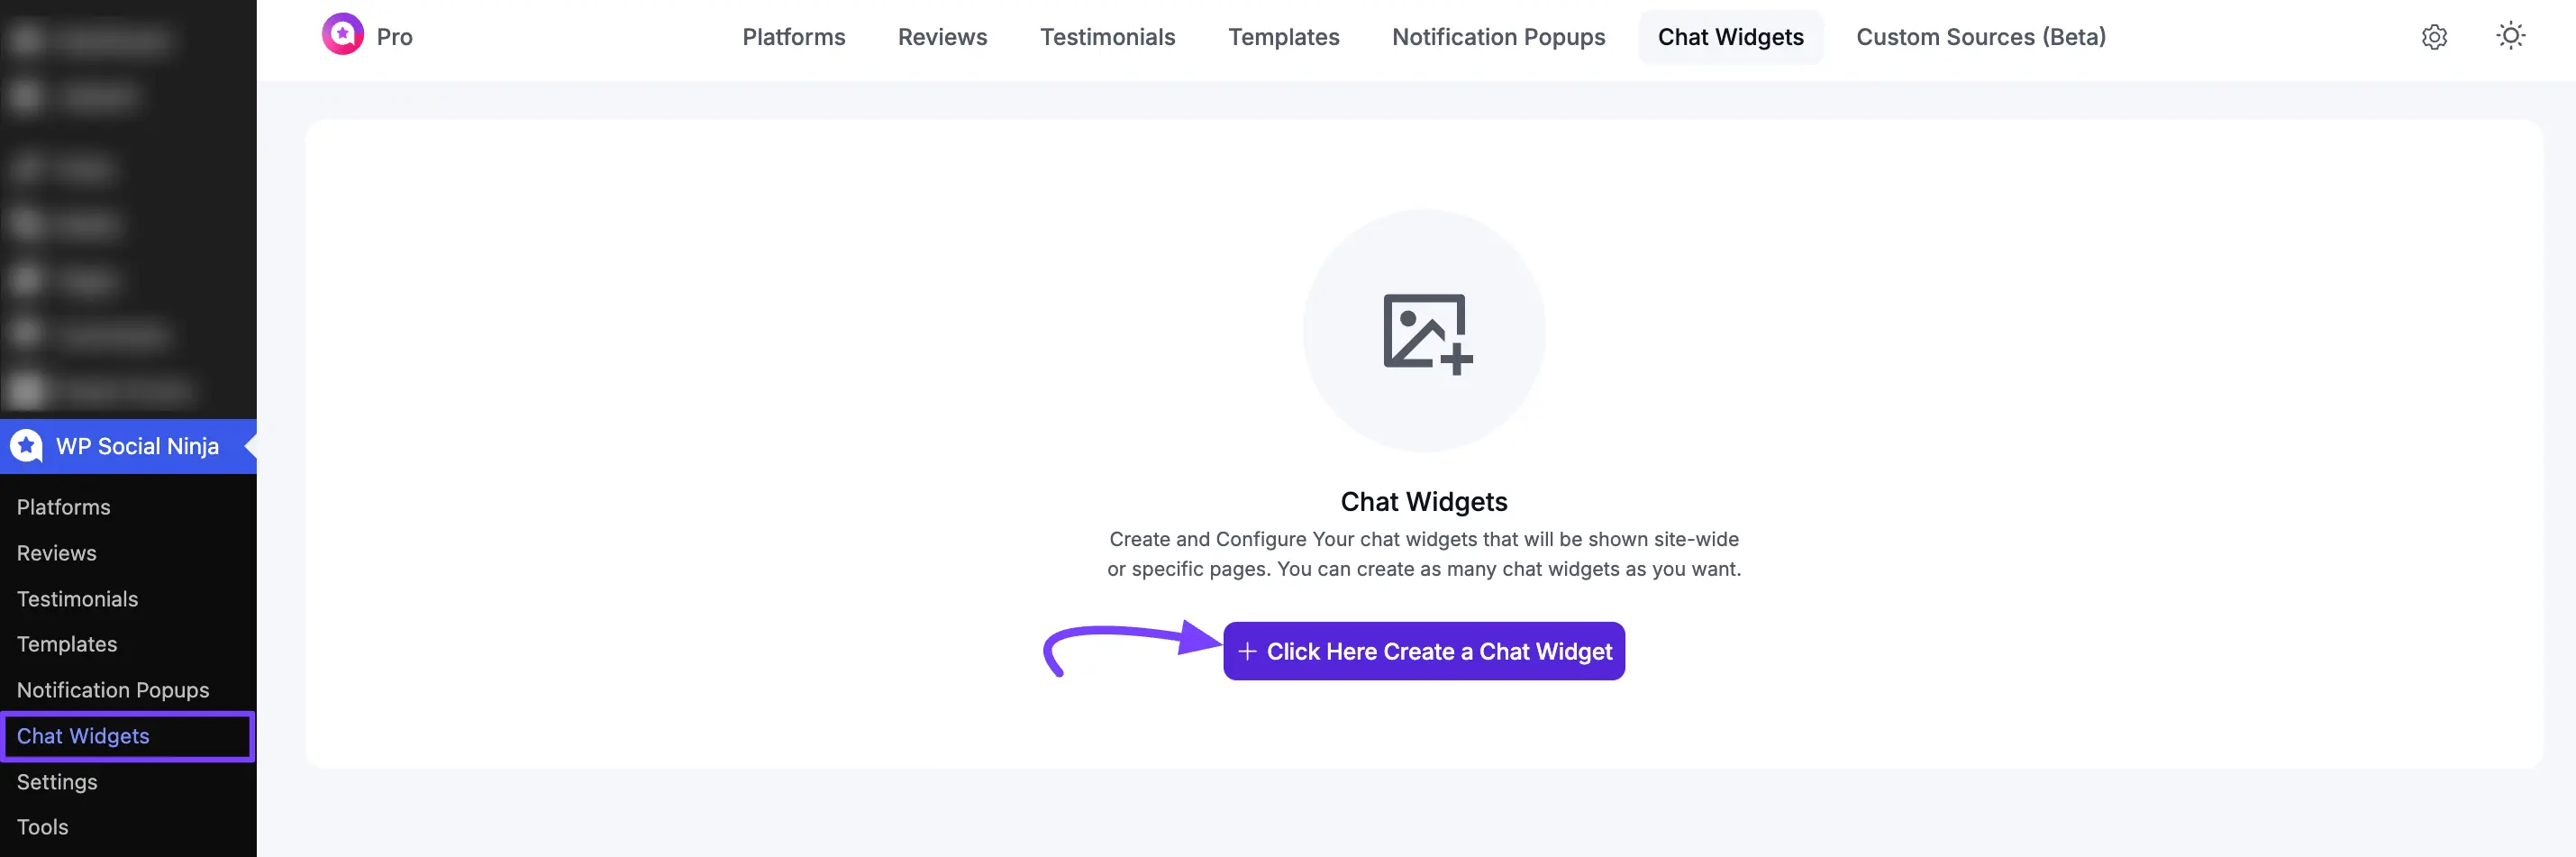
To get started, you first create a new chat widget template.
From your WordPress dashboard, navigate to WP Social Ninja → Chat Widgets. Click the Click Here Create a Chat Widget button. This will take you to the chat template editor.
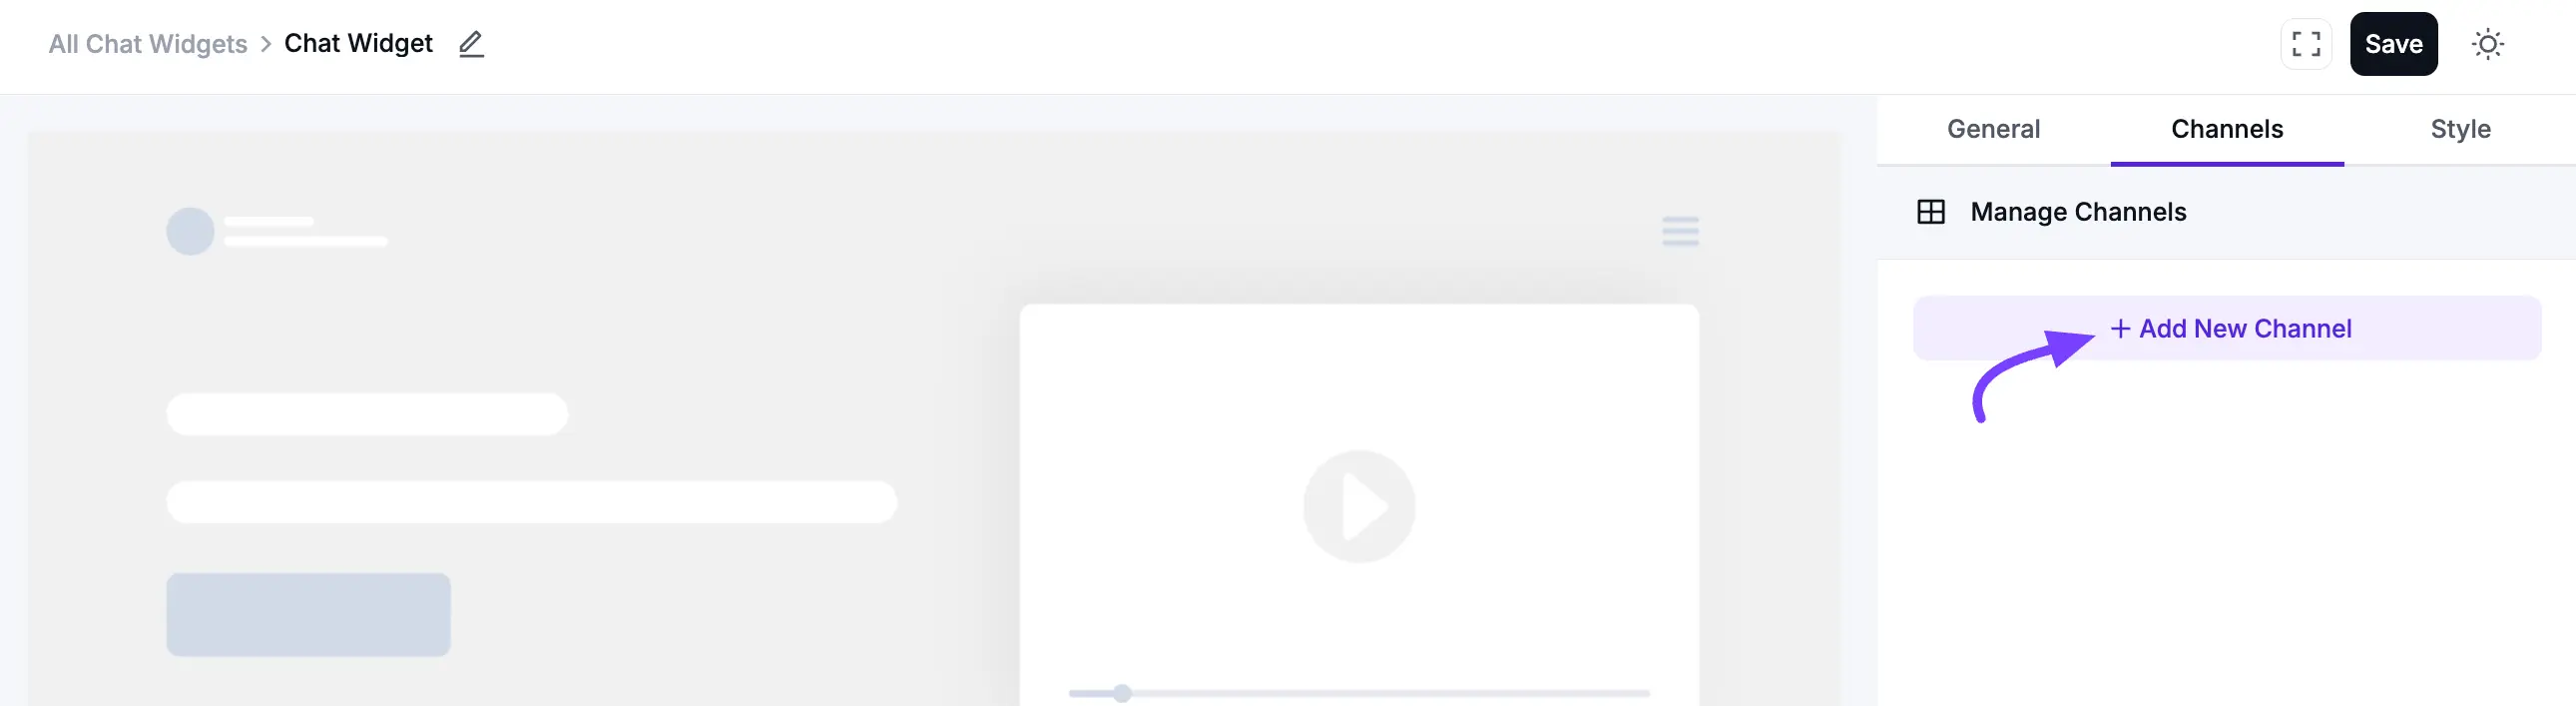
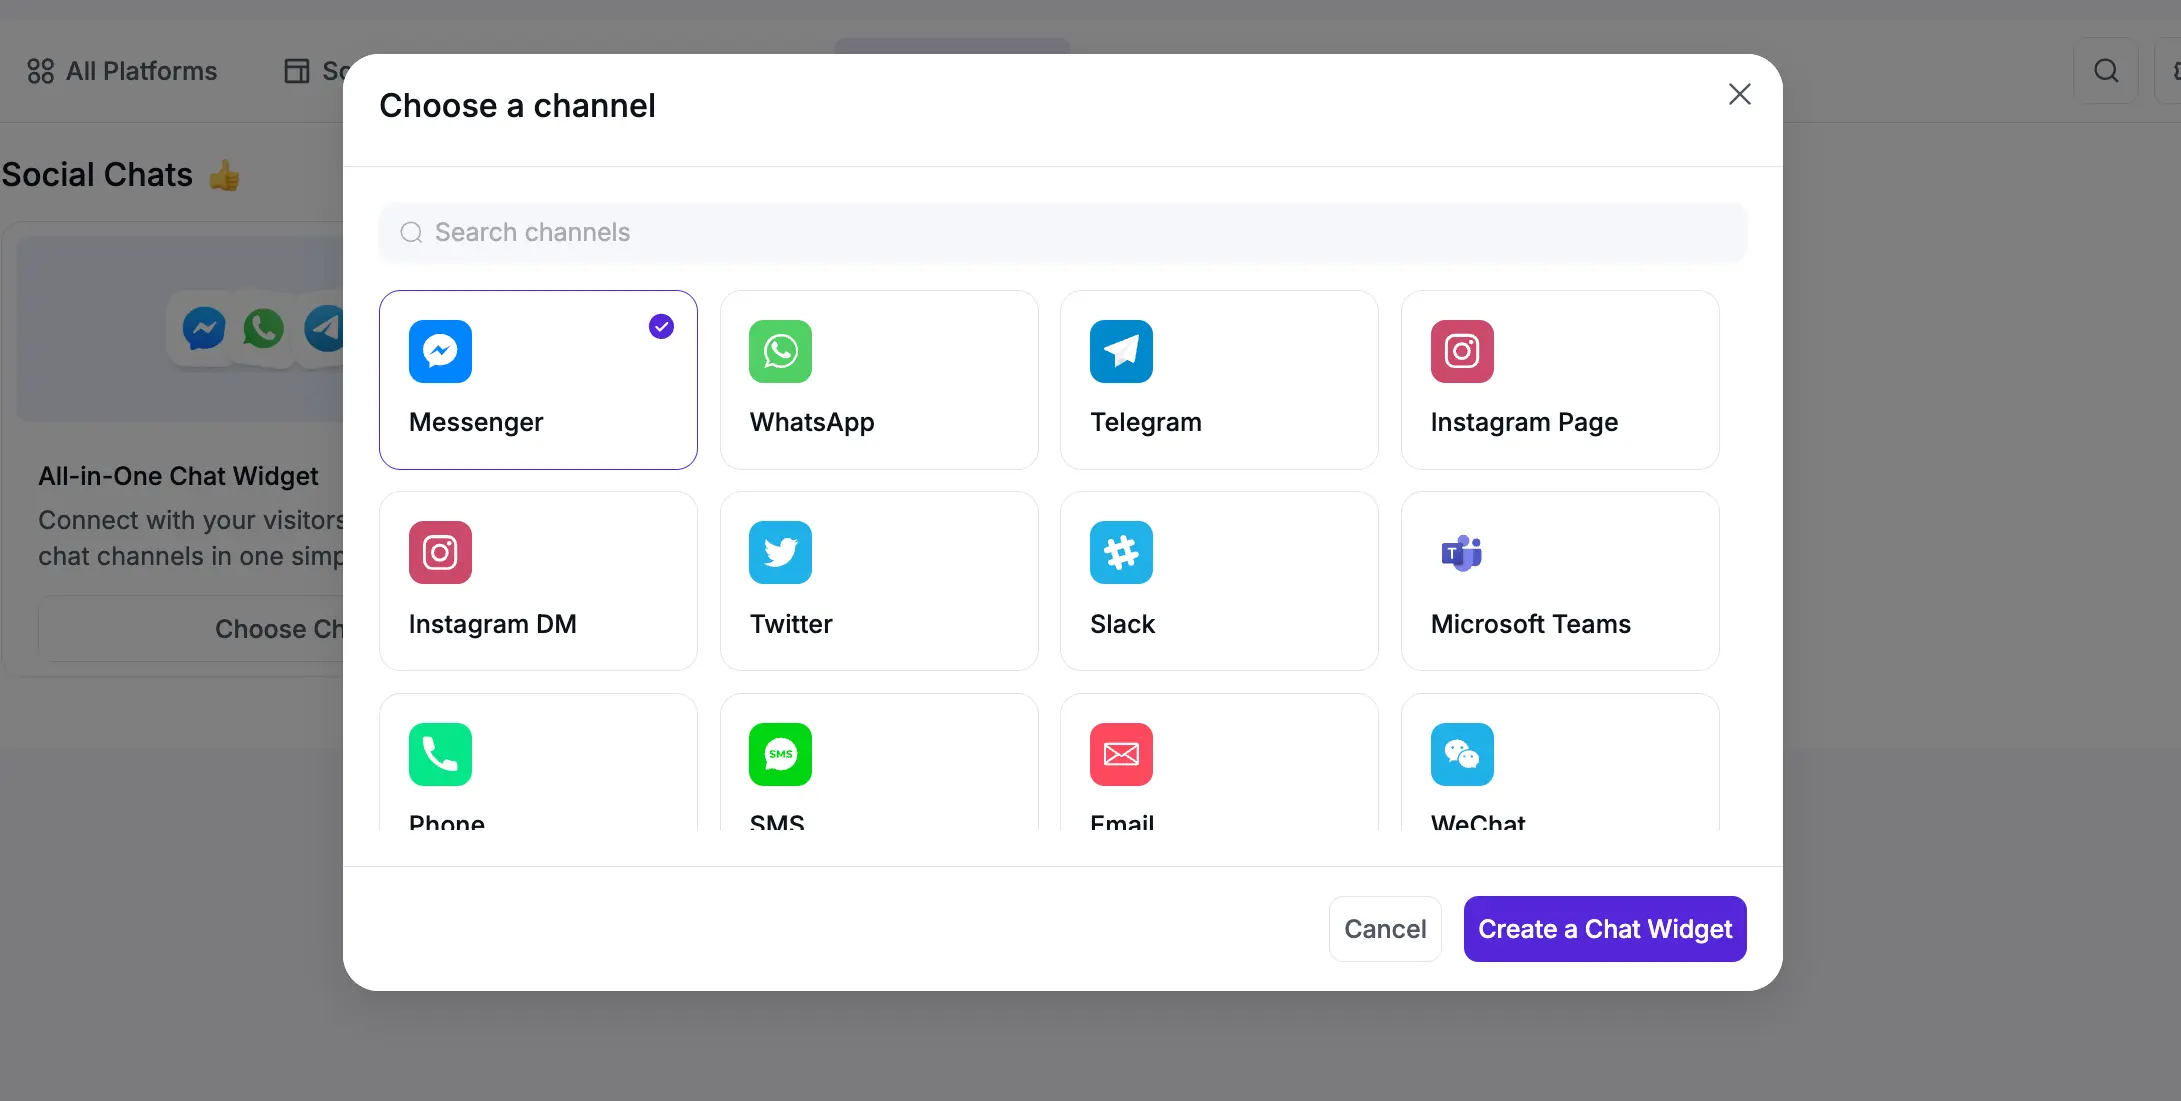
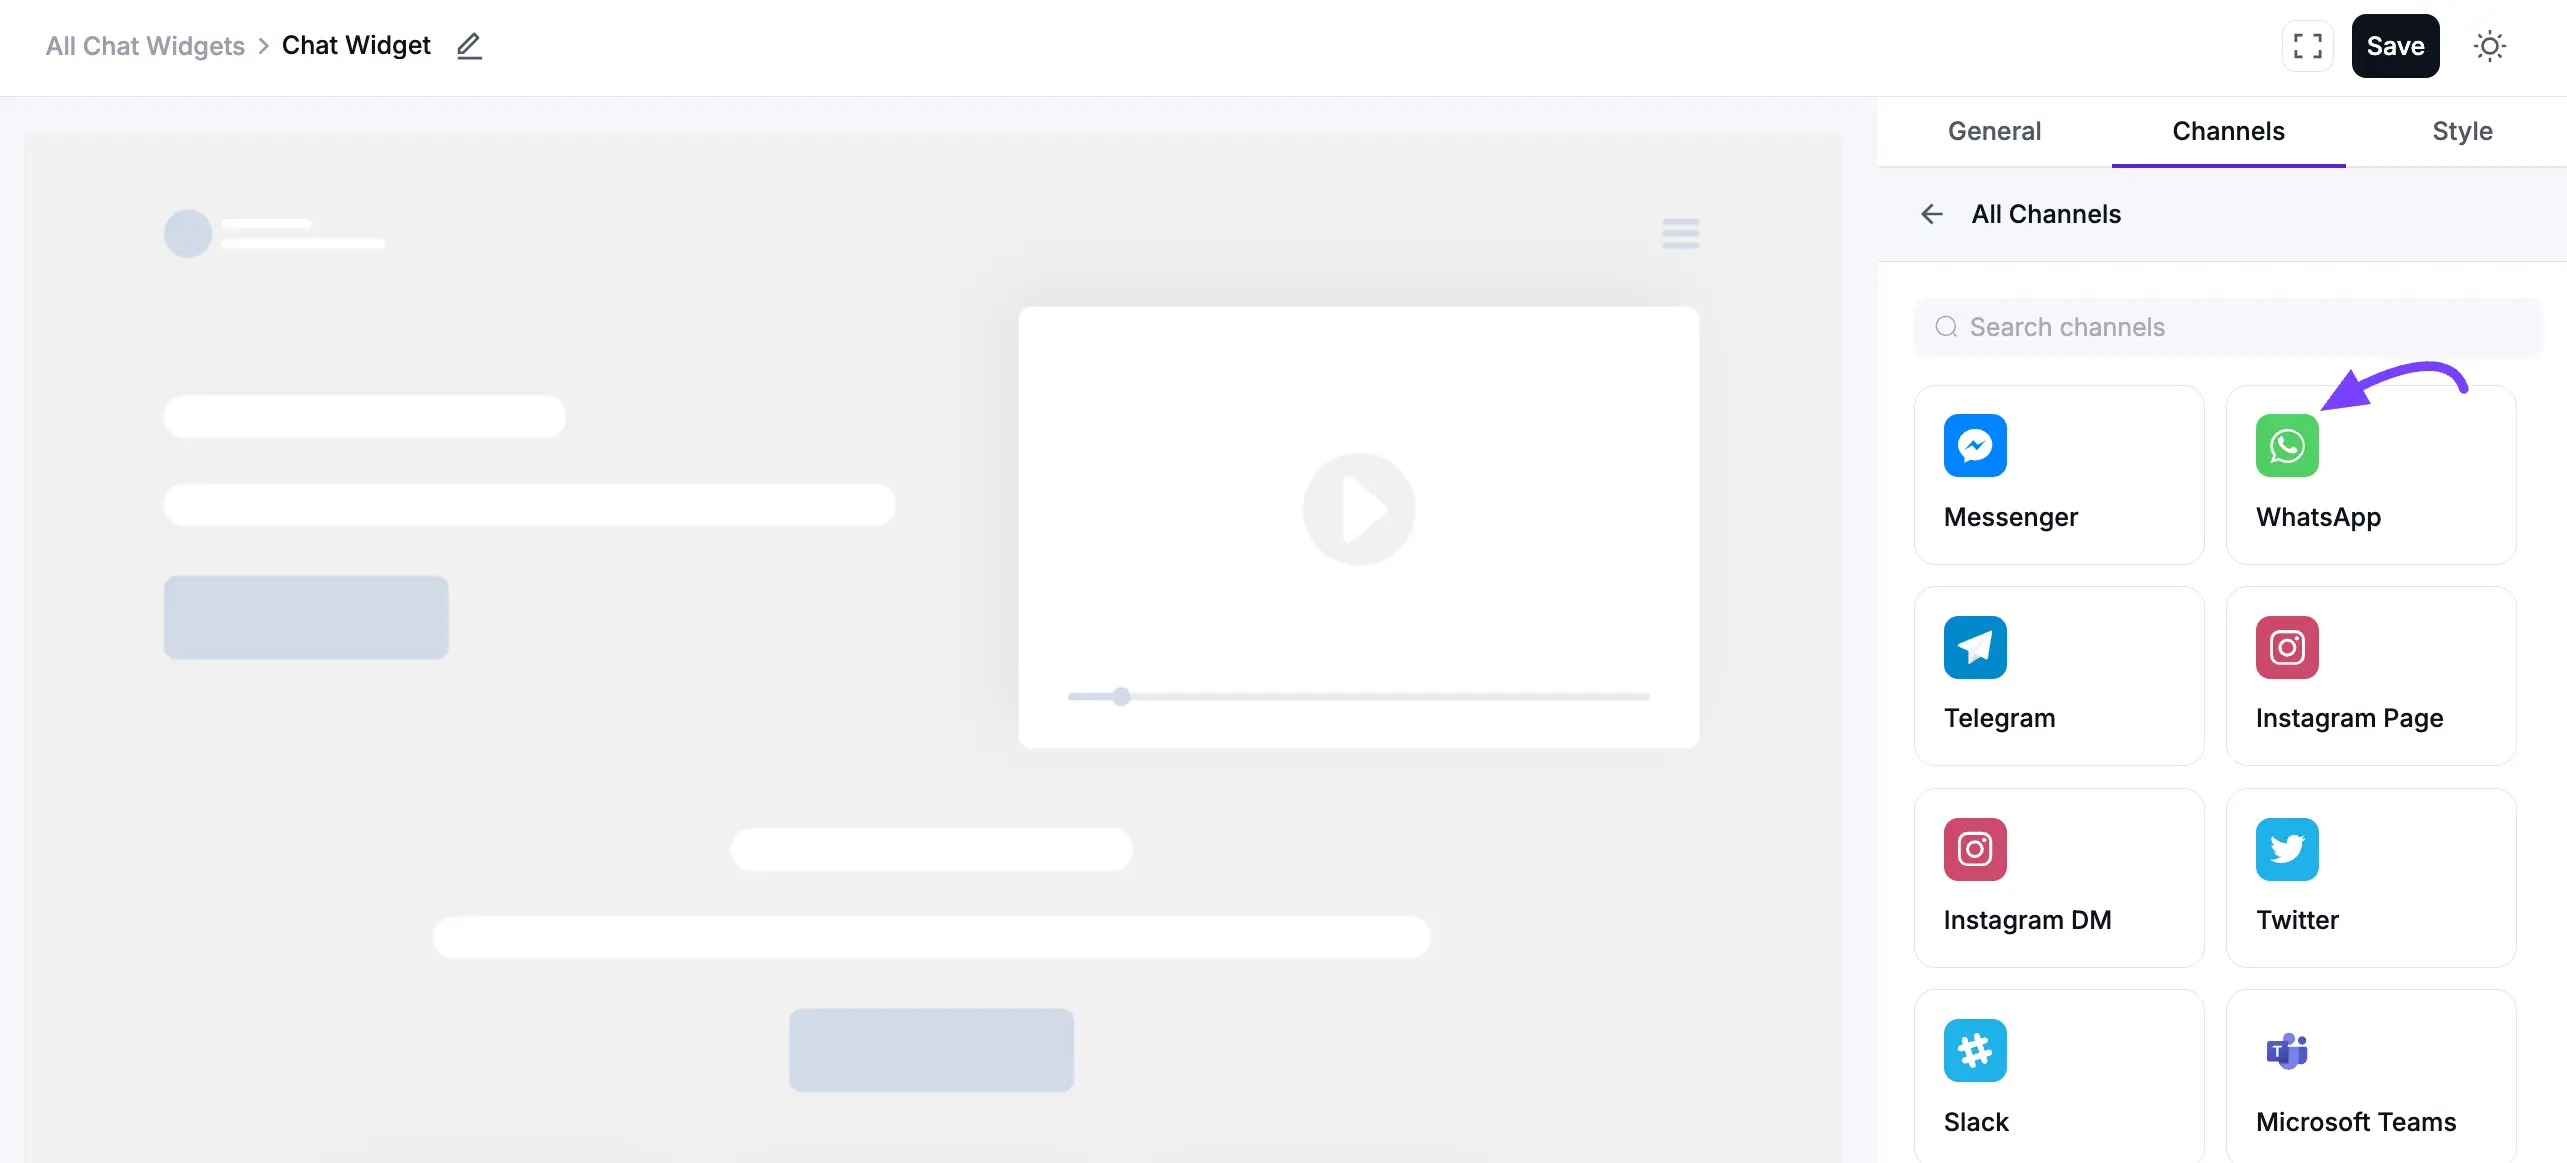
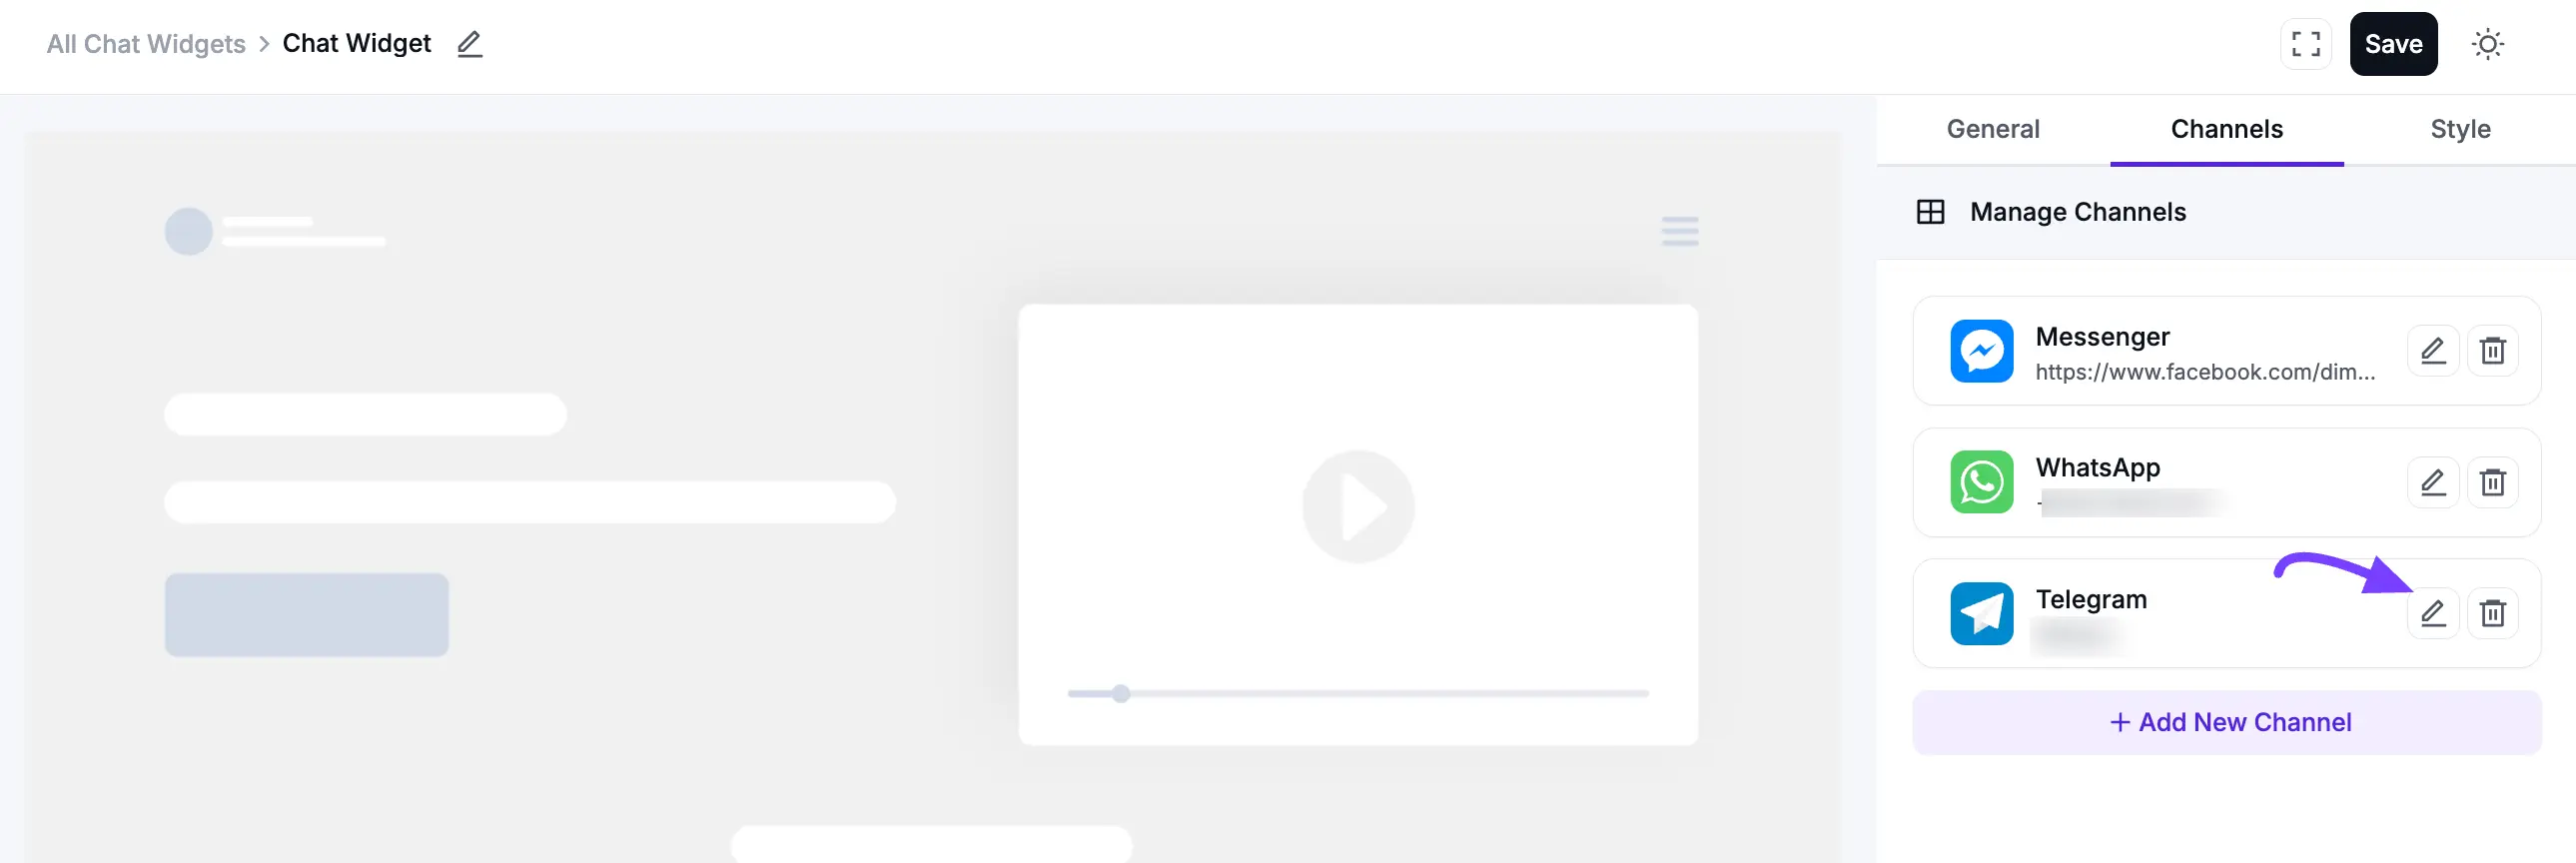
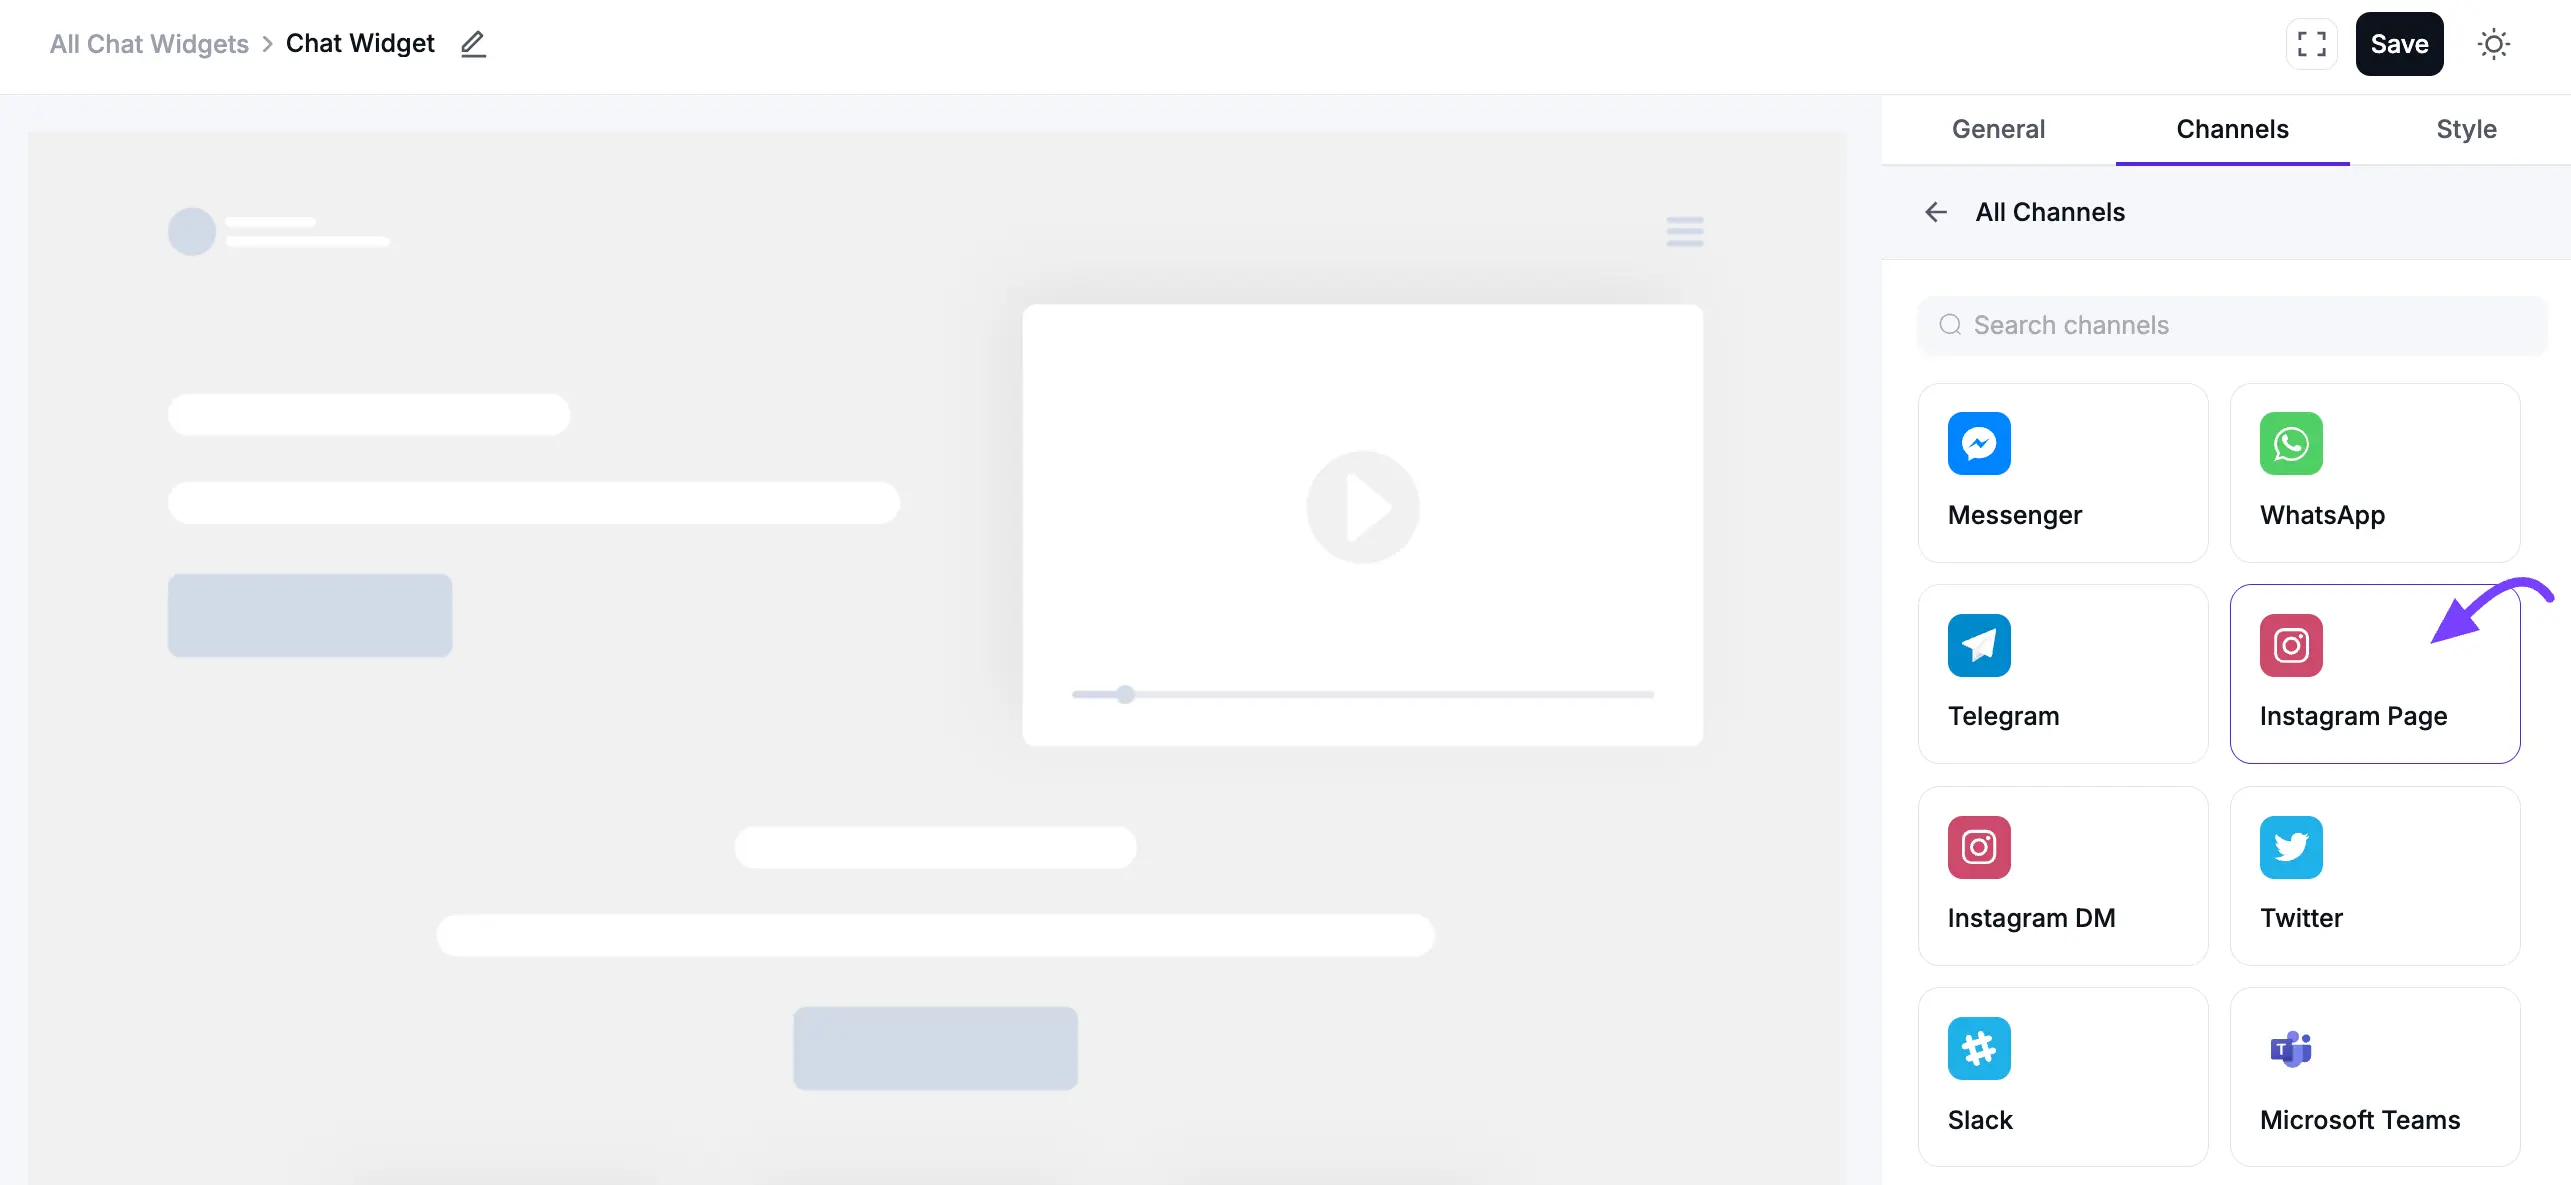
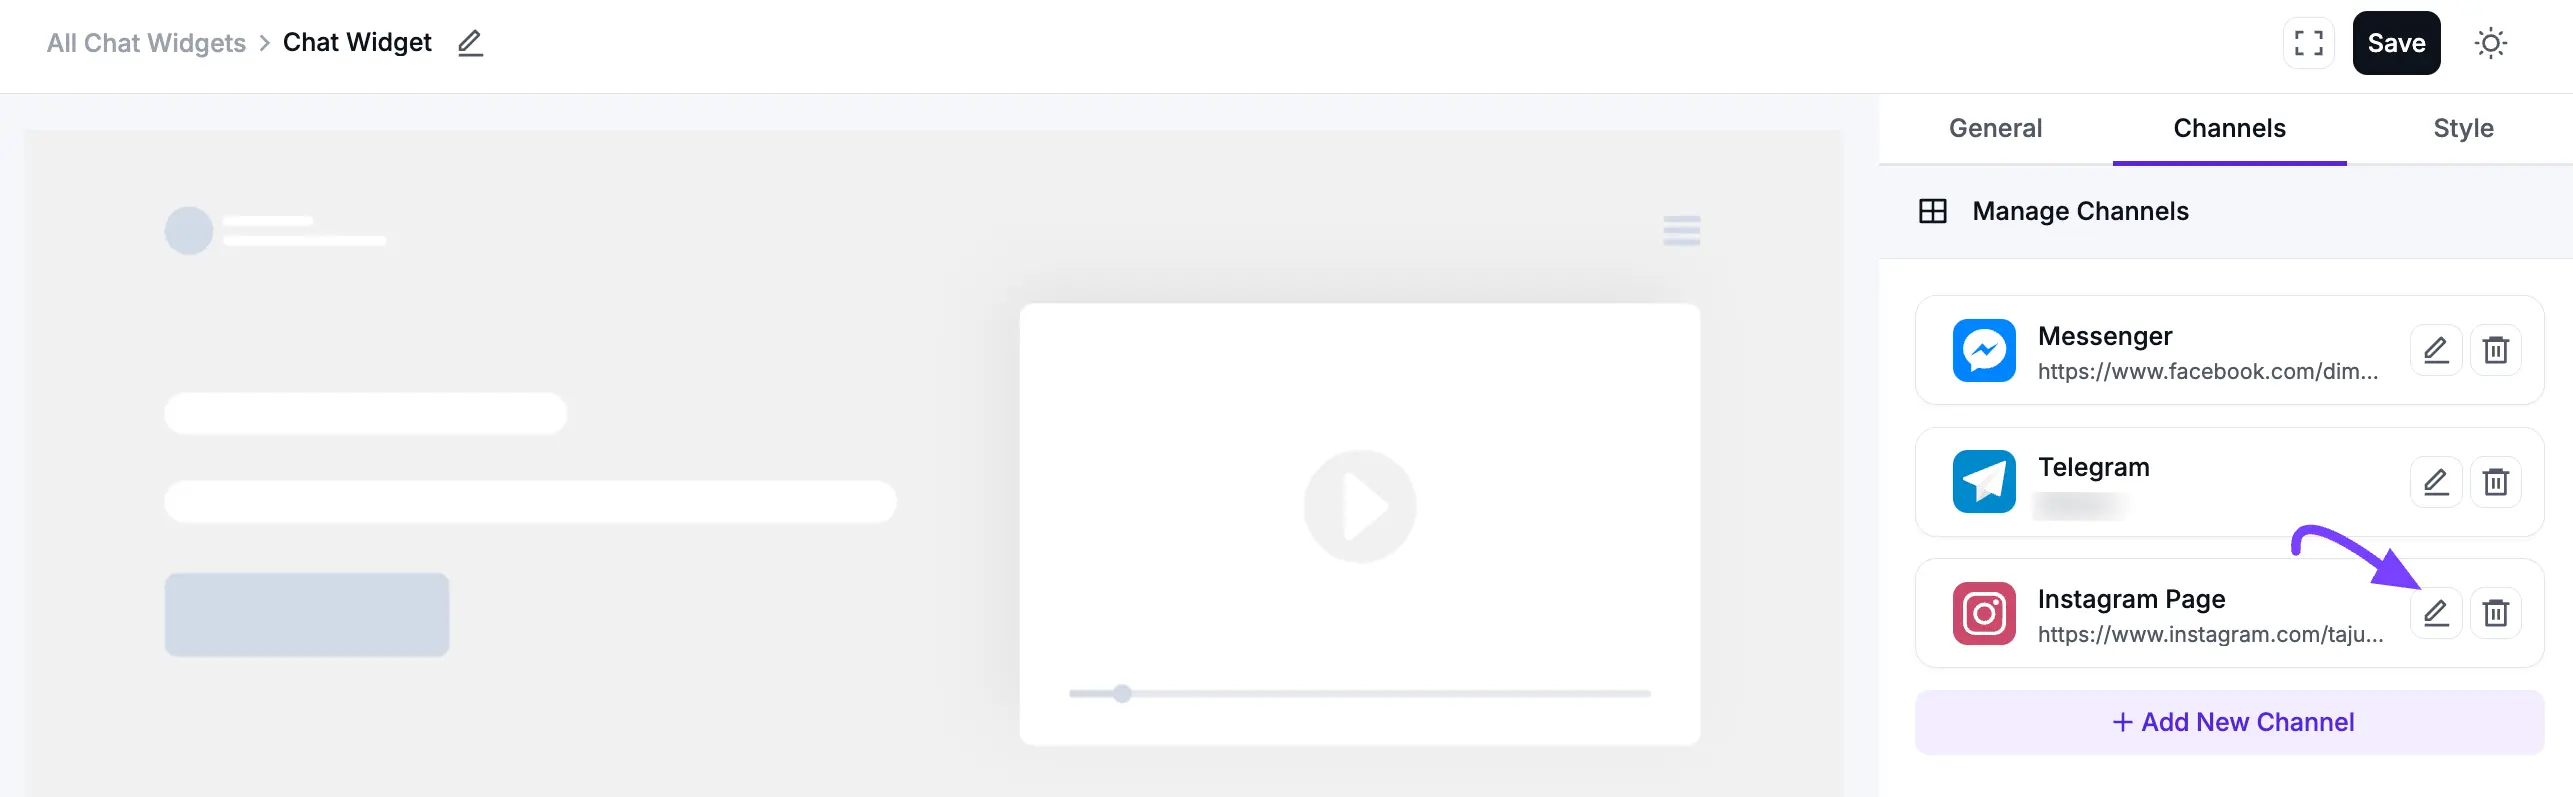
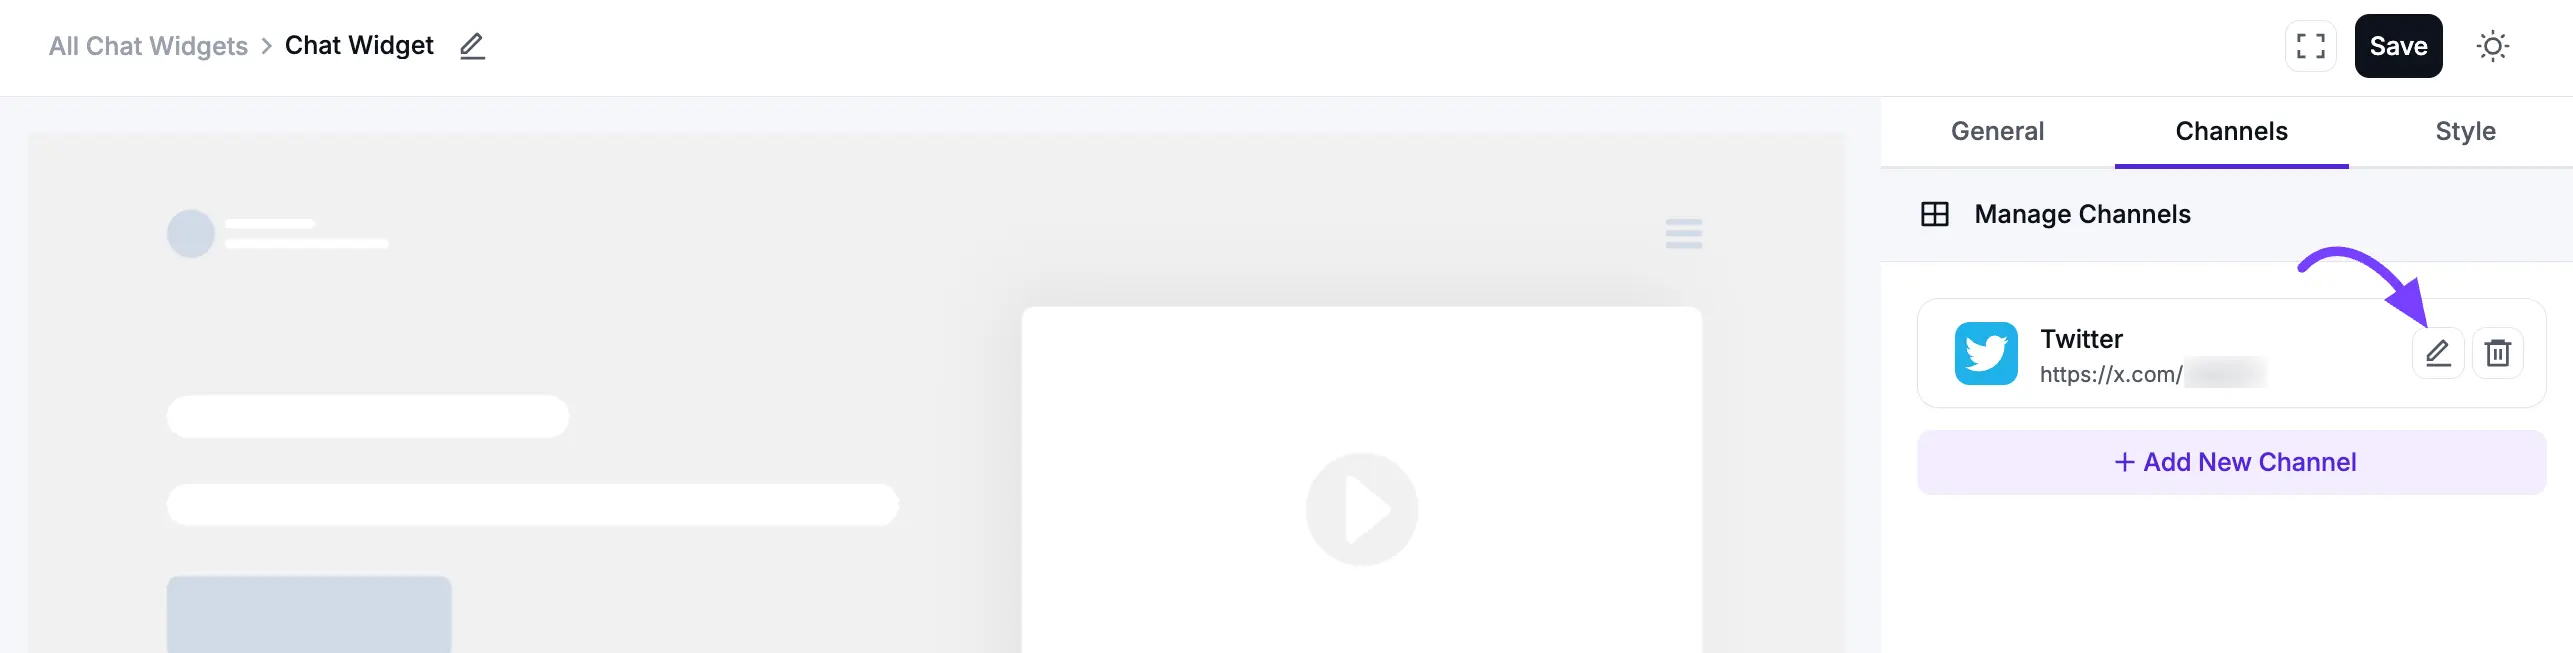
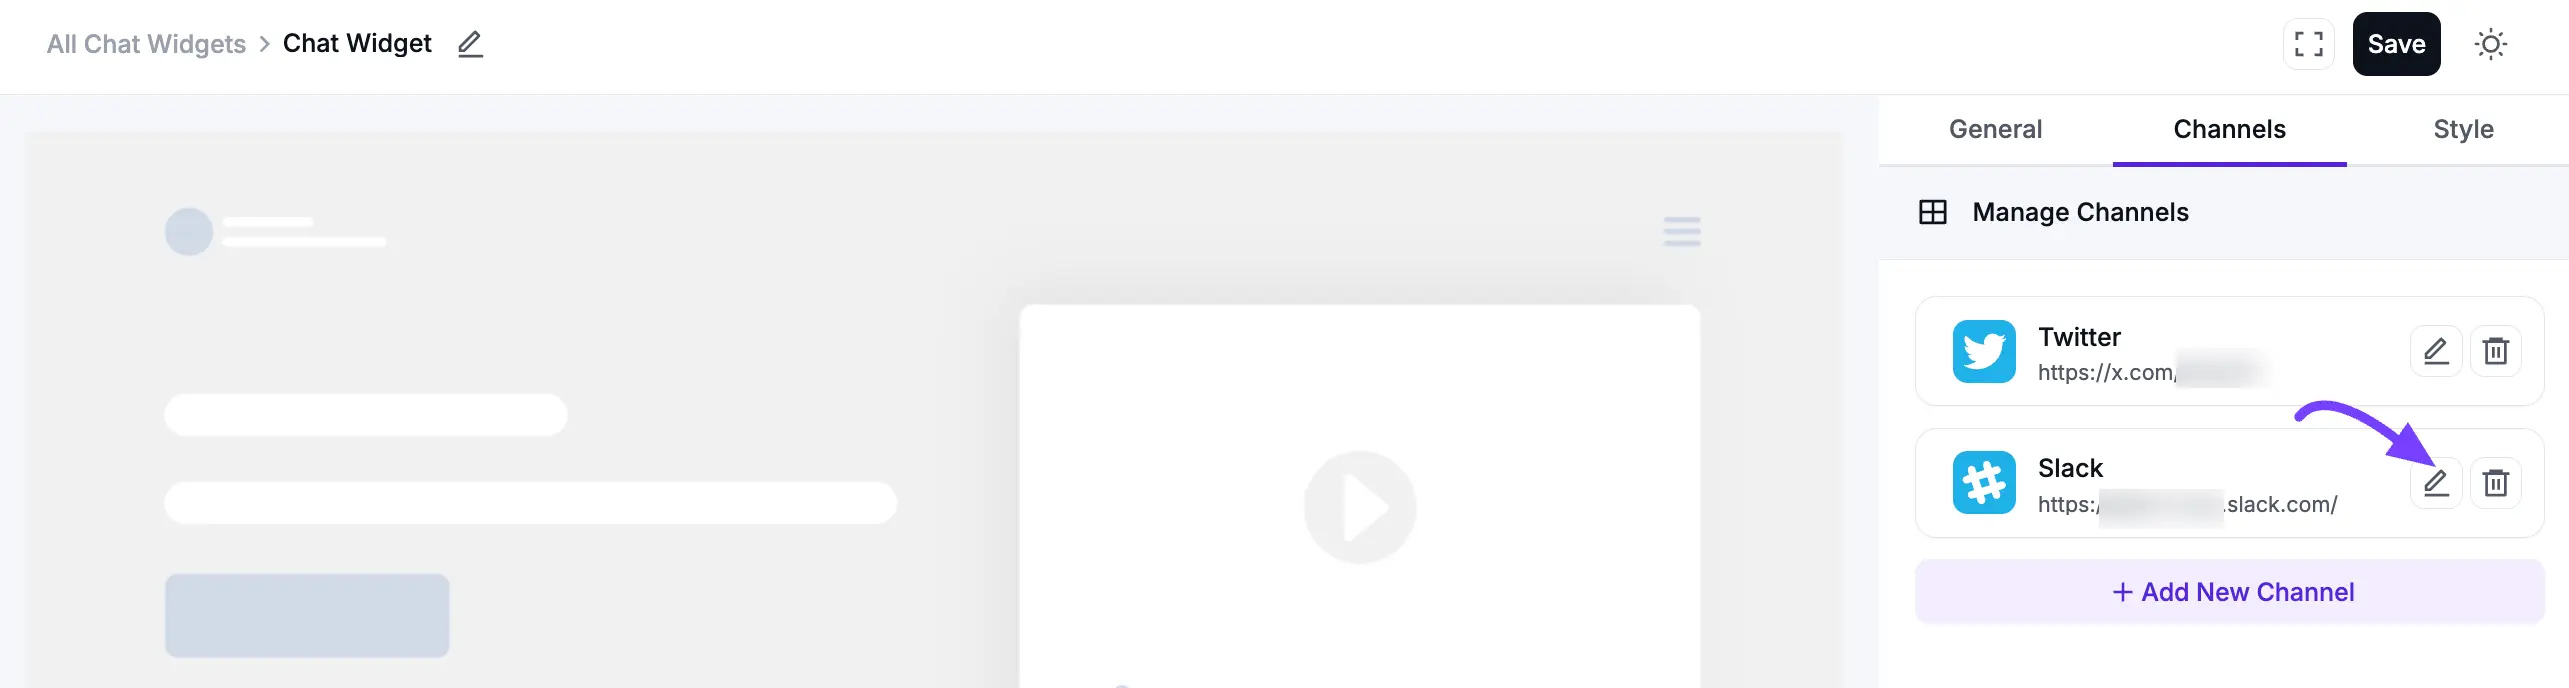
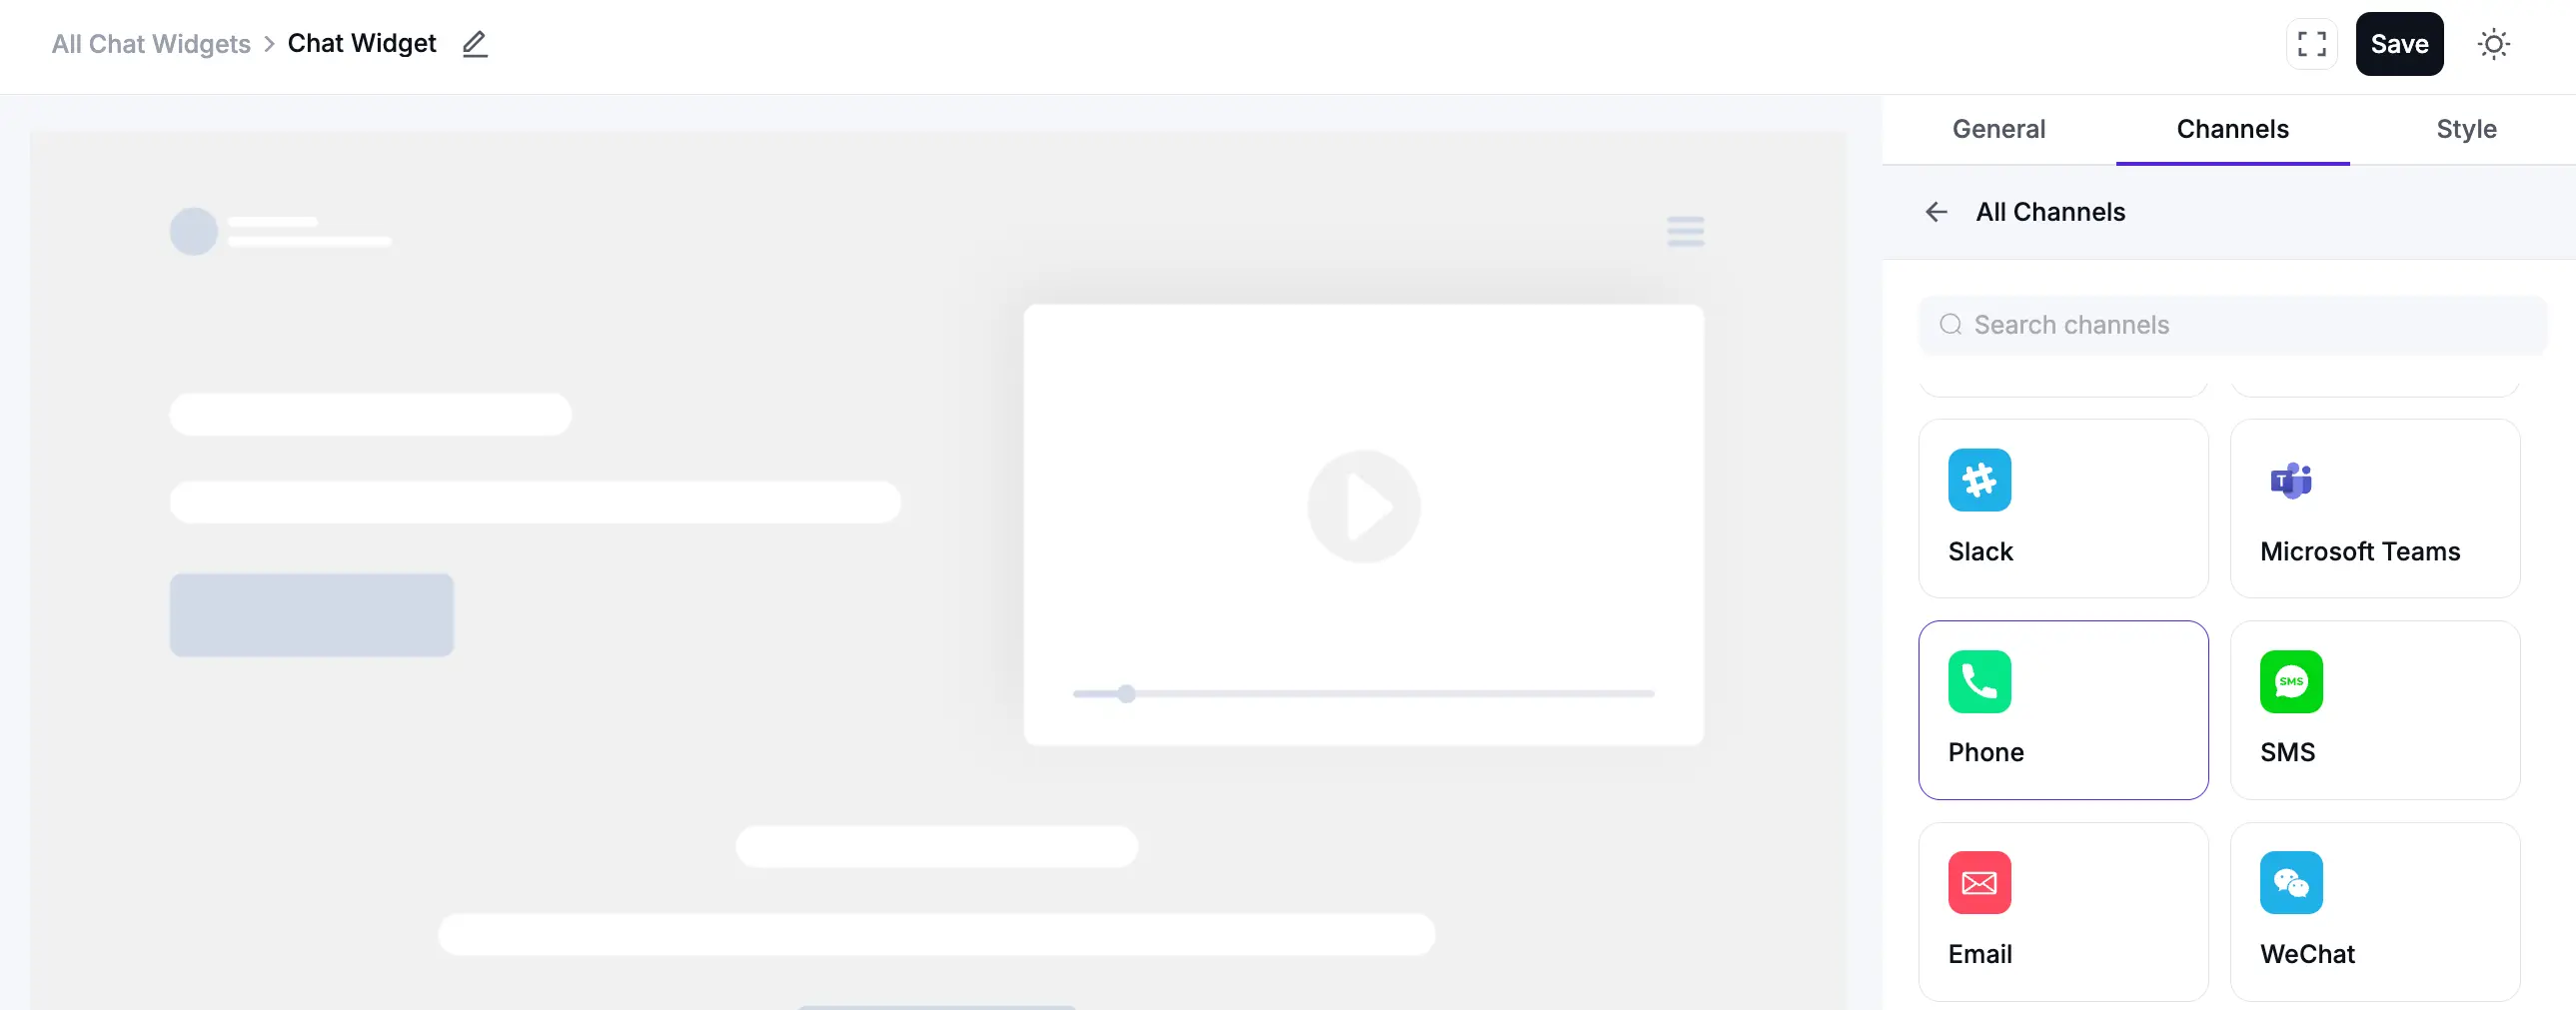
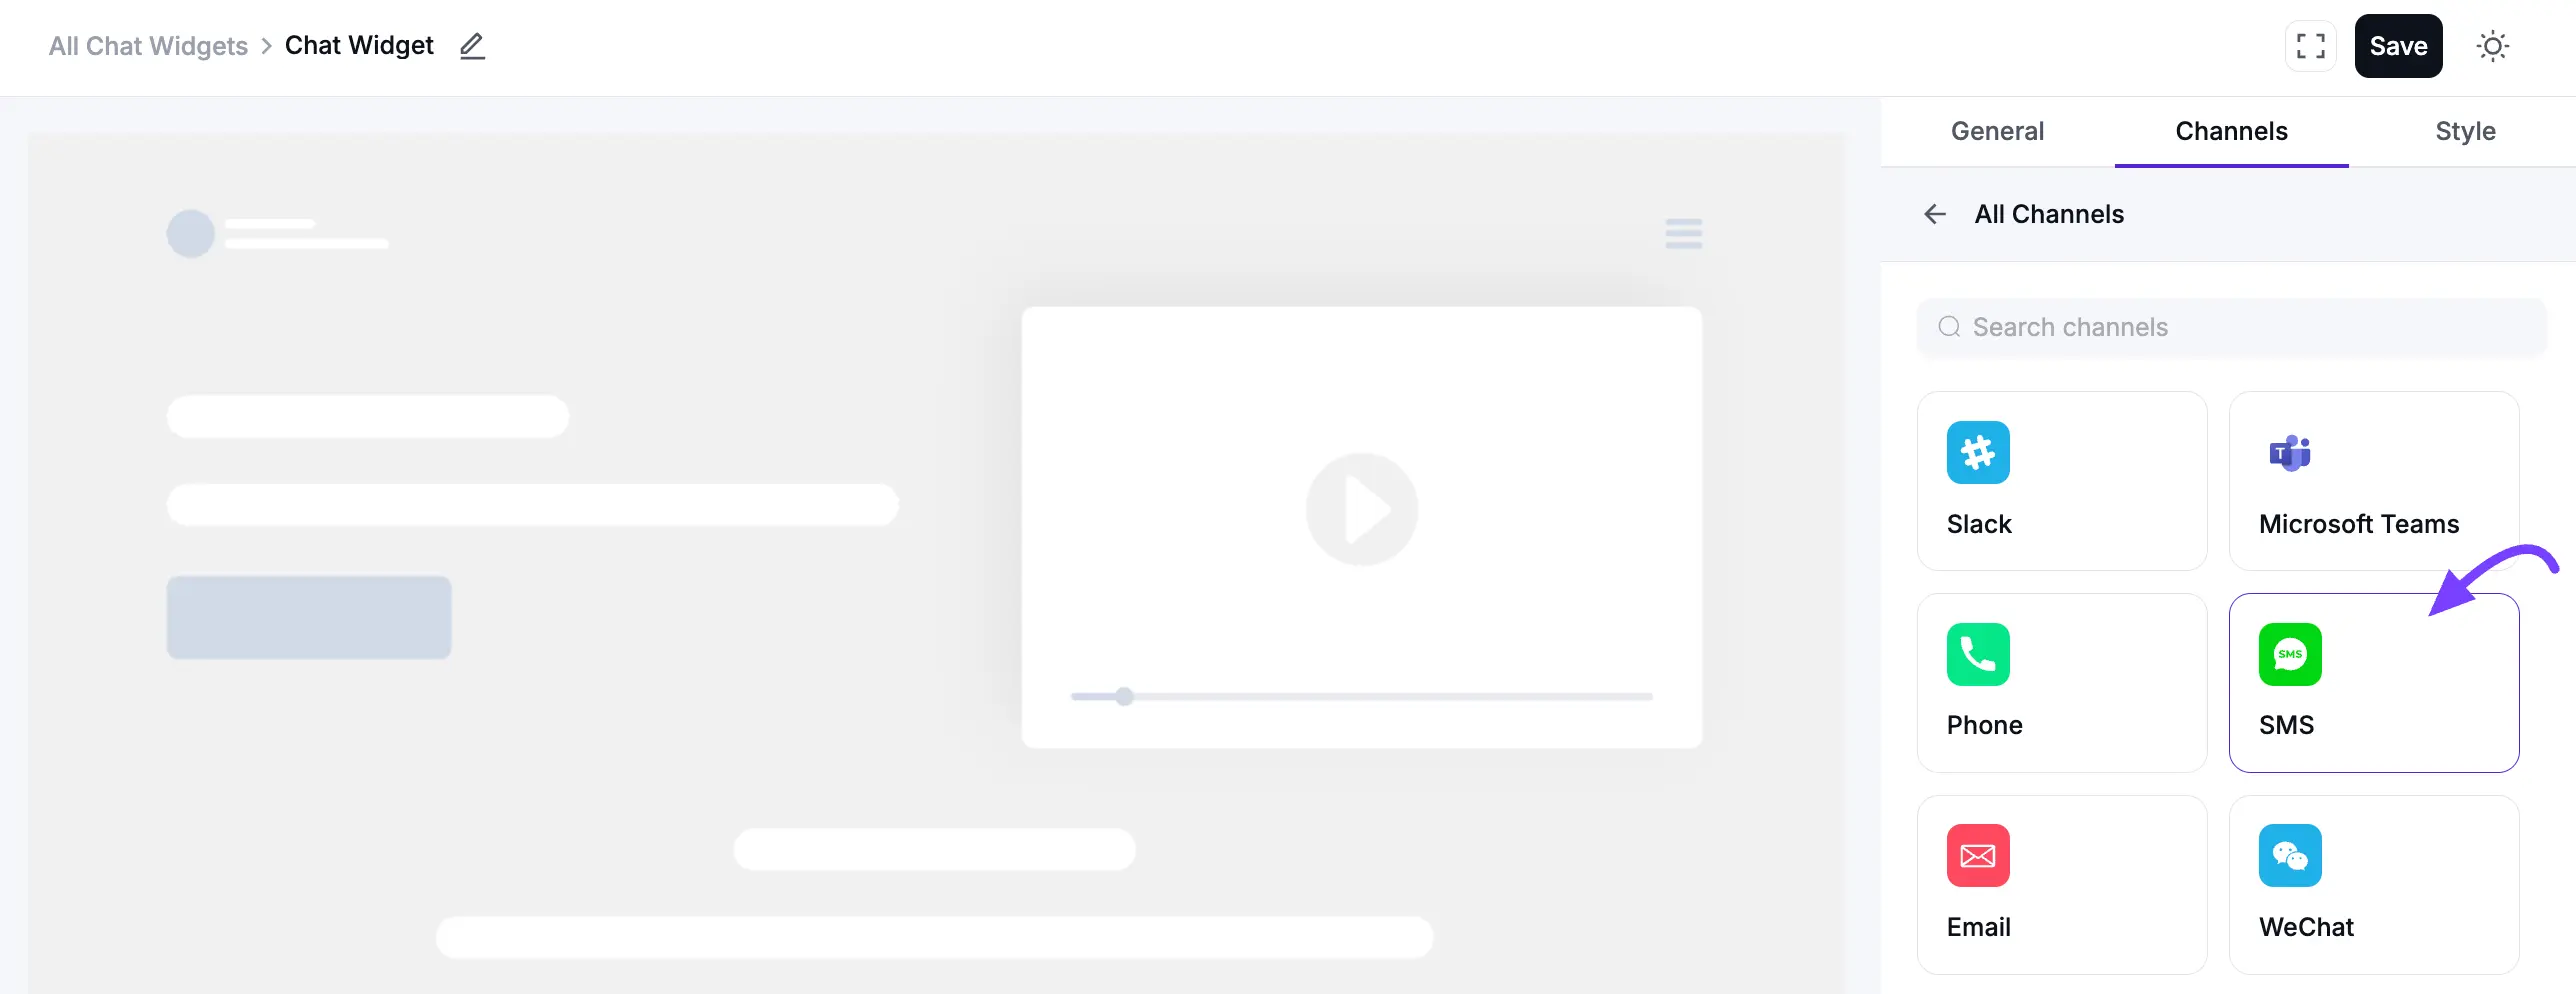
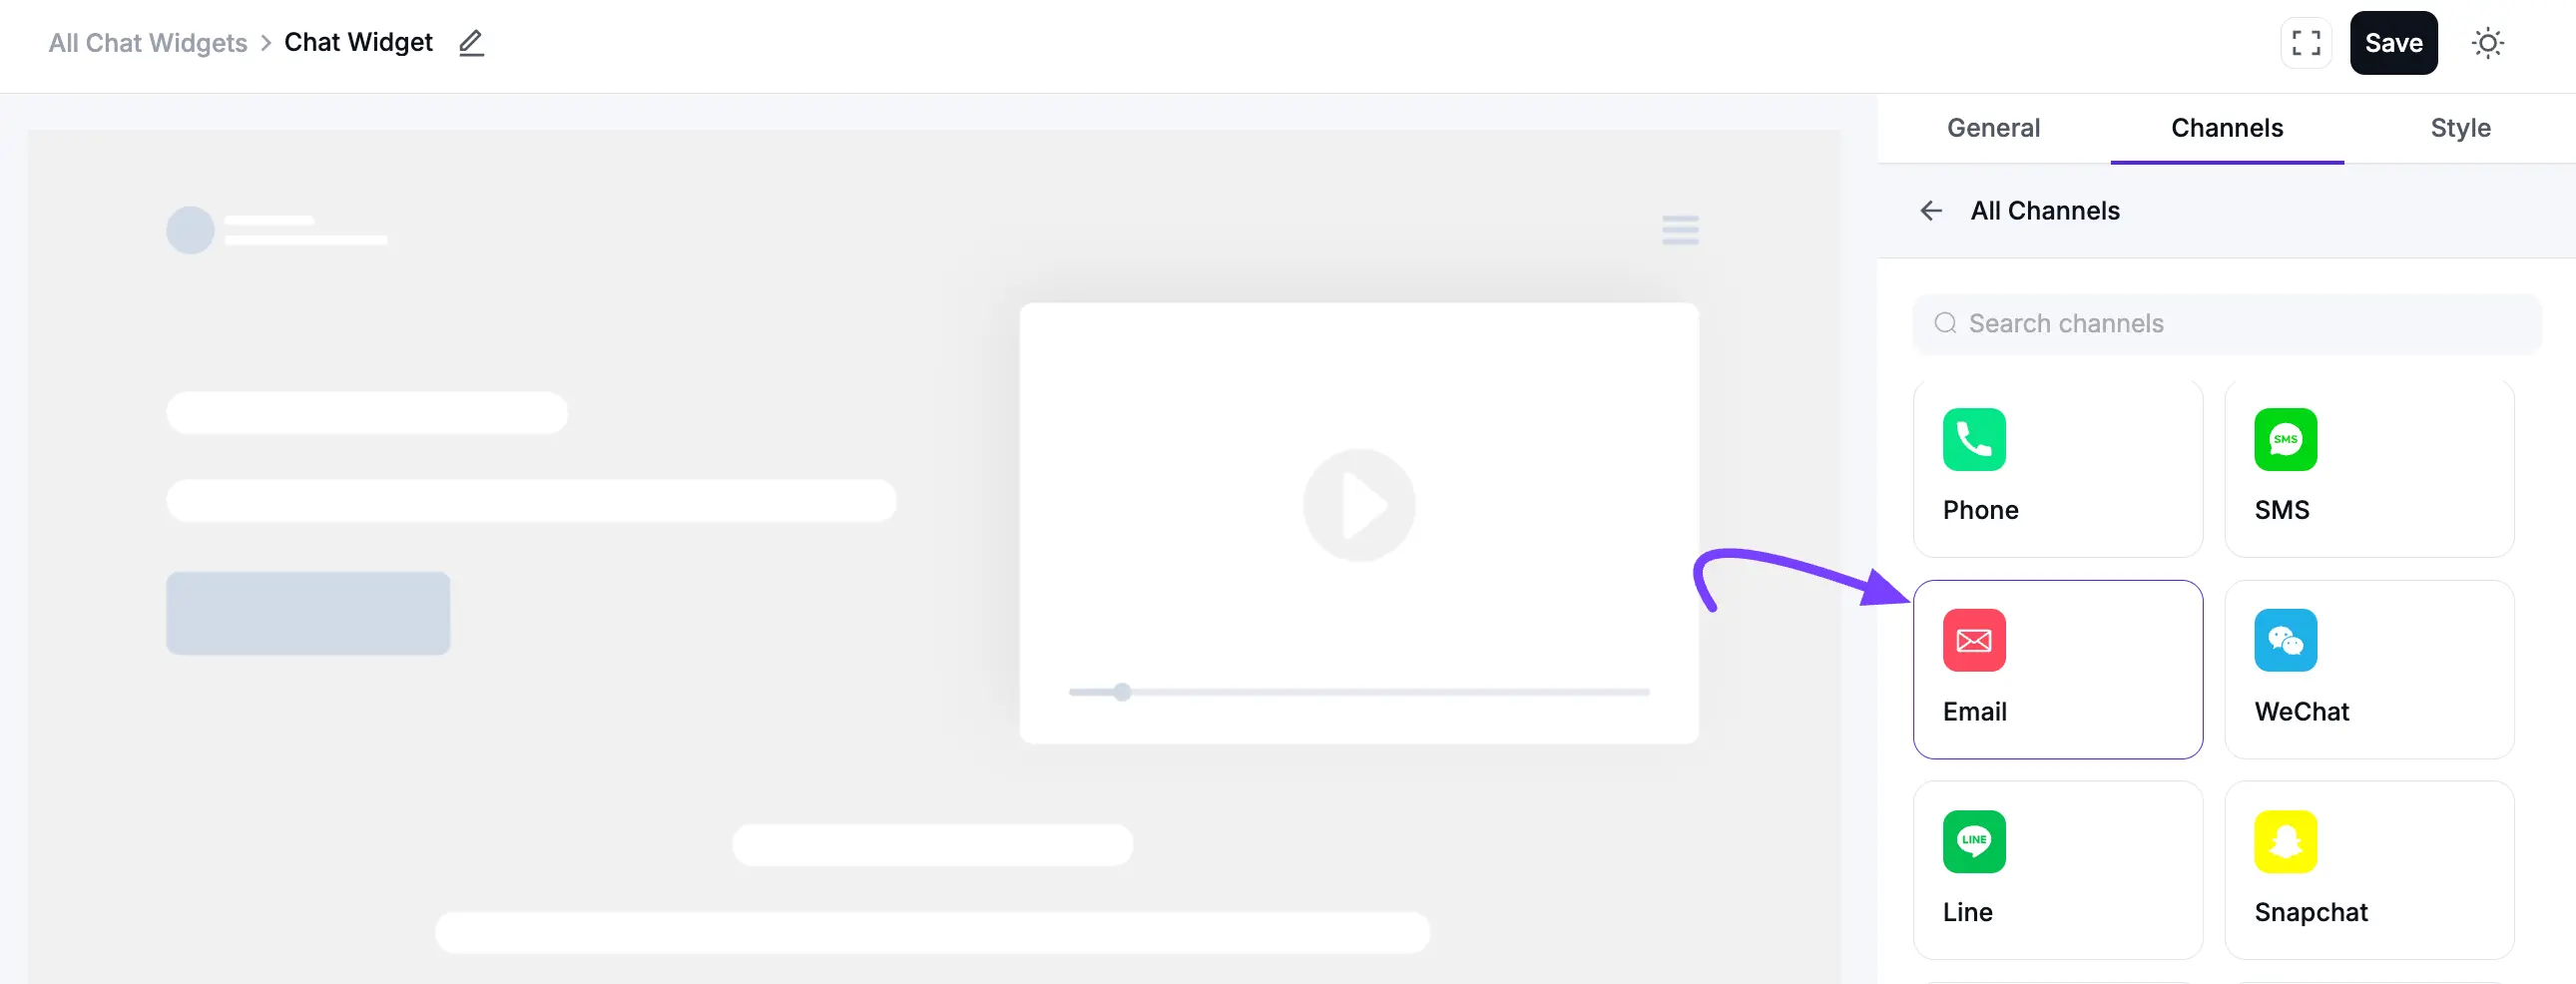
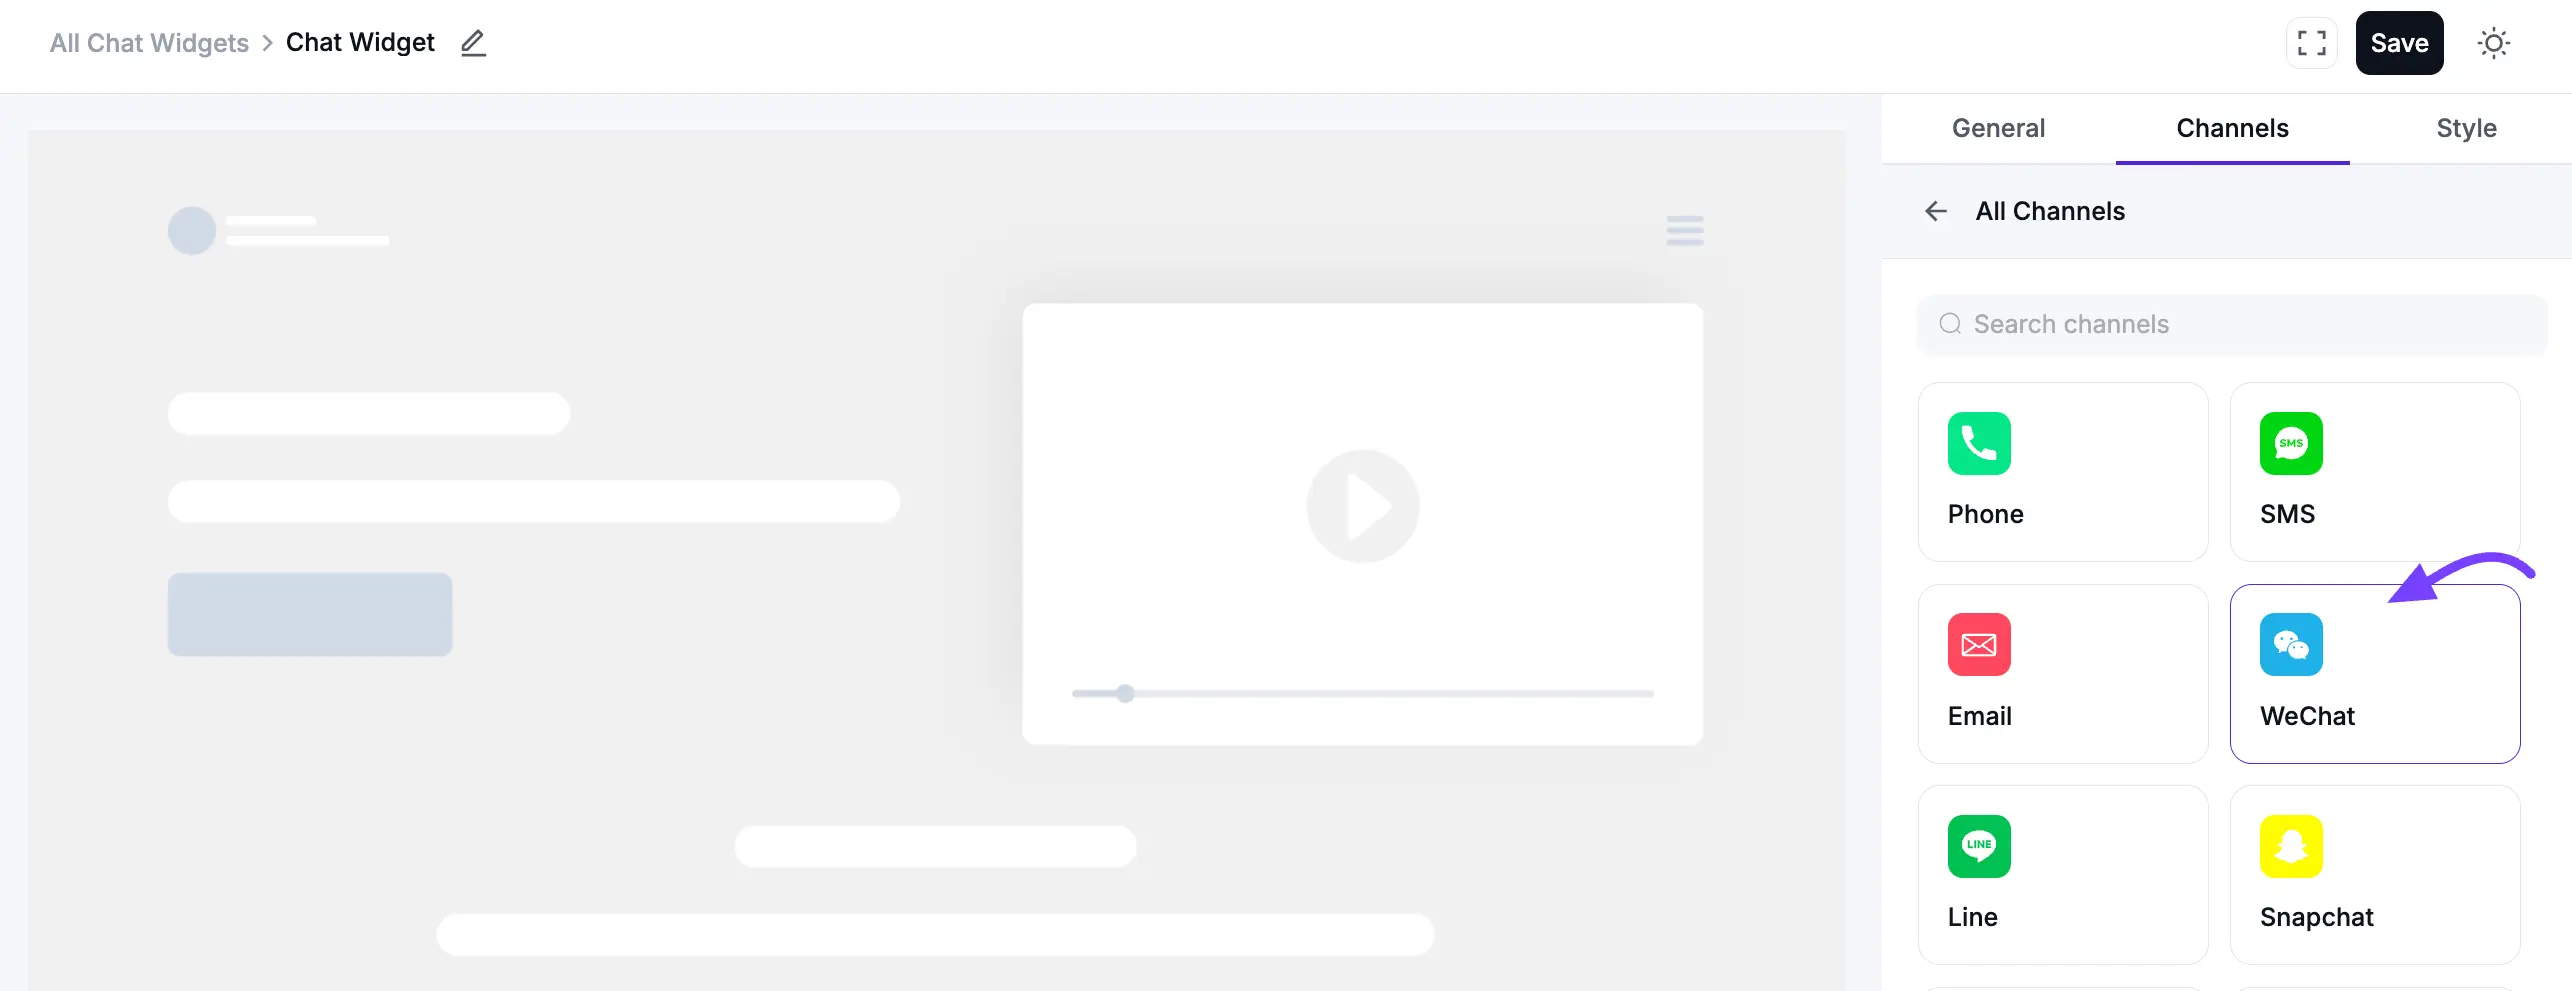
Inside the editor, select the Channels options and click the +Add New Channel button.
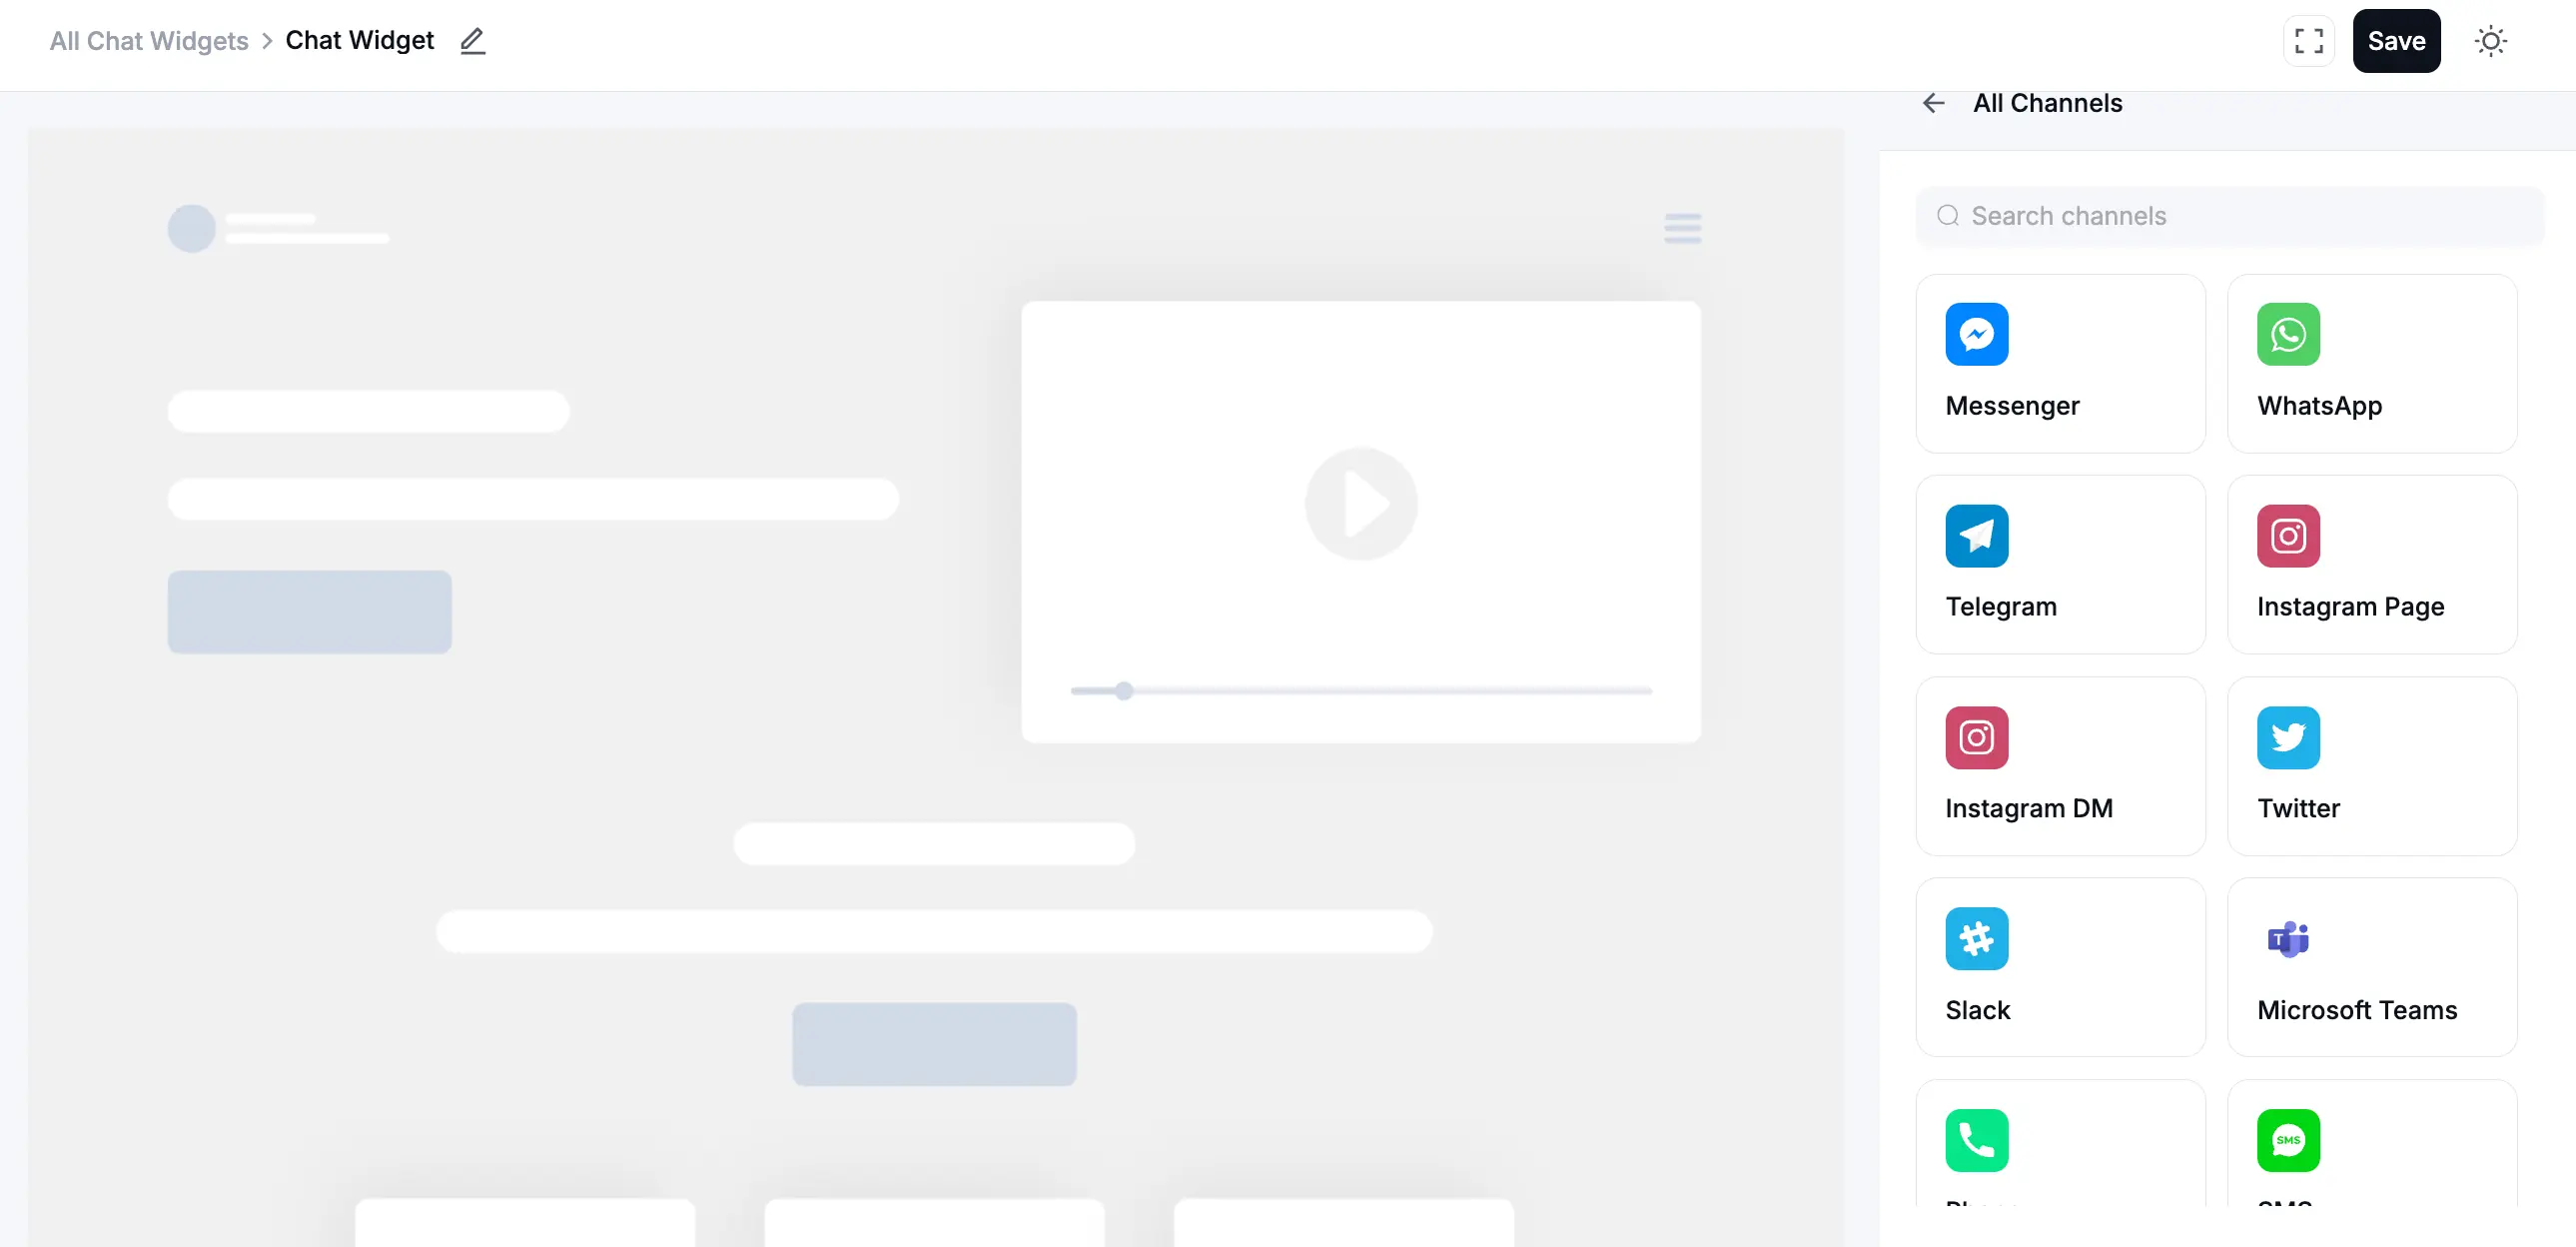
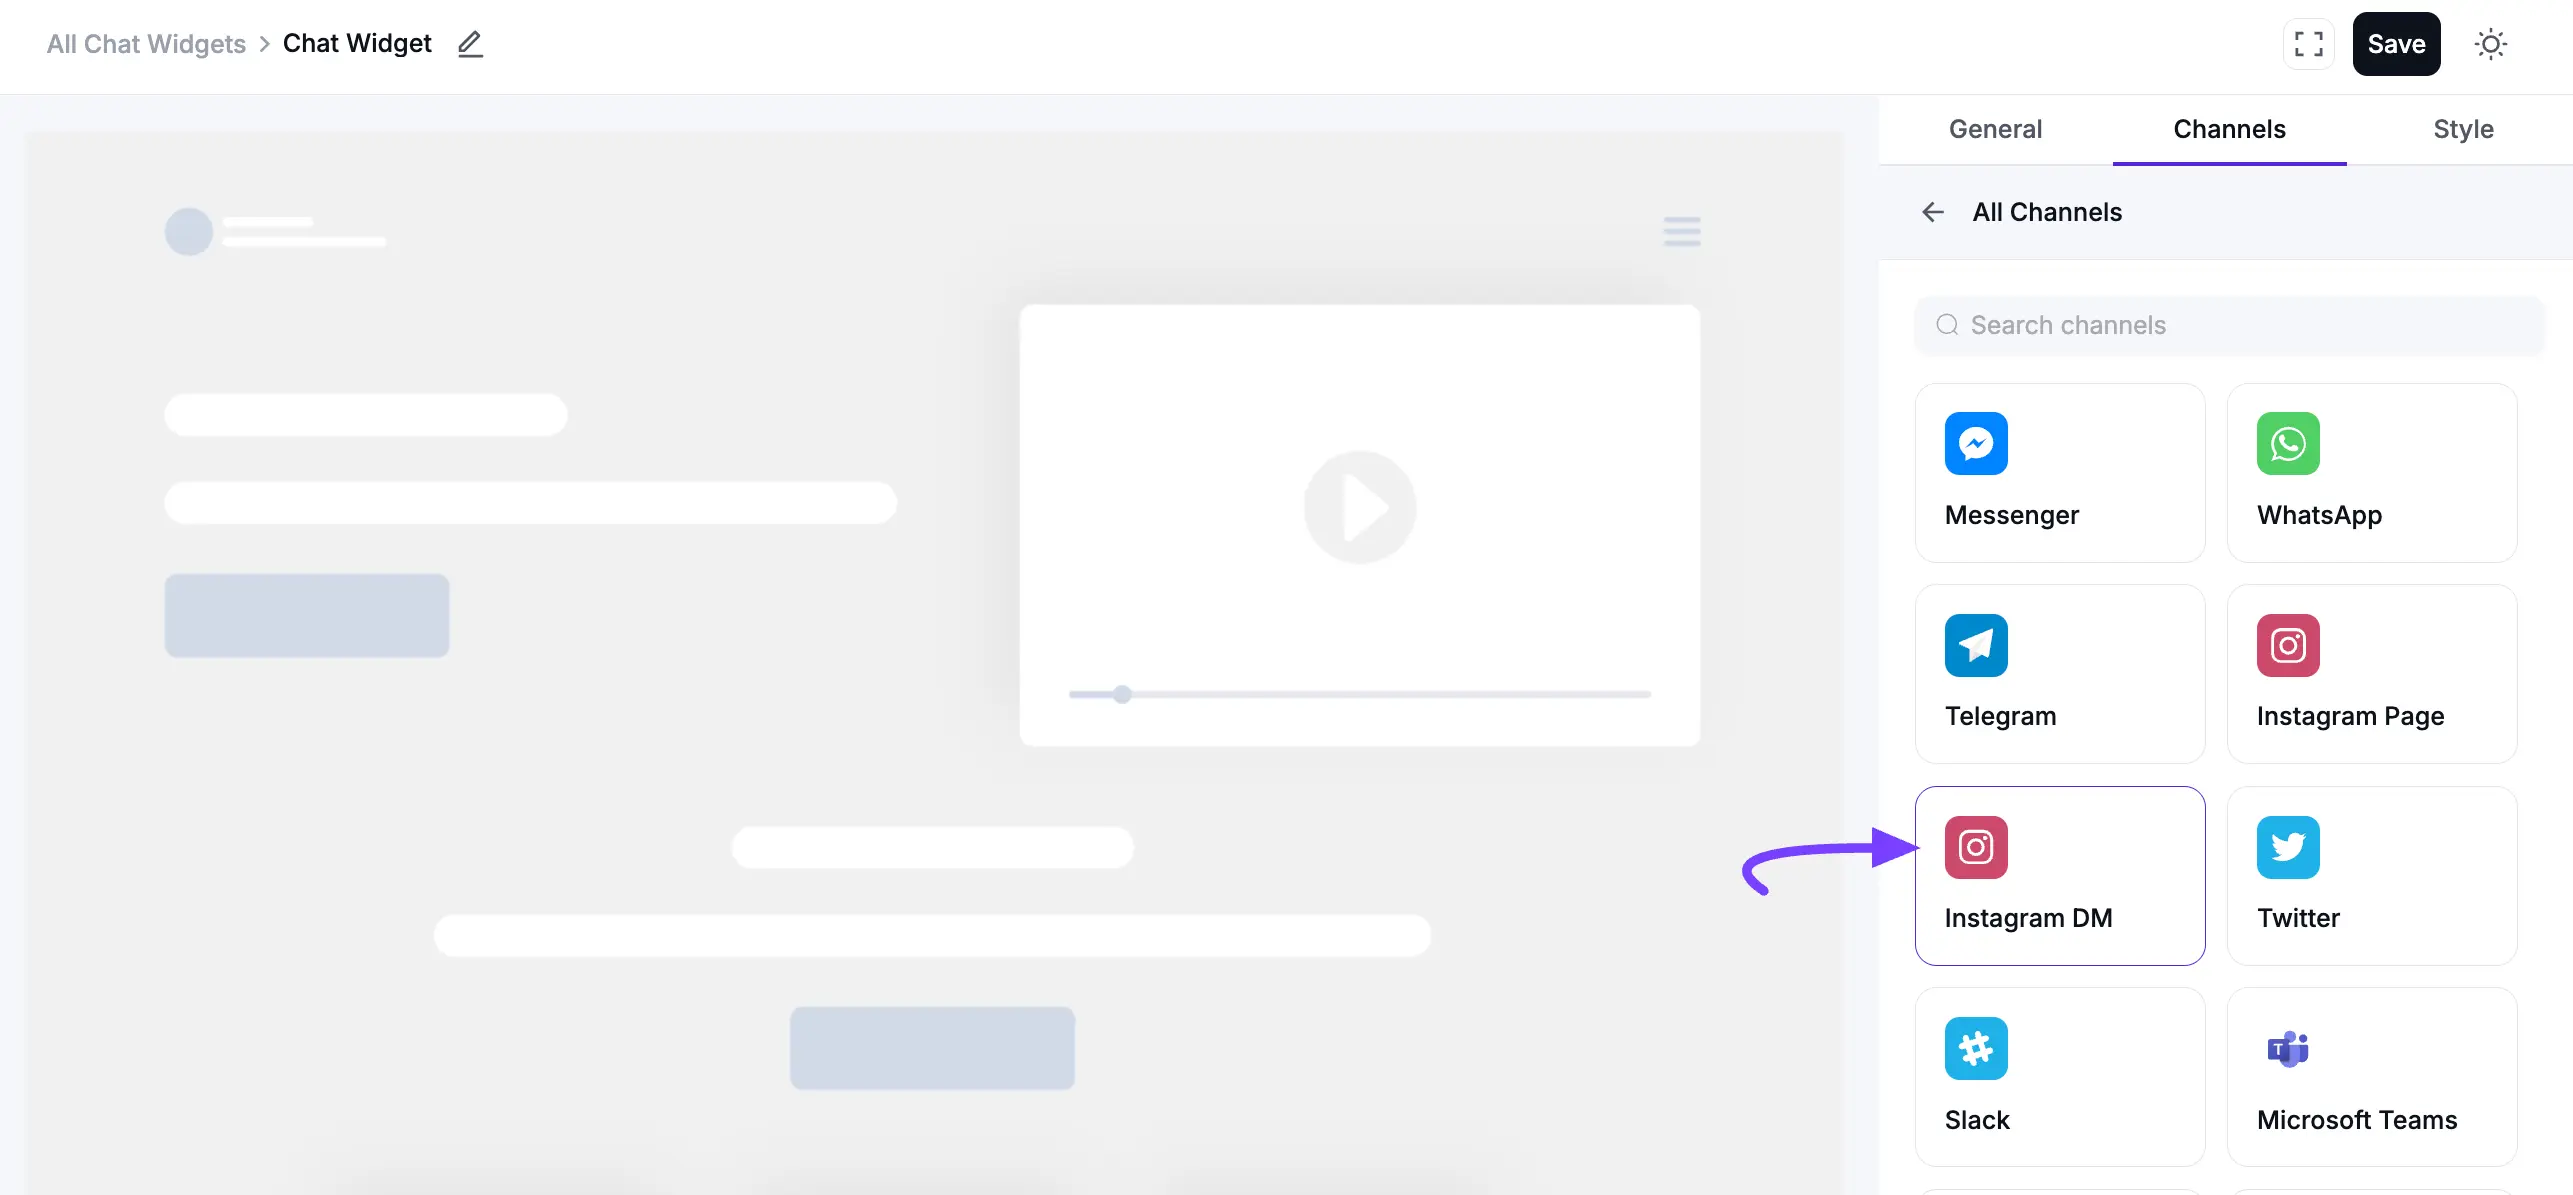
A pop-up will appear showing all available chat platforms. You can now select a channel from the list to configure it.
Option 2
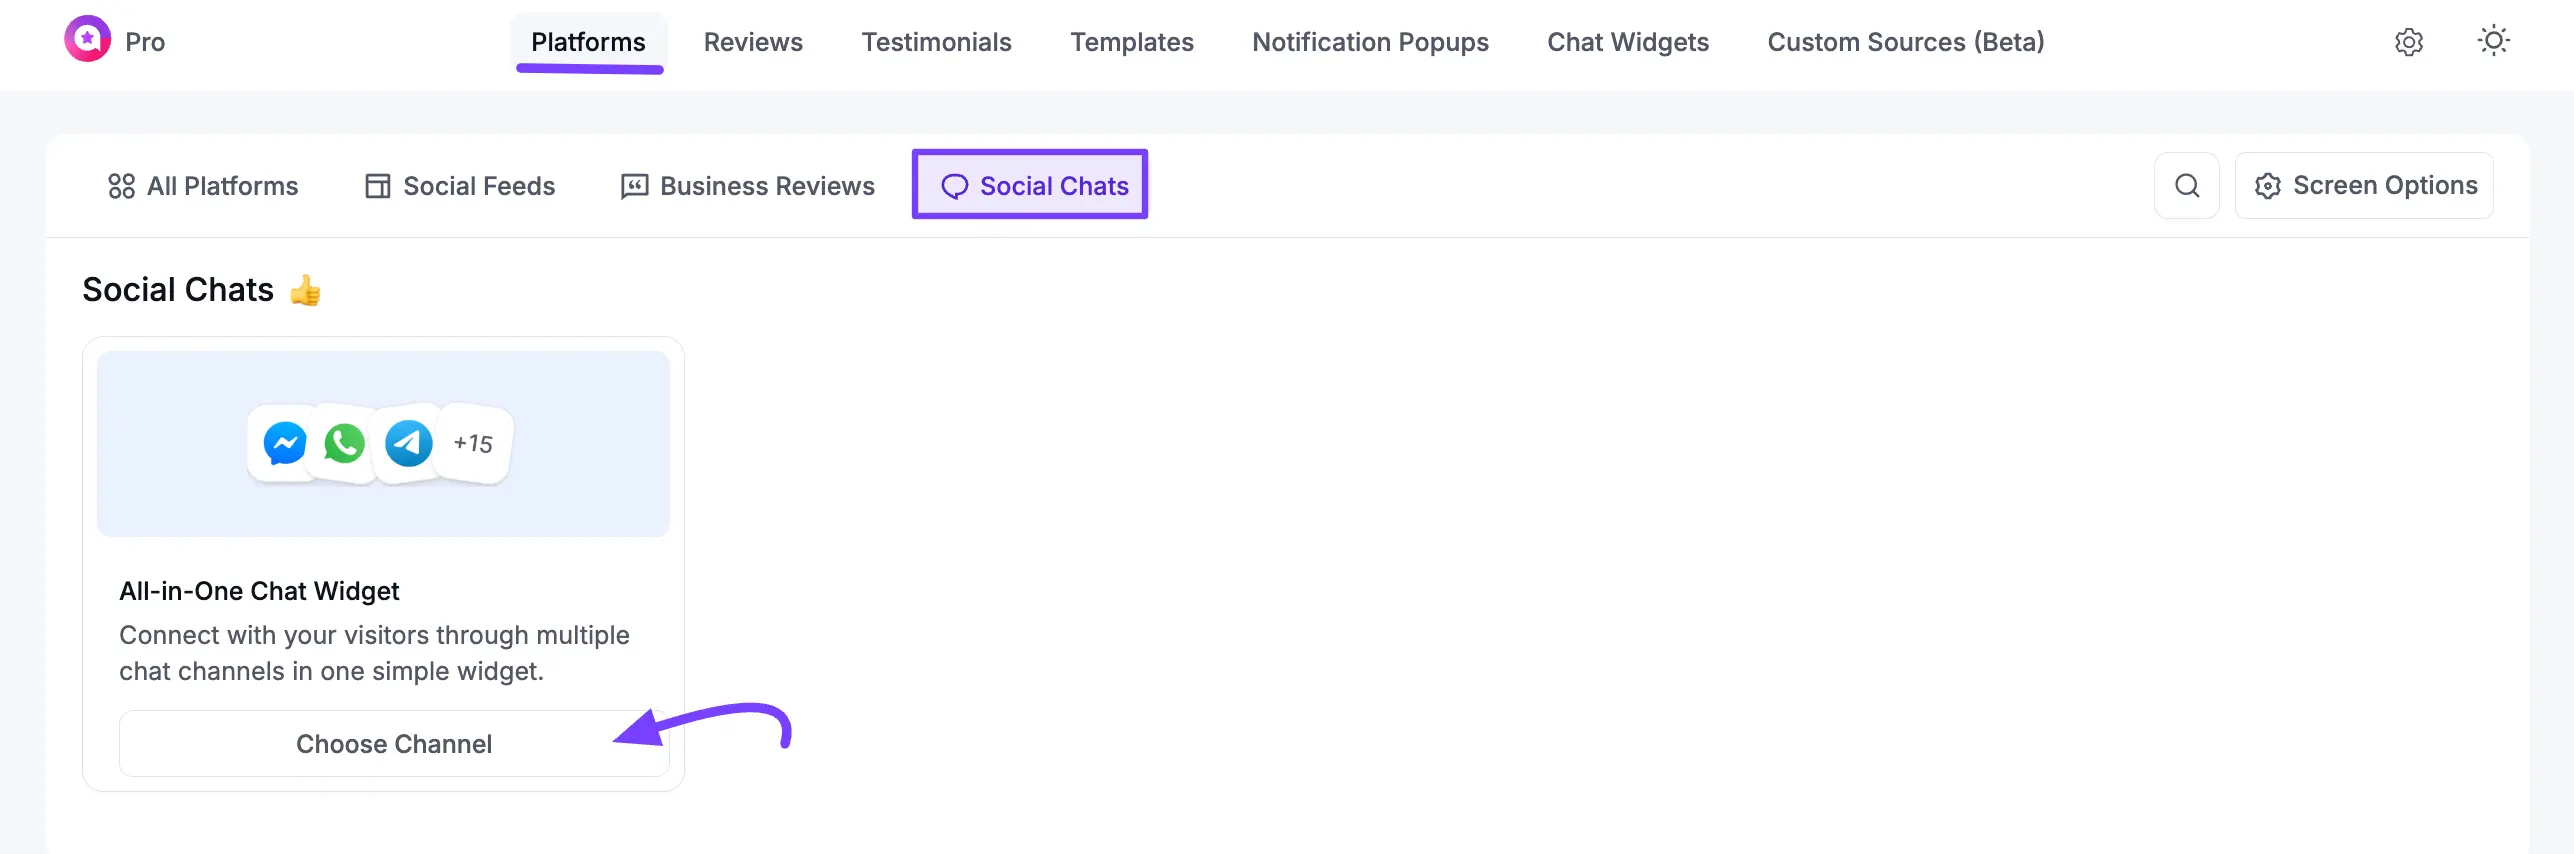
You can access this chat widget section directly from your WP Social Ninja dashboard. For this, click on the Platforms. Next, select the Social Chats and click on the Choose Channel button.
Here, a pop-up will appear showing all available chat platforms. You can now select a channel from the list to configure it.
Configuring Your Chat Channels
Here is how to set up each available channel.
Messenger
Select Messenger from the "Add Channel" list. In the Facebook ID/username or Link field, enter your Facebook Page ID, Group ID, or personal username. Click the Save button.
How to Find Your Facebook ID or Username
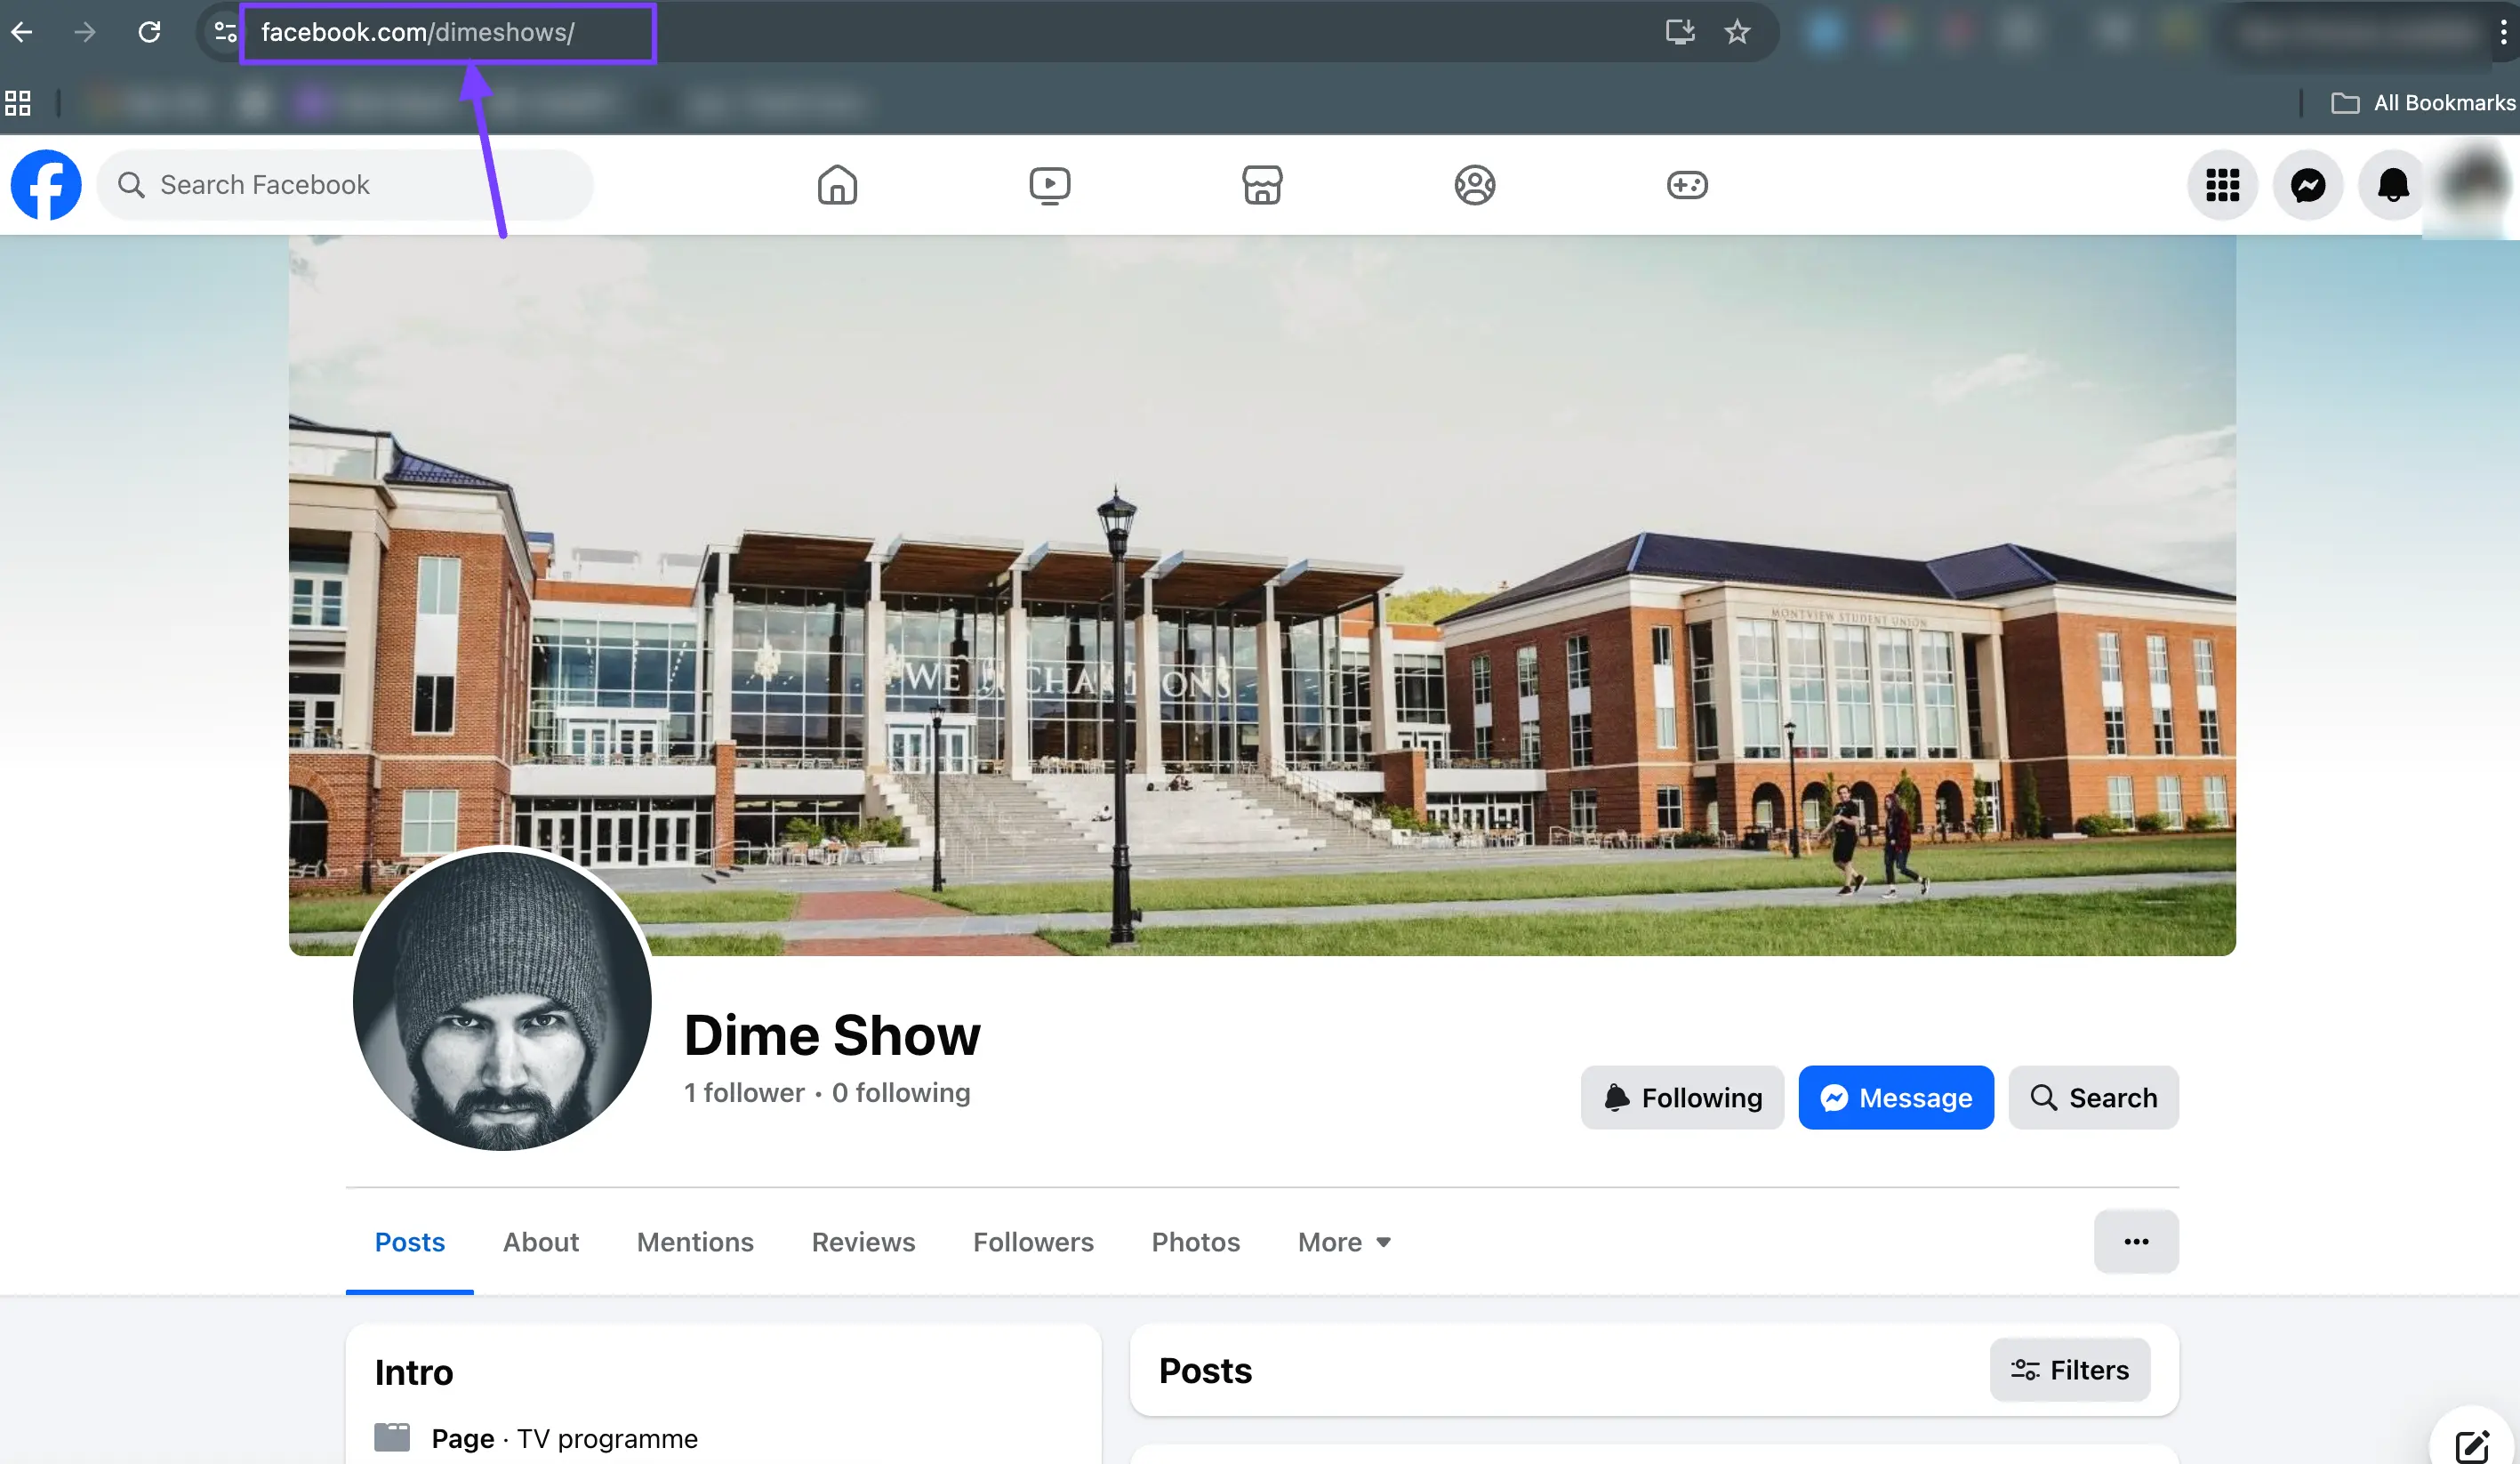
Go to your Facebook Page, Group, or Profile. Look at the URL in your browser:
For a Page:
facebook.com/YourPageNameFor a User:
facebook.com/your.username
Copy the text that comes after facebook.com/ and paste it into the field in the WP Social Ninja configuration field. If you want to customize the Label Name, enter your preferred name in the Label field. Finally, click the Save button to apply your changes. 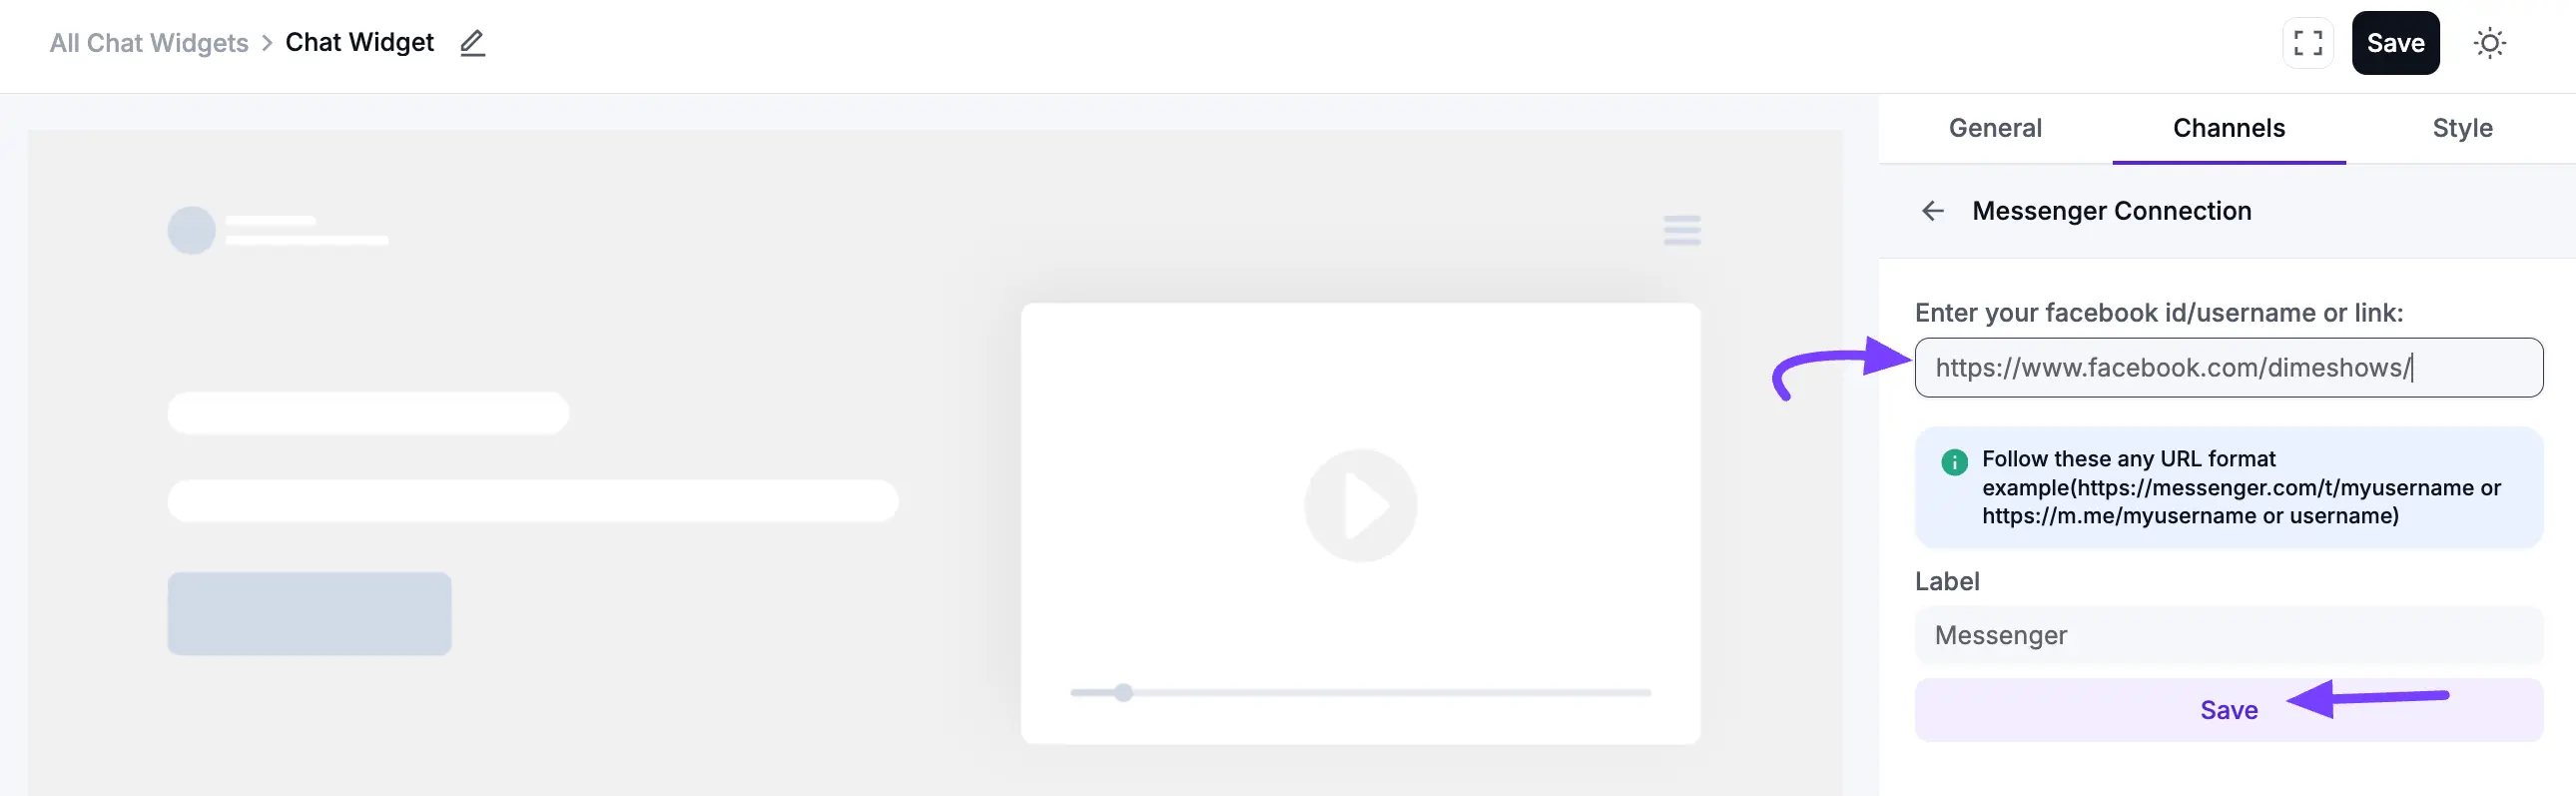
NOTE
You can also connect your Facebook Chat Widget using your Page ID or Group ID.
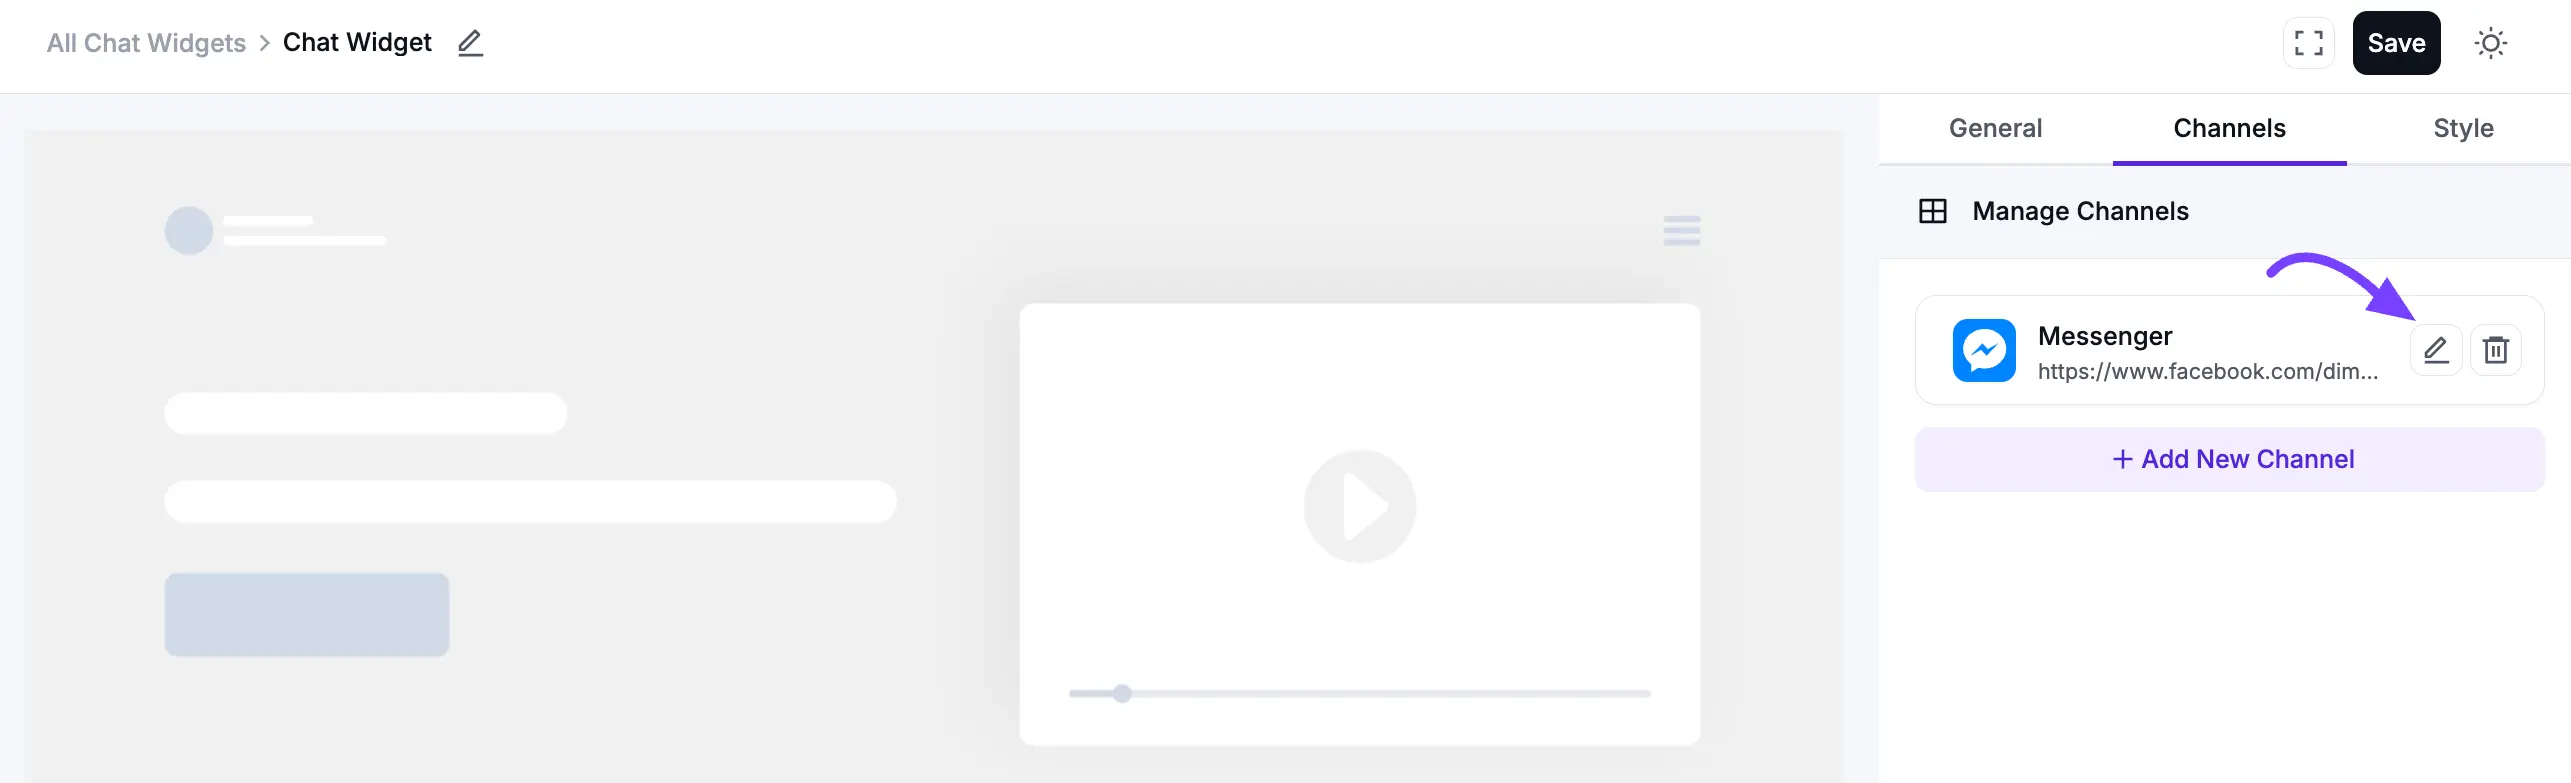
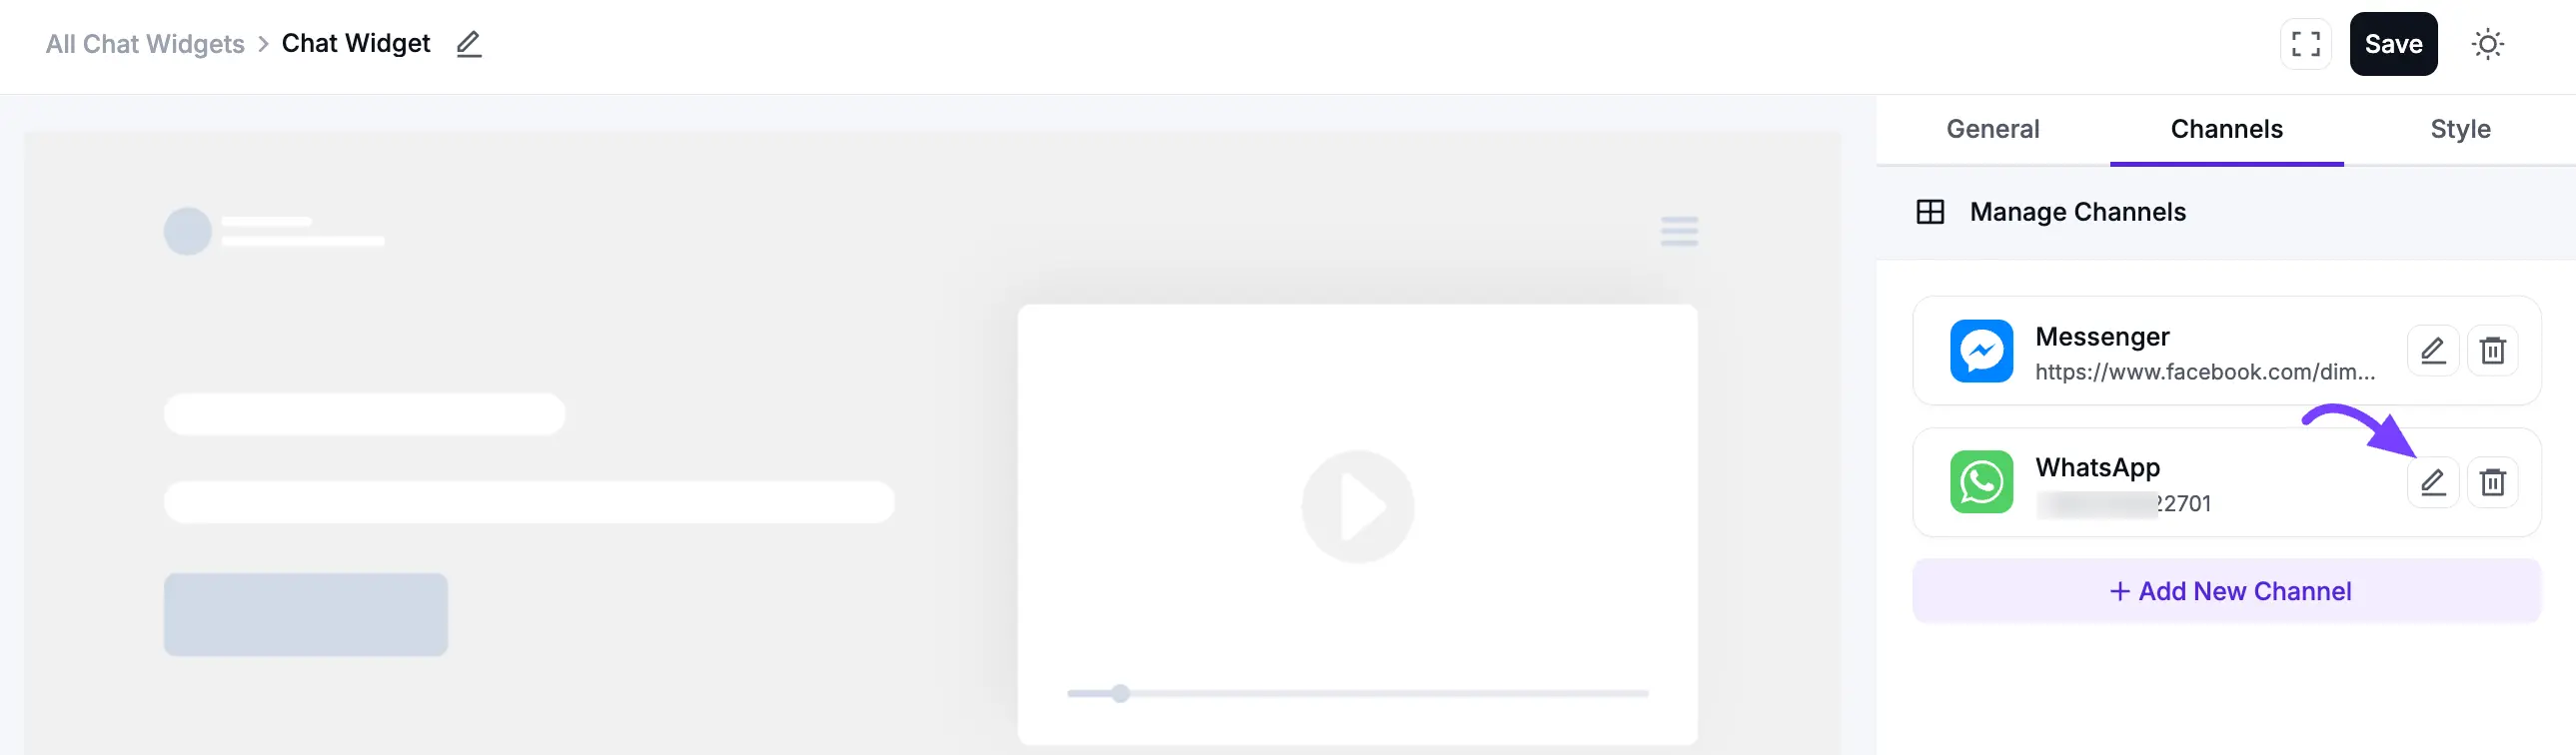
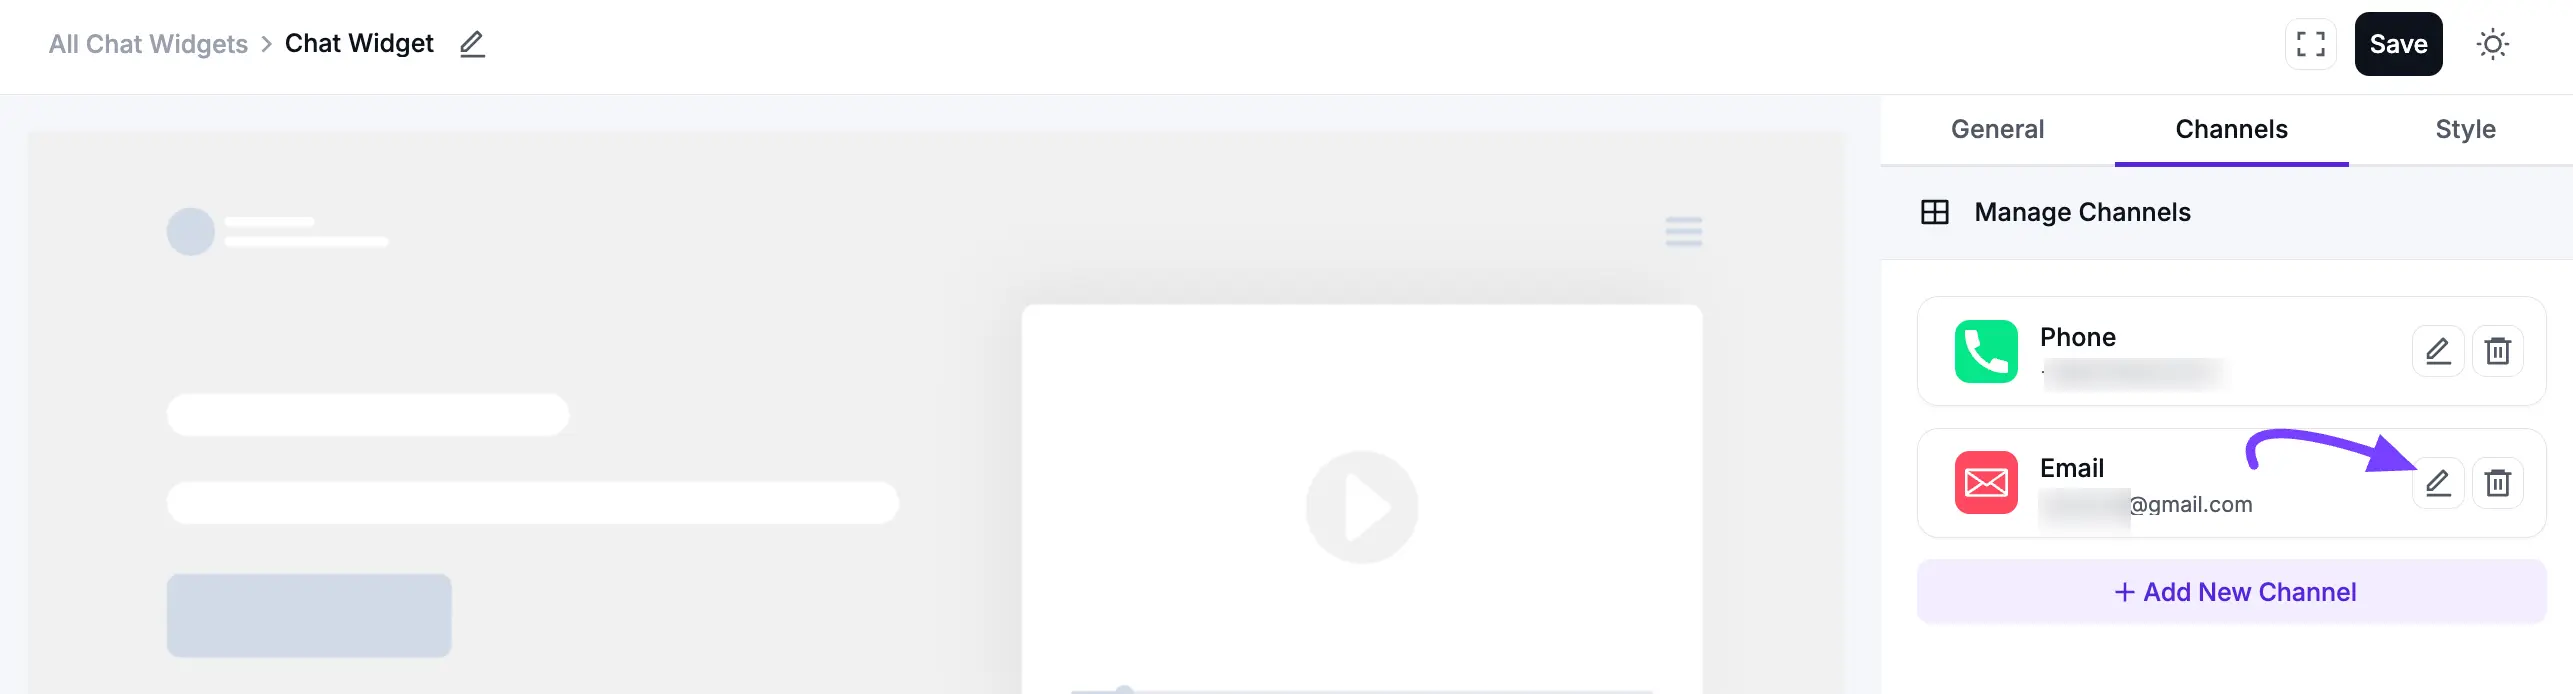
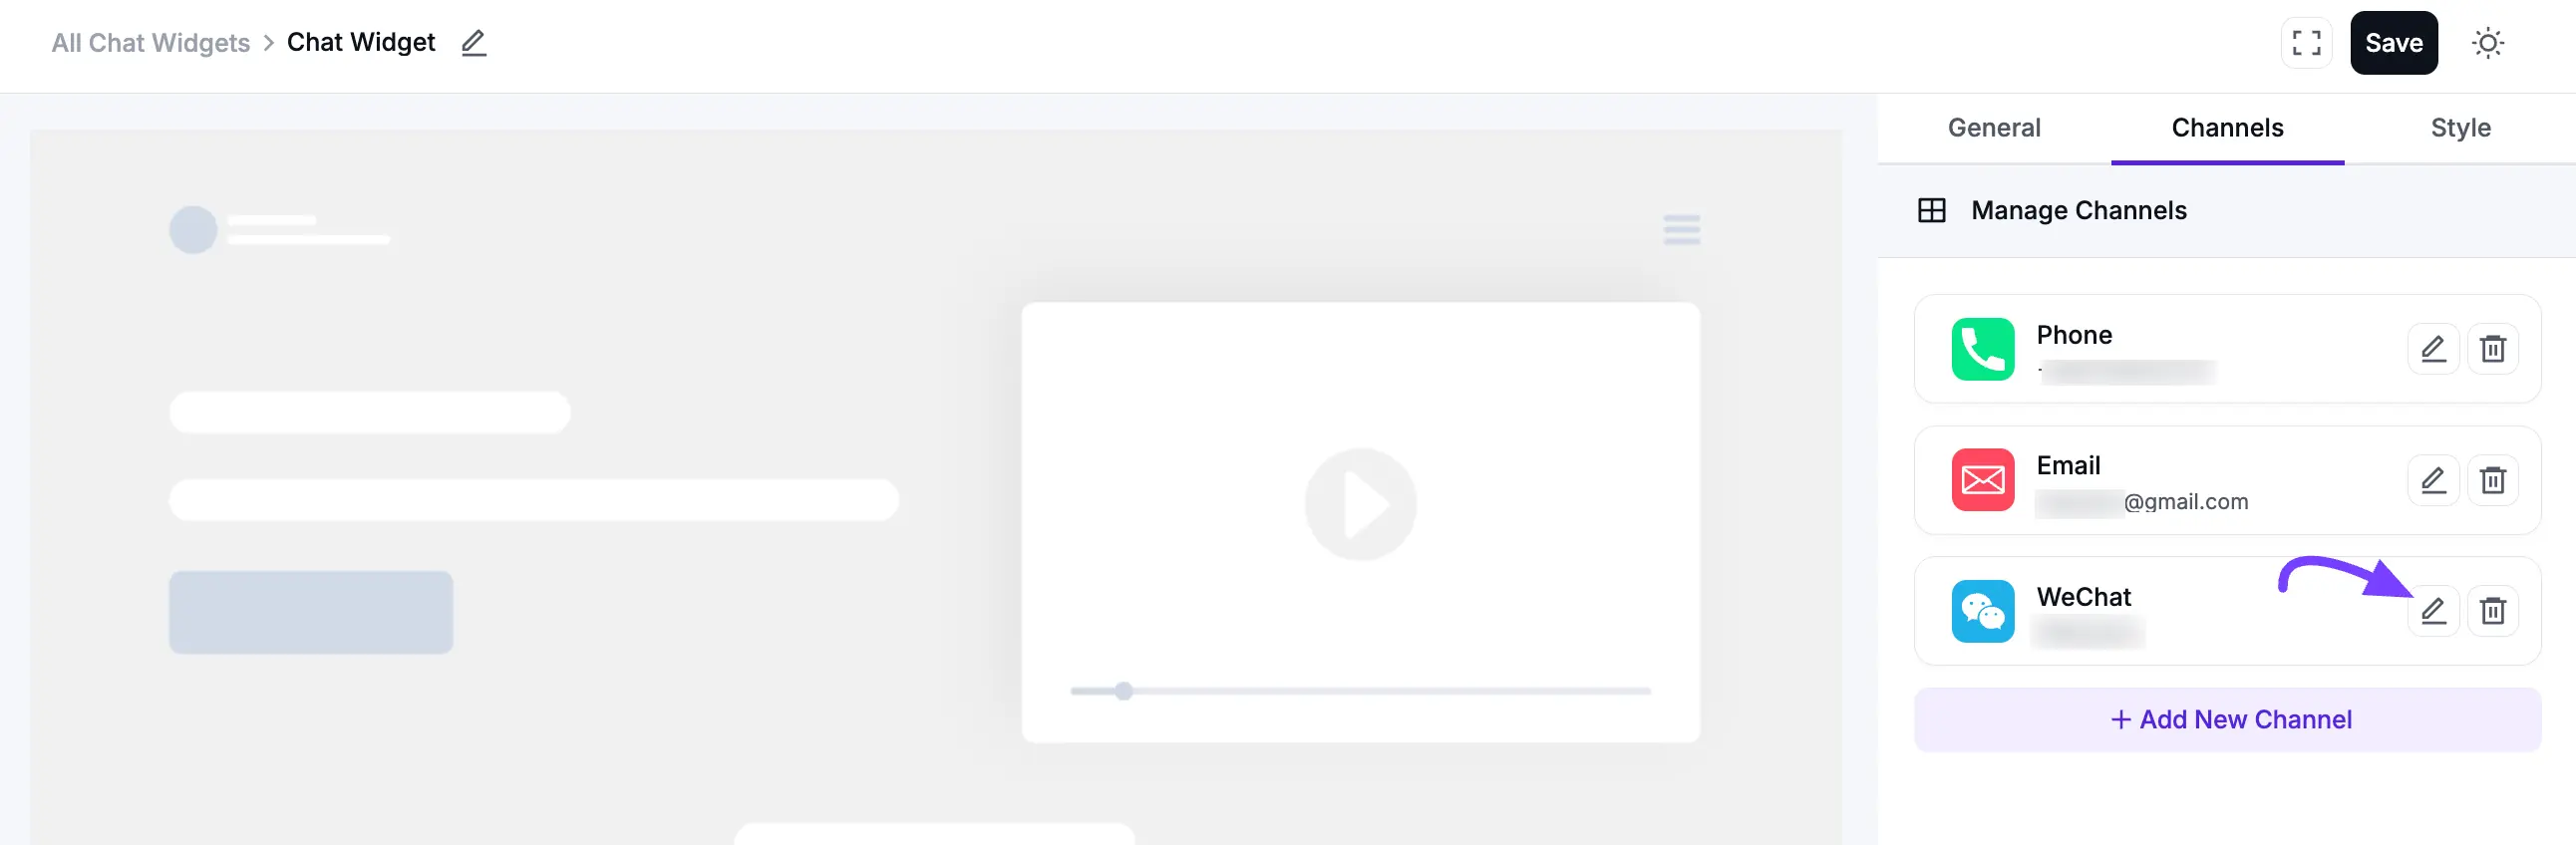
Once connected, your Messenger chat widget will appear successfully. You can edit or delete it at any time by clicking the Edit or Delete icon.
WhatsApp Configuration
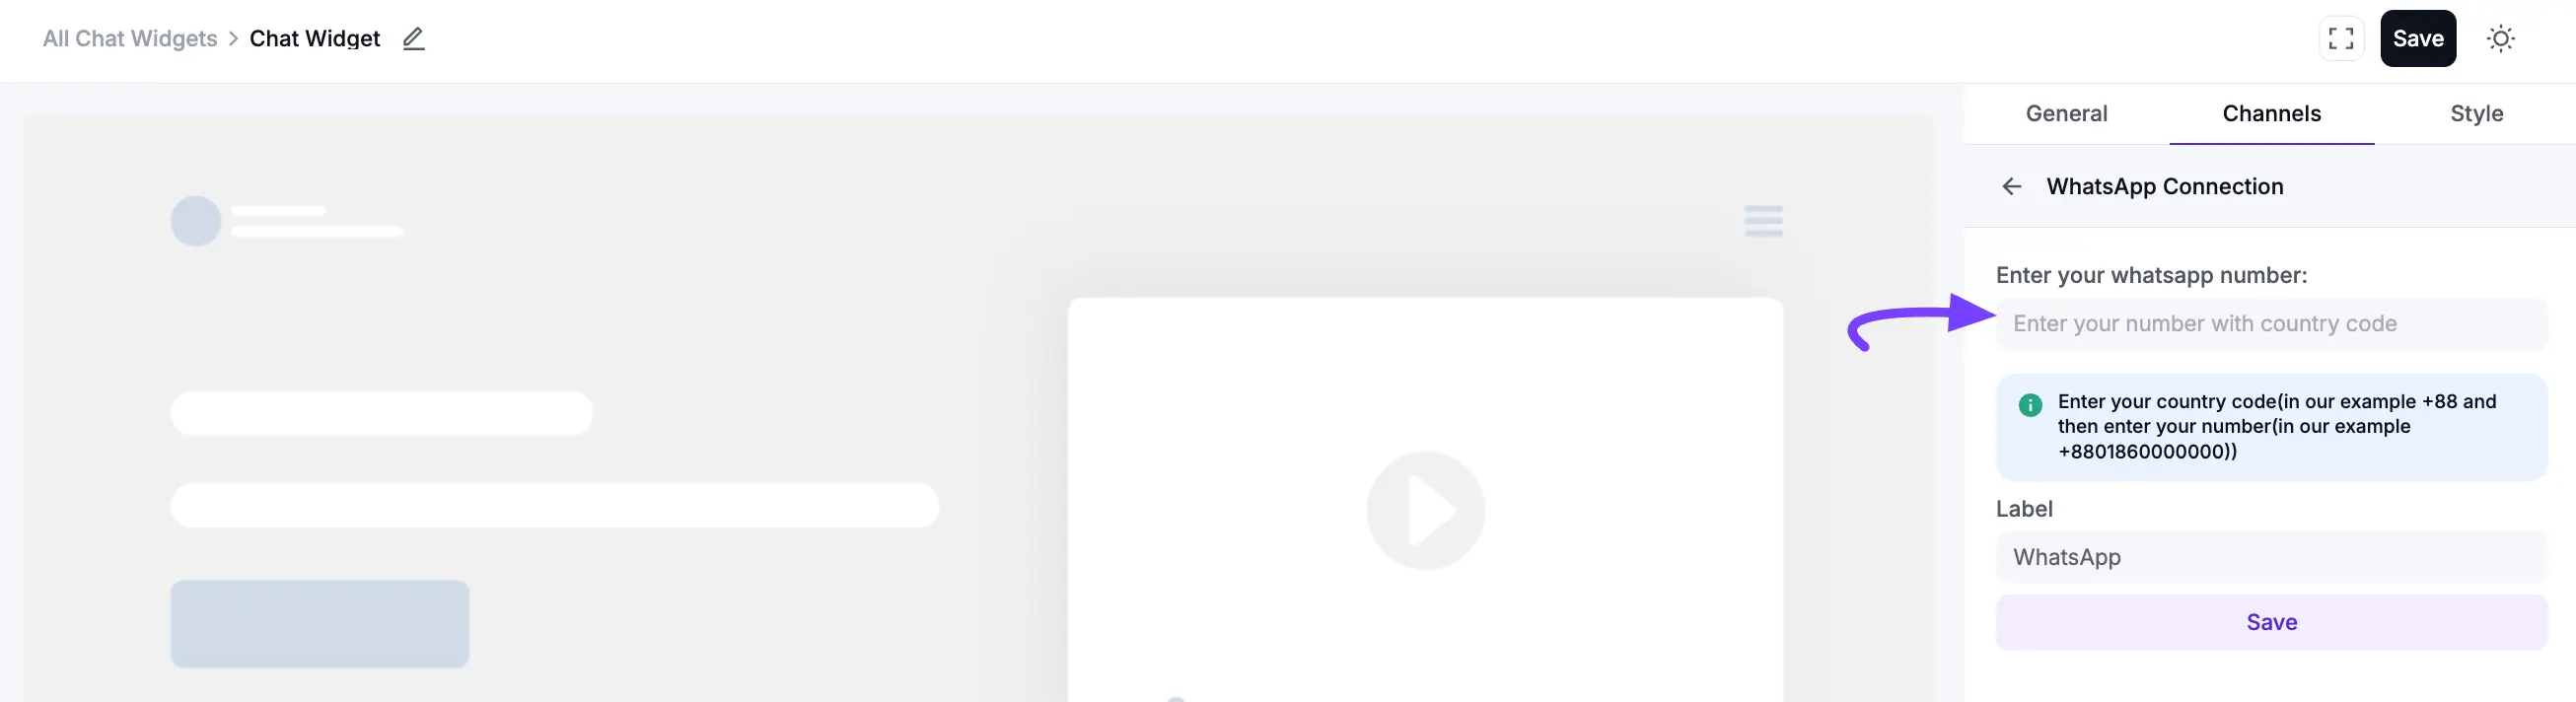
You can add your WhatsApp chat easily by clicking a few times. It helps your business to reach. Adding a WhatsApp chat widget to your site is a great way to connect directly with your customers. To do this, click the Add New Channel button and select the WhatsApp icon.
In the pop-up, enter your phone number, including your country code. If you want to customize the Label Name, enter your preferred name in the Label field. Then, click on the Save button.
Once connected, a WhatsApp icon will appear on your website. You can edit or delete it at any time by clicking the Edit or Delete icon.
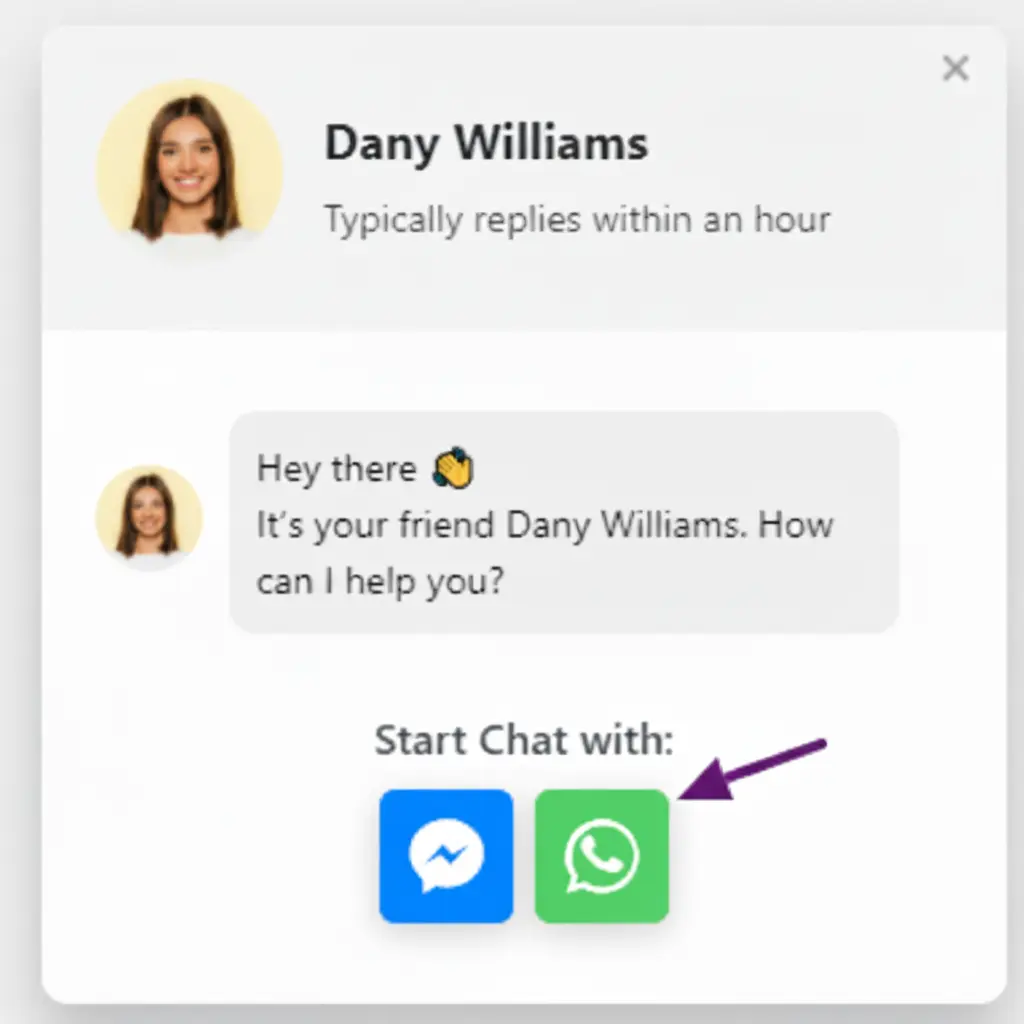
When visitors click the icon, they will be redirected straight to a WhatsApp chat with you. This makes communication quick and convenient for both you and your customers.
Telegram Configuration
If you want to communicate through Telegram, you can easily add it to your chat widget. First, click Add New Channel and select the Telegram icon.

Then, enter your Telegram User ID or Profile Link in the input field. If you want to customize the Label Name, enter your preferred name in the Label field and click Save.
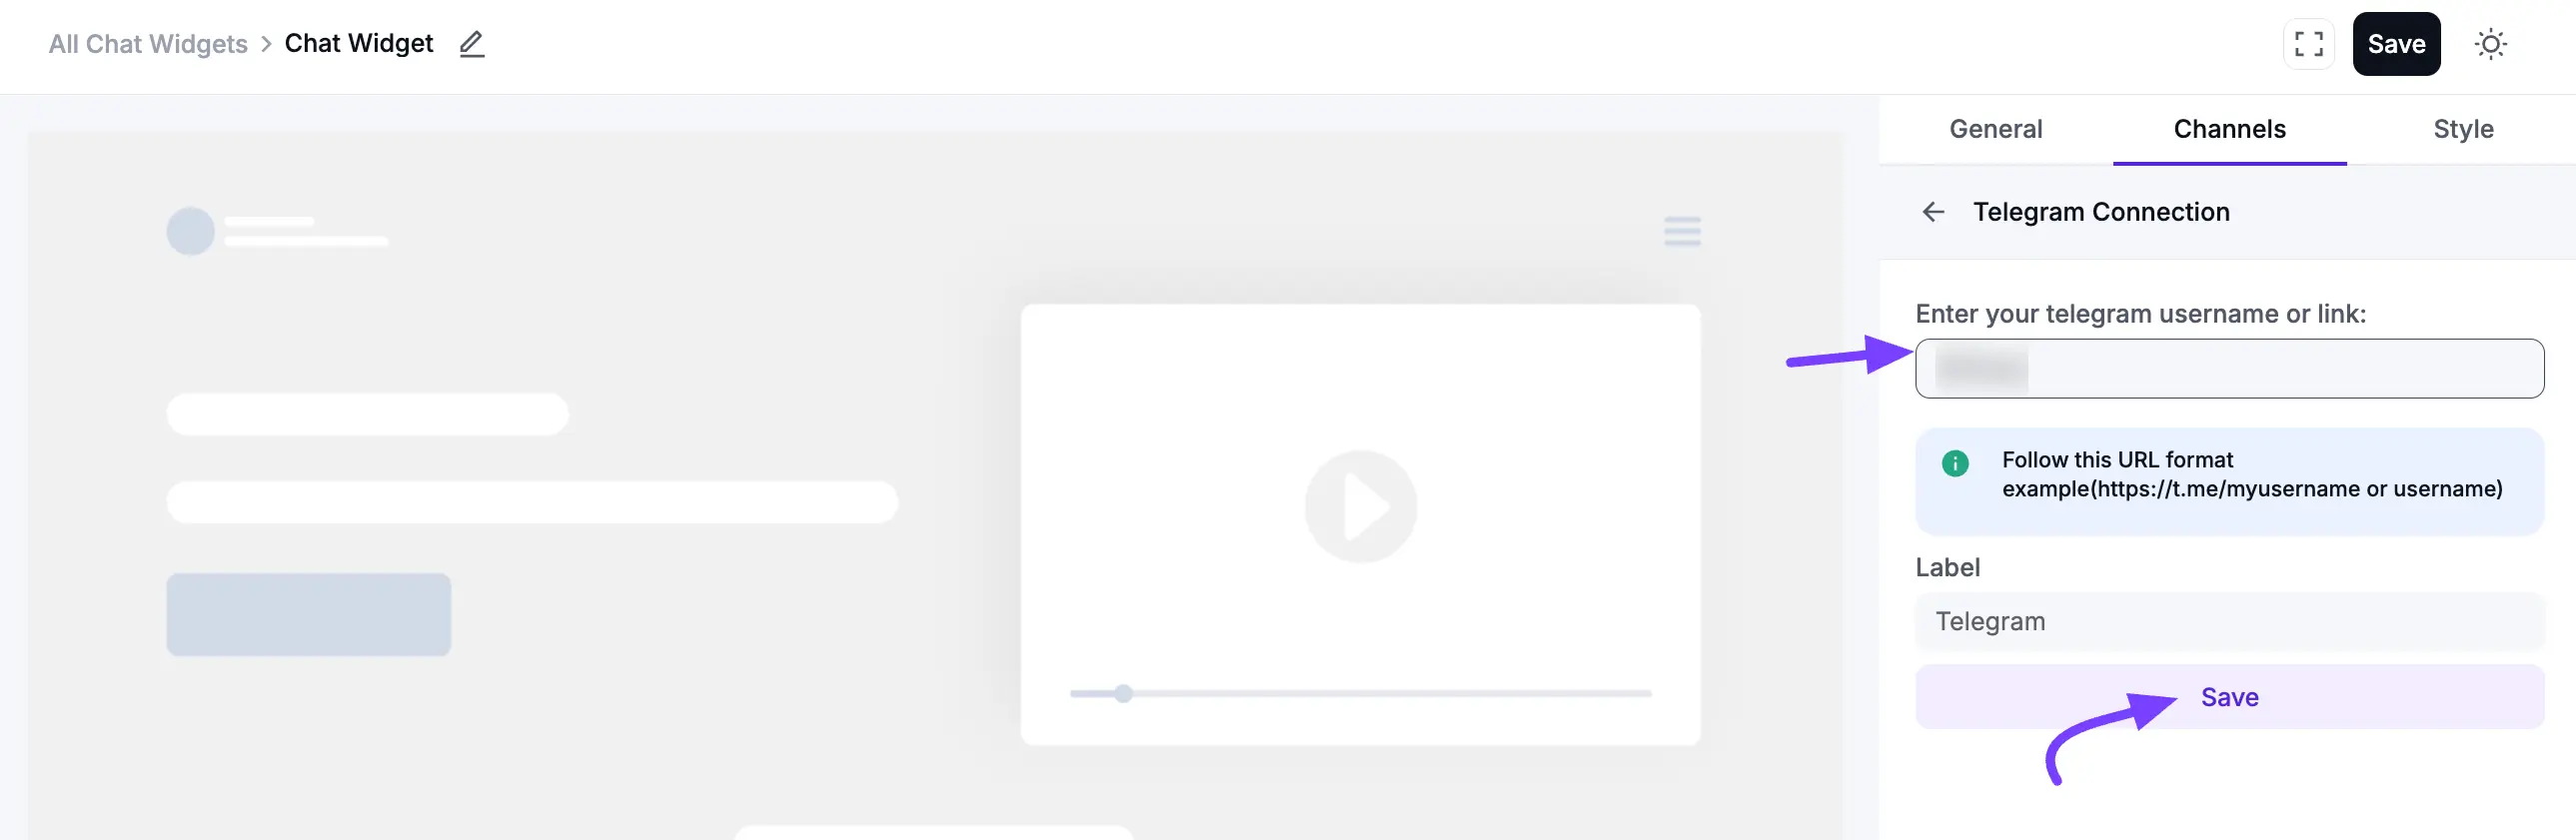
After saving, your Telegram chat button will appear on the website, allowing visitors to contact you directly through the Telegram app. You can edit or delete it at any time by clicking the Edit or Delete icon.
Instagram Page Configuration
You can also add your Instagram profile to your chat widget, allowing visitors to connect with you on this popular platform. First, click Add New Channel and select the Instagram icon.
Then, enter your Instagram Username or Profile Link in the input field. If you want to customize the Label Name, enter your preferred name in the Label field and click Save.
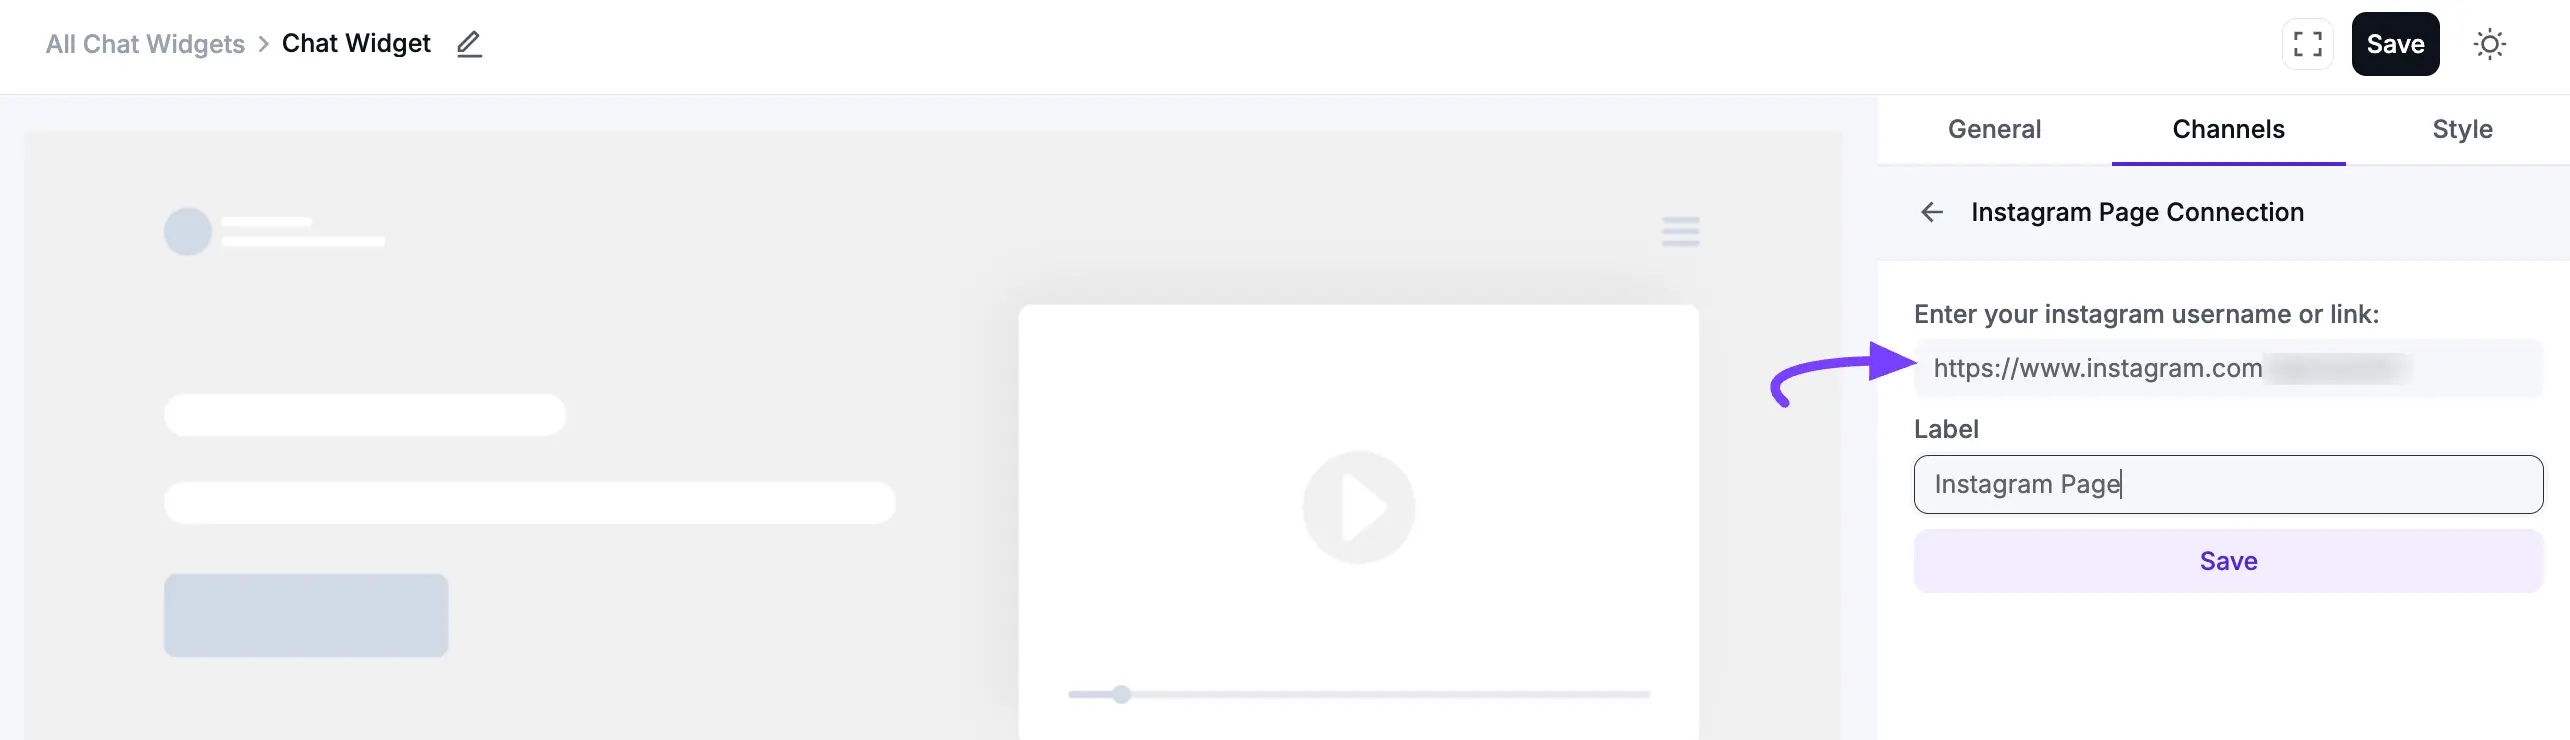
After saving, your Instagram chat button will appear on the website, allowing visitors to see your profile or contact you directly. You can edit or delete it at any time by clicking the Edit or Delete icon.
Instagram DM (Pro) Configuration
For a more direct line of communication, you can add Instagram Direct Message (DM) to your chat widget. This Pro feature lets customers message you privately. First, click Add New Channel and select the Instagram DM icon.
Then, enter your Instagram Username or Profile Link in the input field. If you want to customize the Label Name, enter your preferred name in the Label field and click Save.
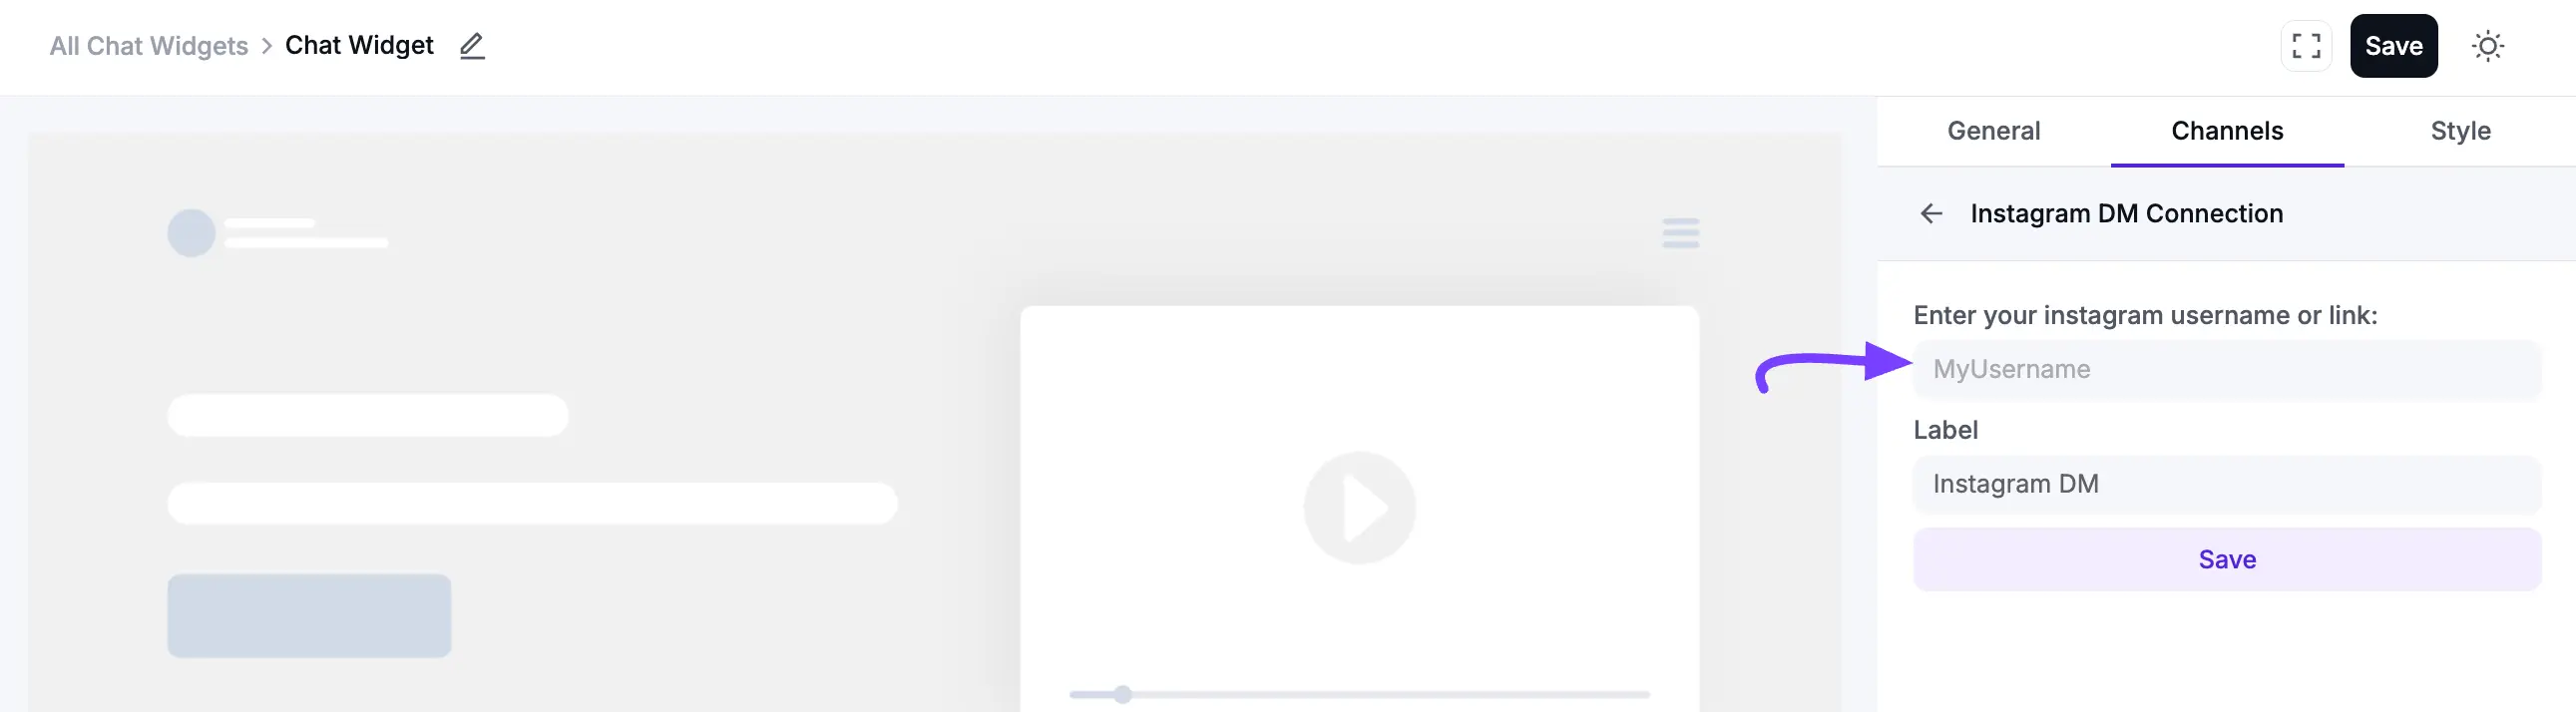
After saving, your Instagram DM chat button will appear on the website, allowing visitors to send you a direct message through the Instagram app. You can edit or delete it at any time by clicking the Edit or Delete icon.
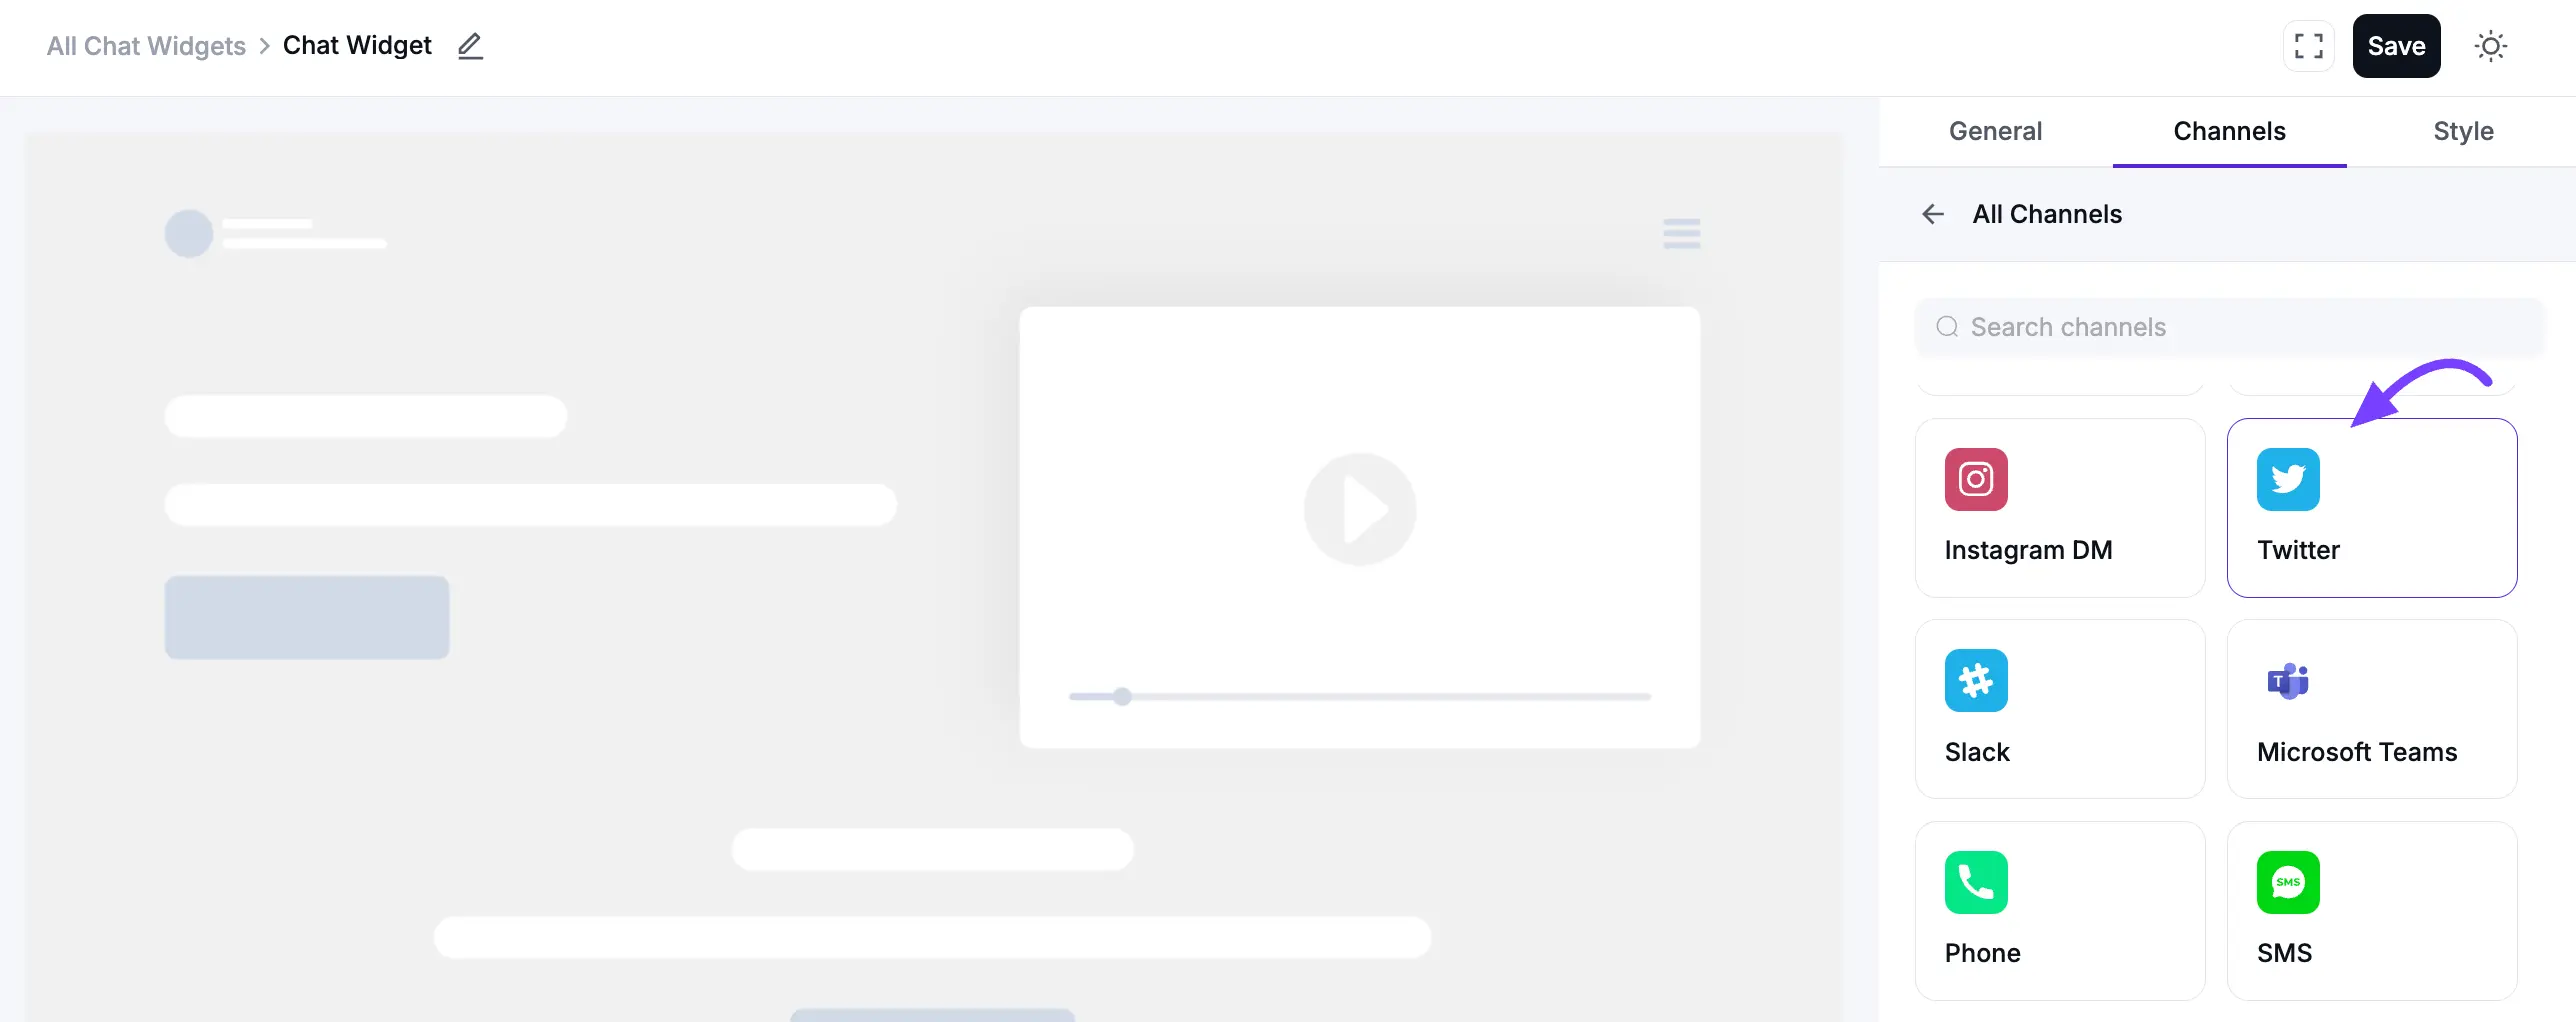
Twitter Configuration
Connect your Twitter account to let visitors start a conversation or follow you directly from the chat widget. First, click Add New Channel and select the Twitter icon.
Then, enter your Twitter Username or Profile Link in the input field. If you want to customize the Label Name, enter your preferred name in the Label field and click Save.
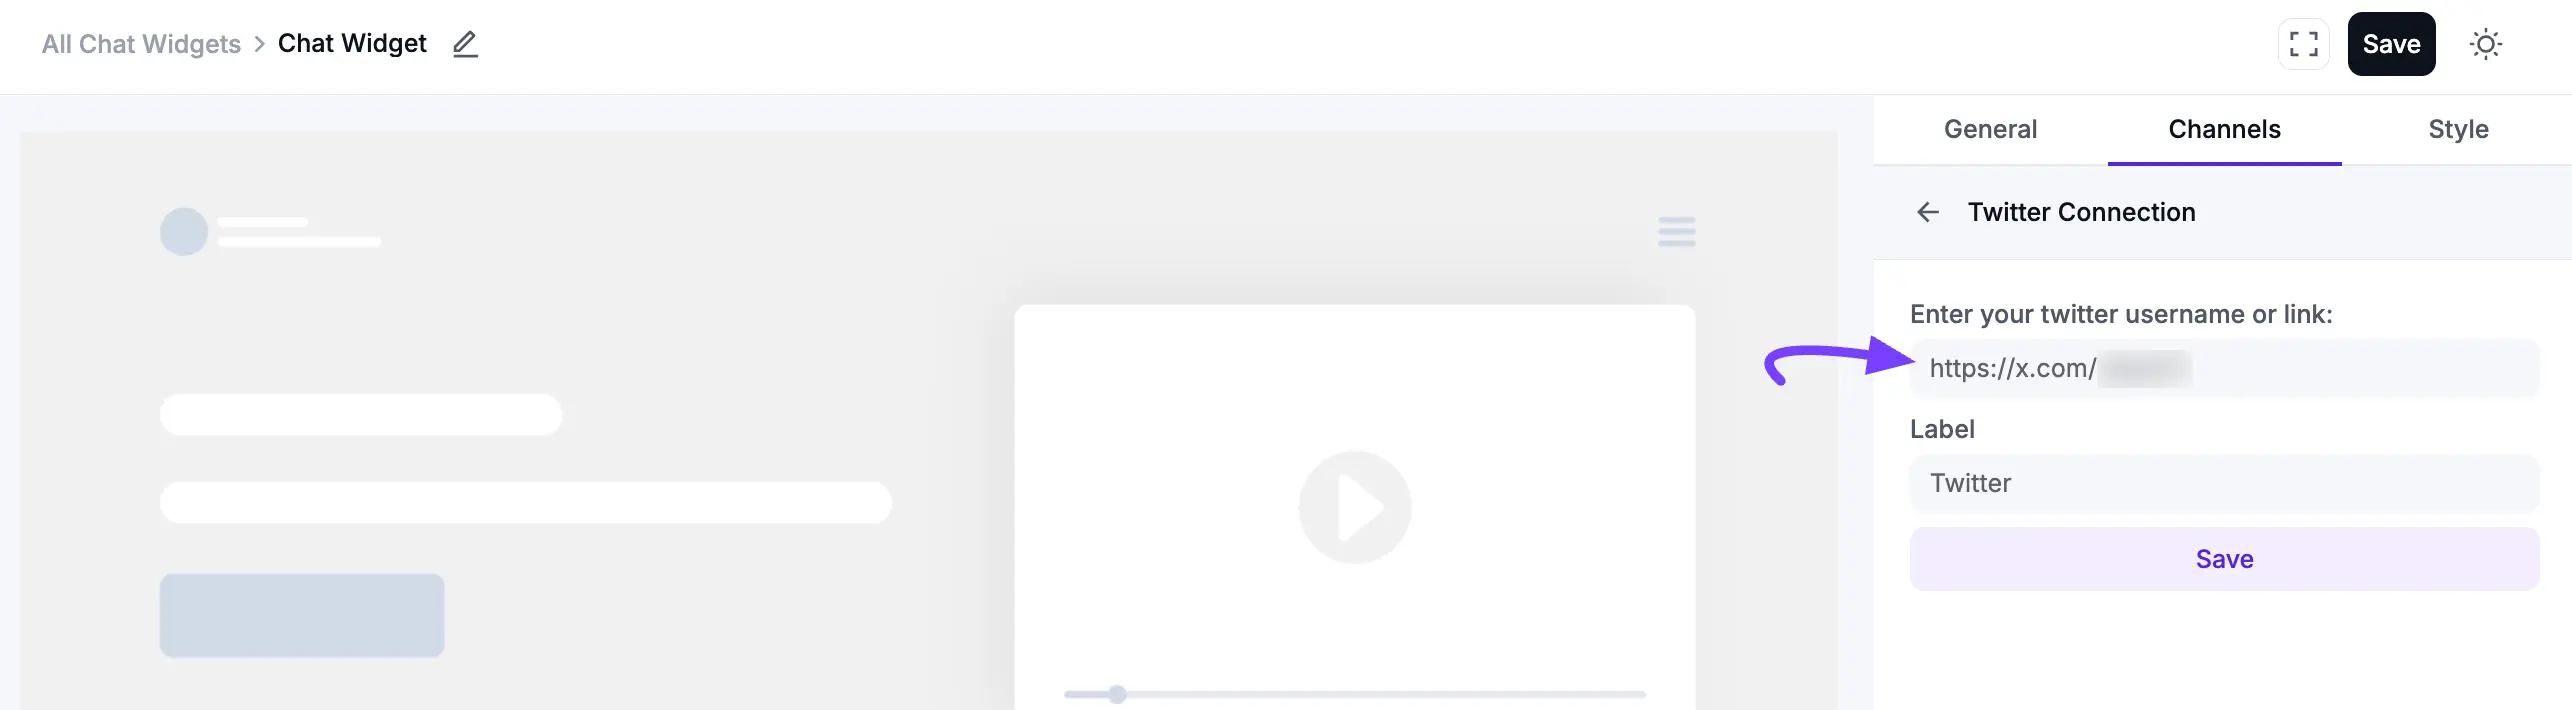
After saving, your Twitter chat button will appear on the website, allowing visitors to contact you directly on Twitter. You can edit or delete it at any time by clicking the Edit or Delete icon.
Slack Configuration
If your team uses Slack, you can add it to your chat widget to receive messages from visitors directly. First, click Add New Channel and select the Slack icon.

Then, enter your Slack Username or Link in the input field. If you want to customize the Label Name, enter your preferred name in the Label field and click Save.

After saving, your Slack chat button will appear on the website, allowing visitors to contact you directly through the Slack app. You can edit or delete it at any time by clicking the Edit or Delete icon.
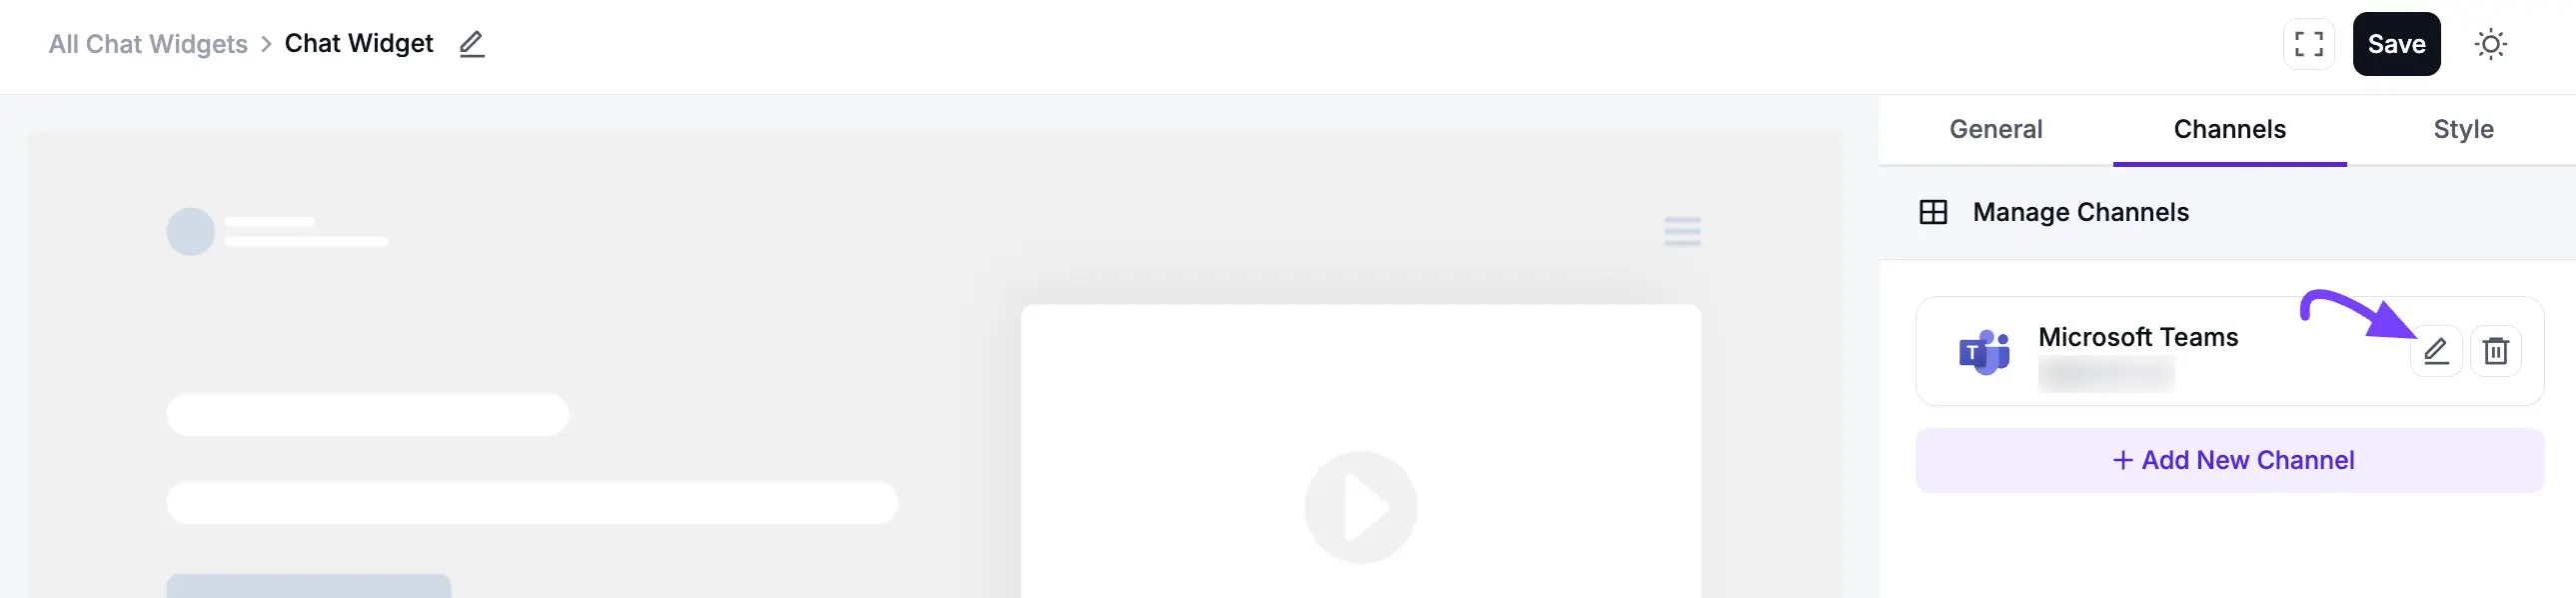
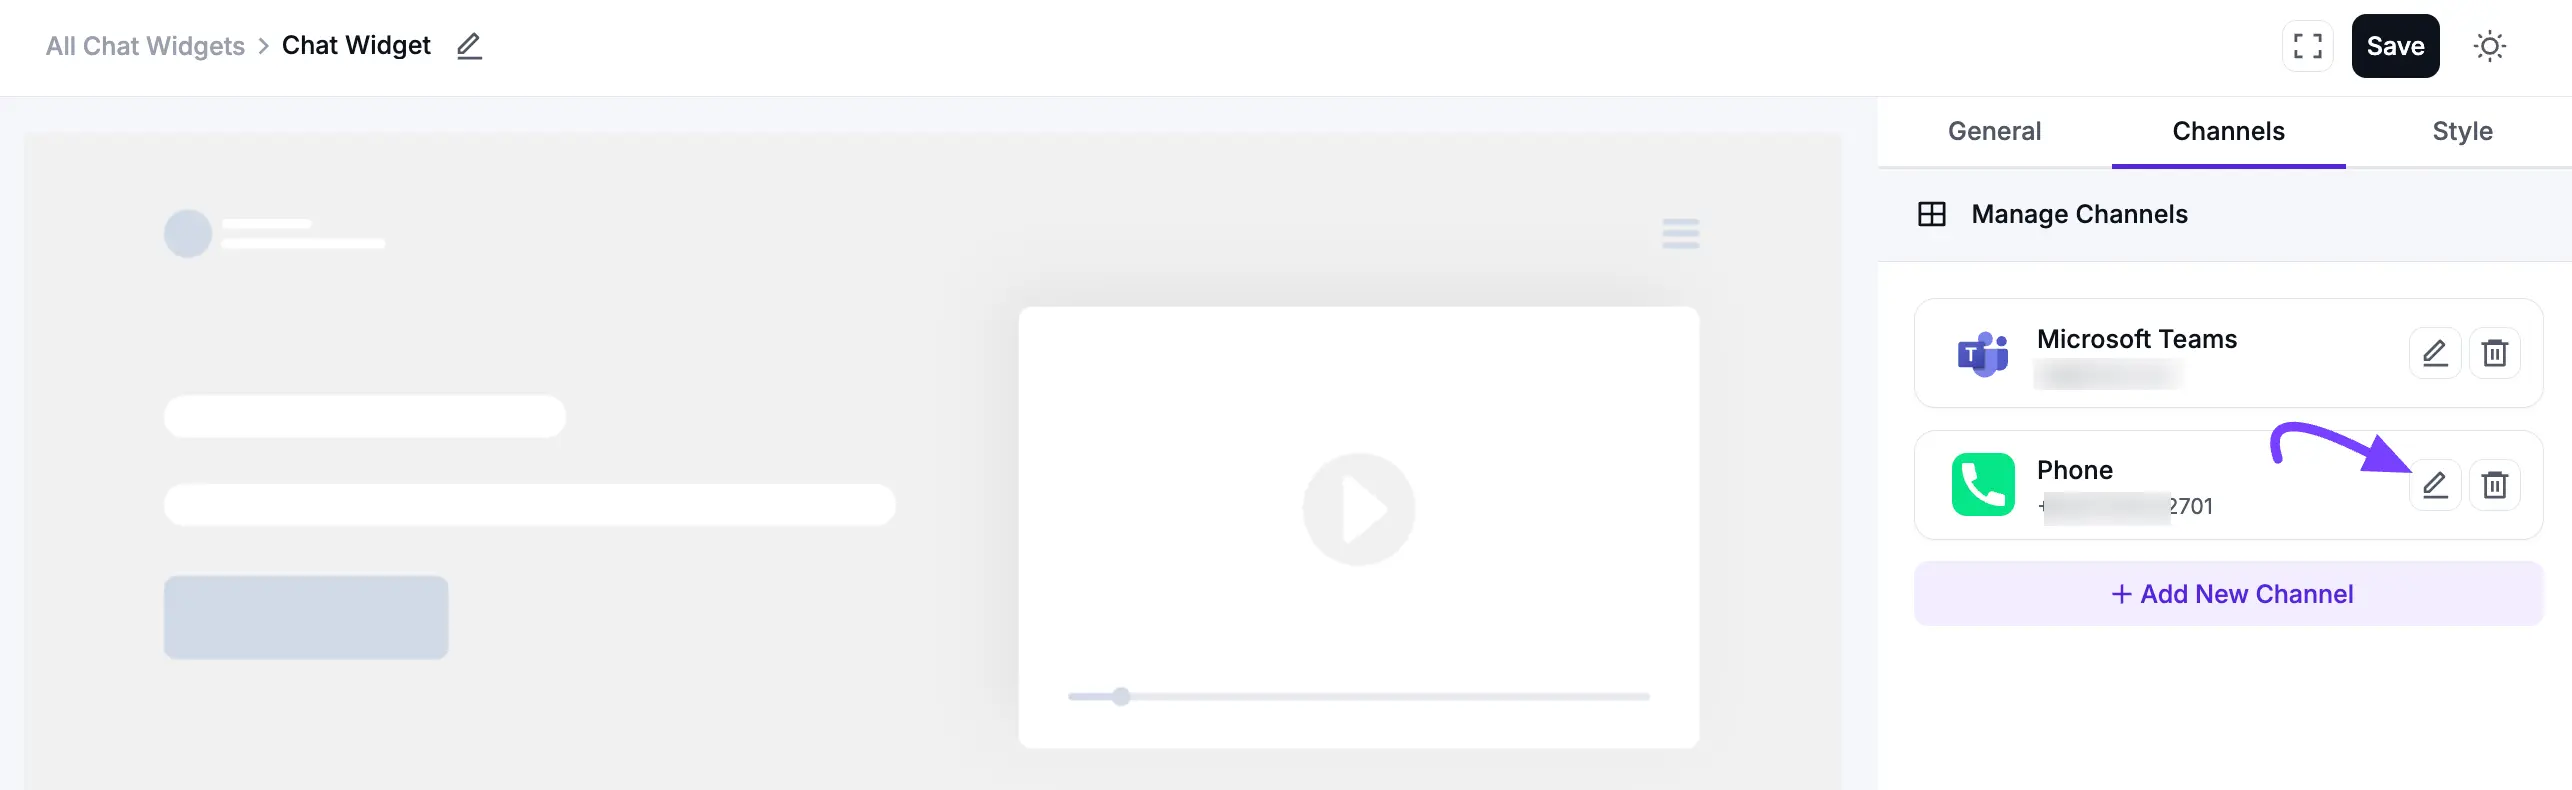
Microsoft Teams Configuration
You can add your Microsoft Teams account to your website to communicate with customers or colleagues. First, click Add New Channel and select the Microsoft Teams icon.
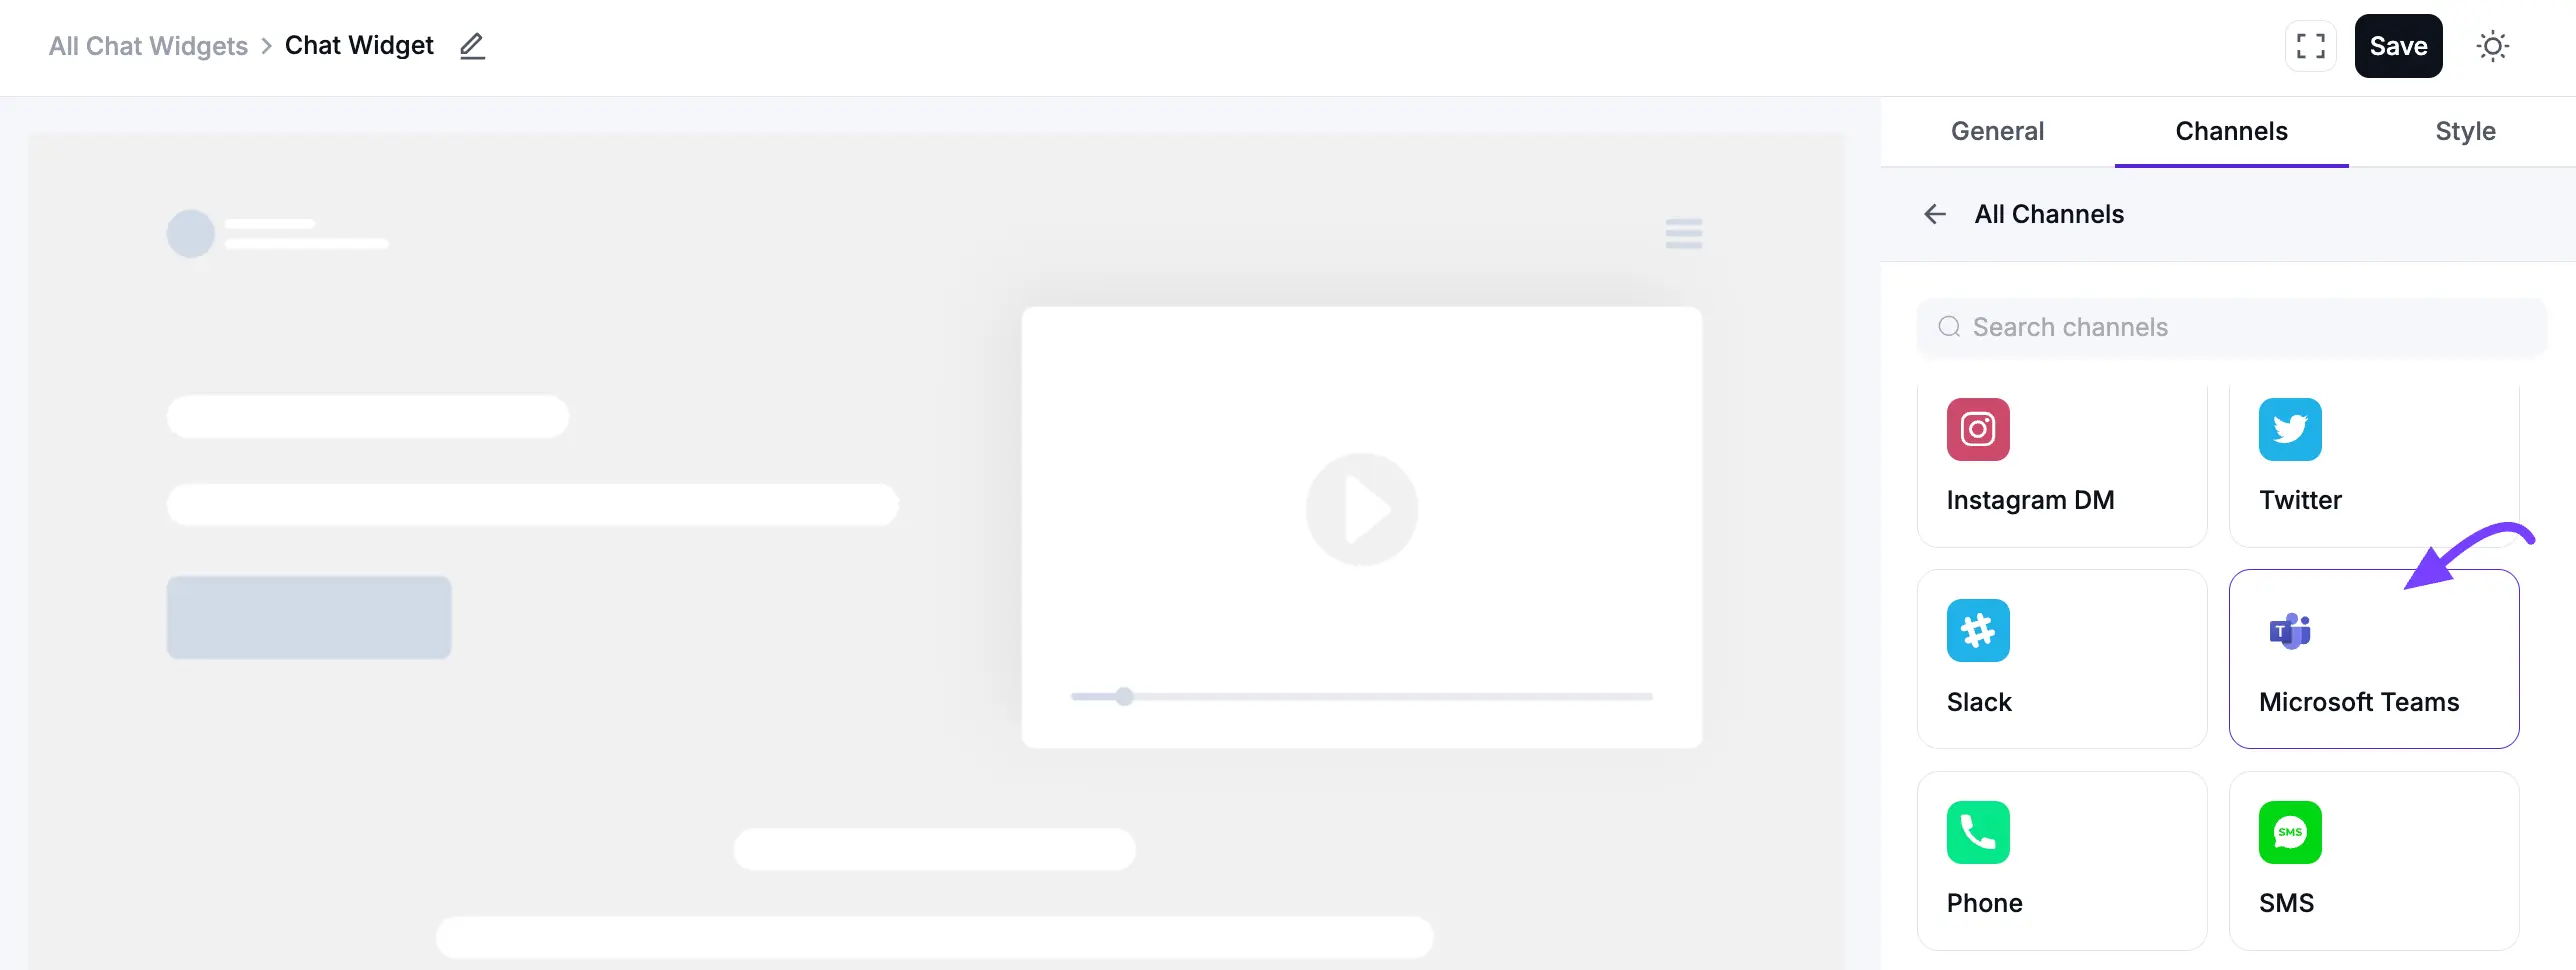
Then, enter your Microsoft Teams URL in the input field. If you want to customize the Label Name, enter your preferred name in the Label field and click Save.
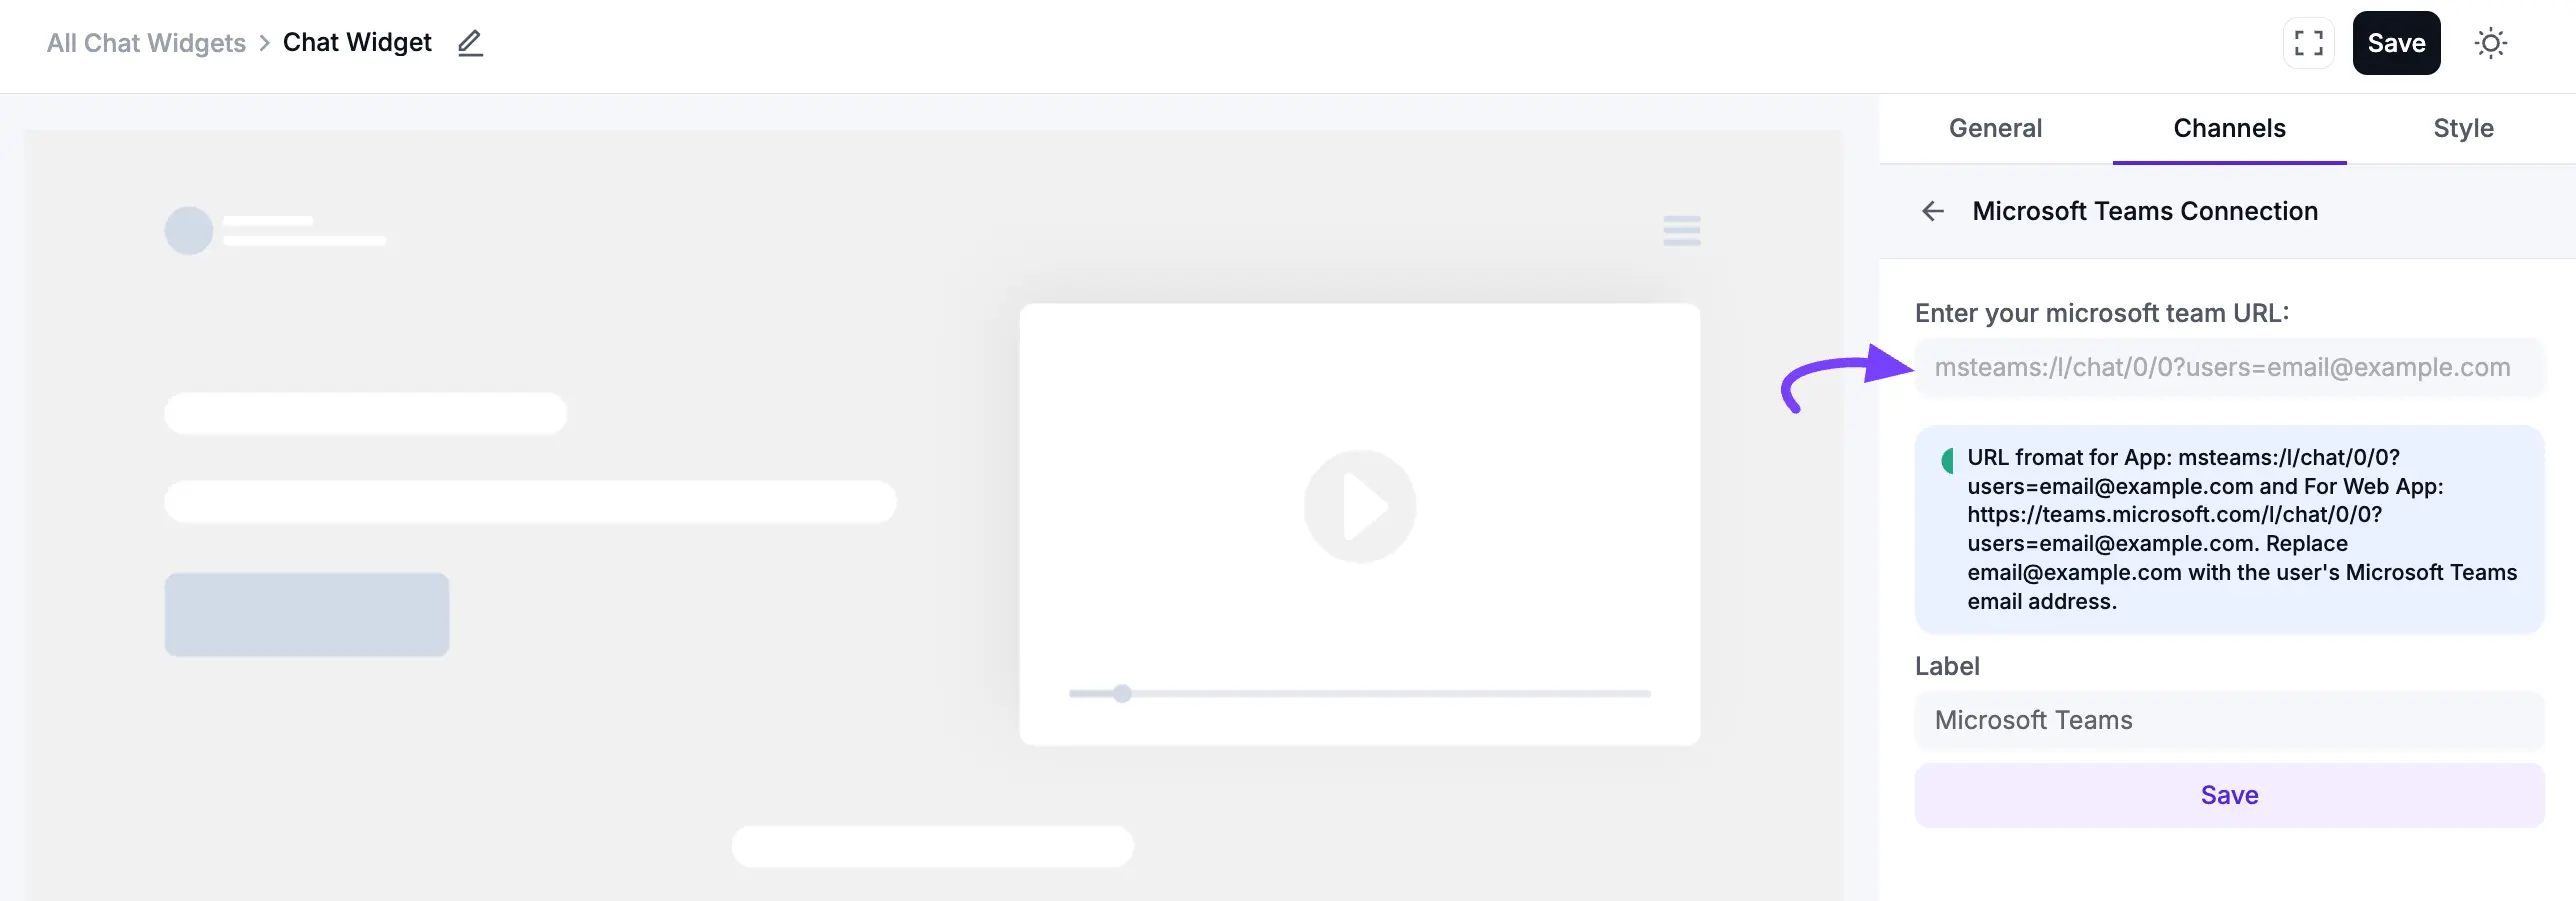
After saving, your Microsoft Teams chat button will appear on the website, allowing visitors to contact you directly. You can edit or delete it at any time by clicking the Edit or Delete icon.
Phone Configuration
Add a direct call button to your chat widget, allowing visitors to call you with a single click. First, click Add New Channel and select the Phone icon.
In the pop-up, enter your Phone number, including your country code. If you want to customize the Label Name, enter your preferred name in the Label field. Then, click on the Save button.
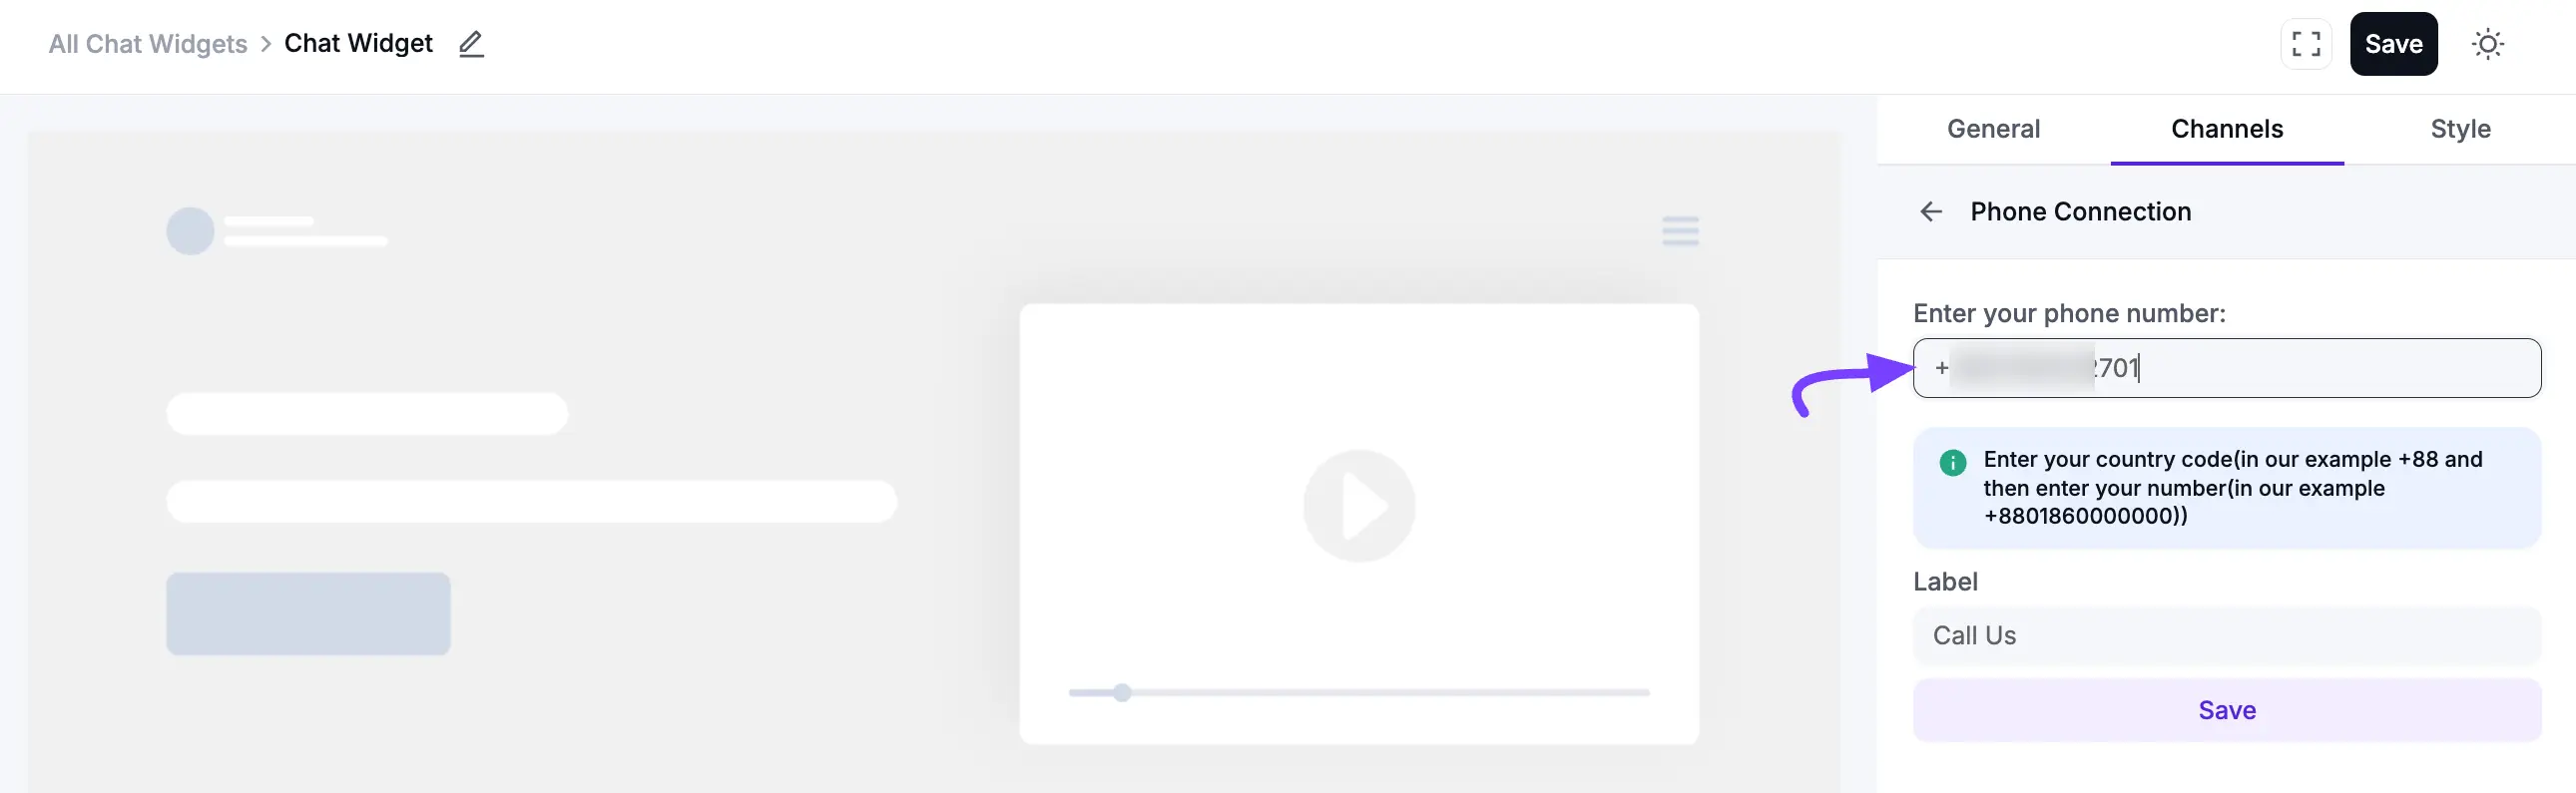
After saving, your Phone icon will appear on the website. When visitors click the icon, it will prompt them to start a phone call with you. You can edit or delete it at any time by clicking the Edit or Delete icon.
SMS (Pro) Configuration
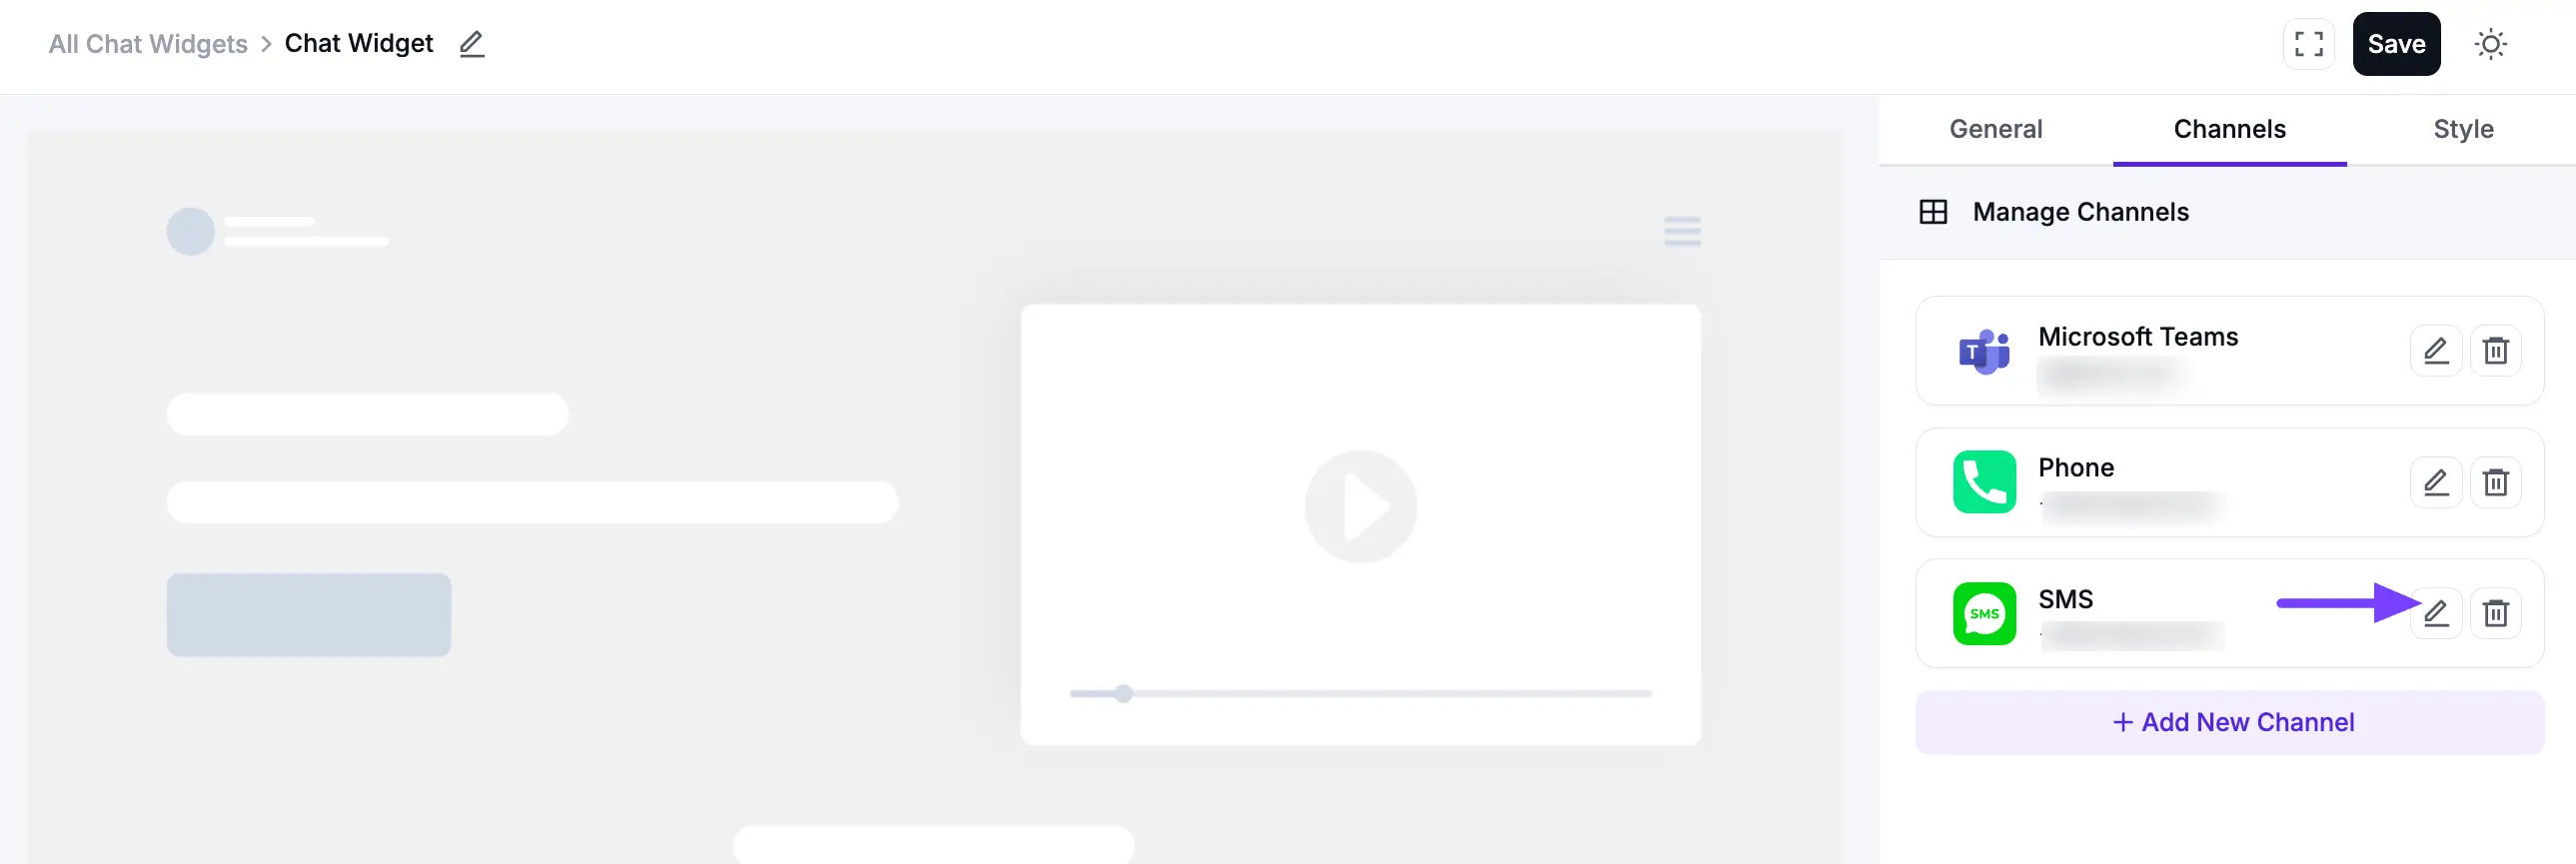
You can add an SMS chat widget to your site, allowing customers to send you a text message directly. To do this, click the Add New Channel button and select the SMS icon.
In the pop-up, enter the phone number where you want to receive messages, including your country code. If you want to customize the Label Name, enter your preferred name in the Label field. Then, click on the Save button.
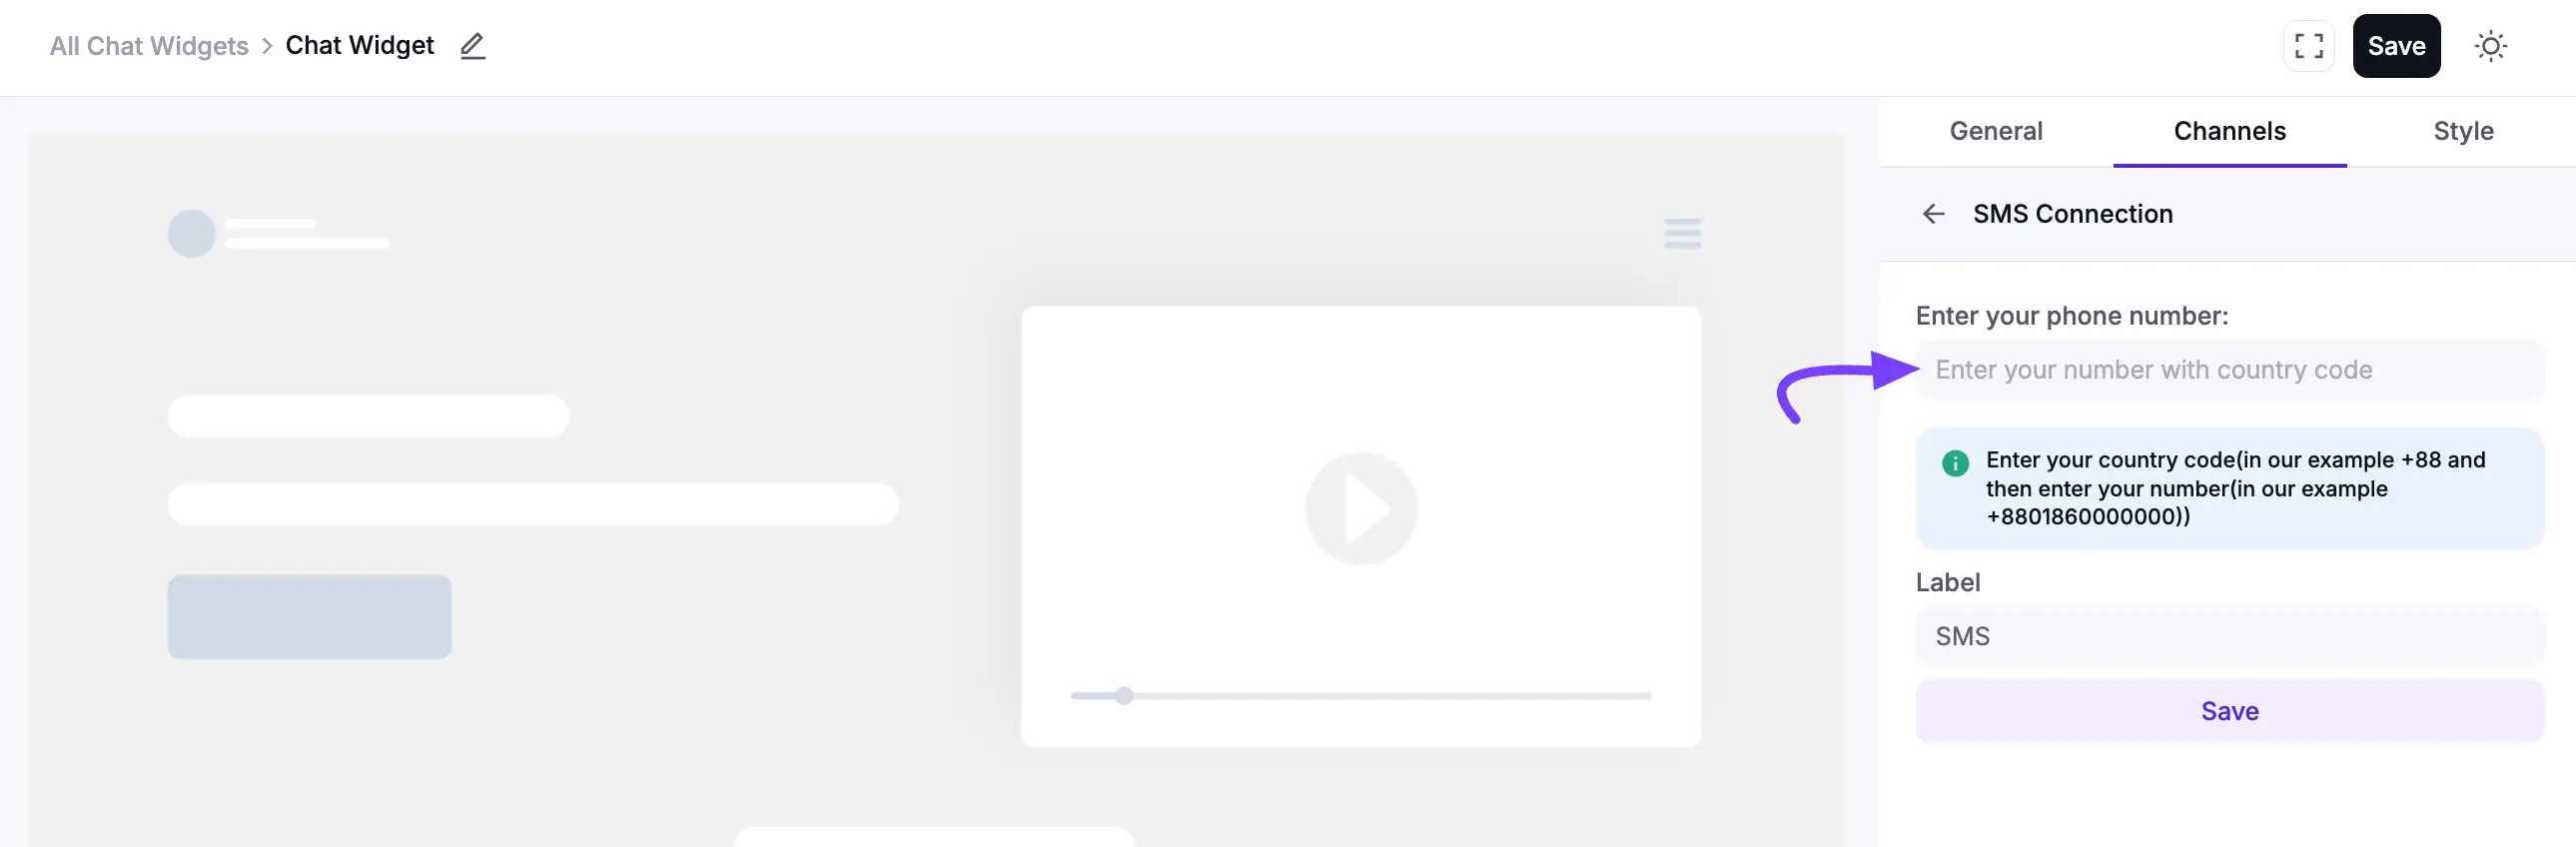
Once connected, an SMS icon will appear on your website. When visitors click the icon, it will open their phone's default messaging app, ready to send you a text. You can edit or delete it at any time by clicking the Edit or Delete icon.
Email Configuration
Add an Email channel to let visitors quickly send you a message directly to your inbox. First, click Add New Channel and select the Email icon.
Then, enter your Email Address in the input field. If you want to customize the Label Name, enter your preferred name in the Label field and click Save.
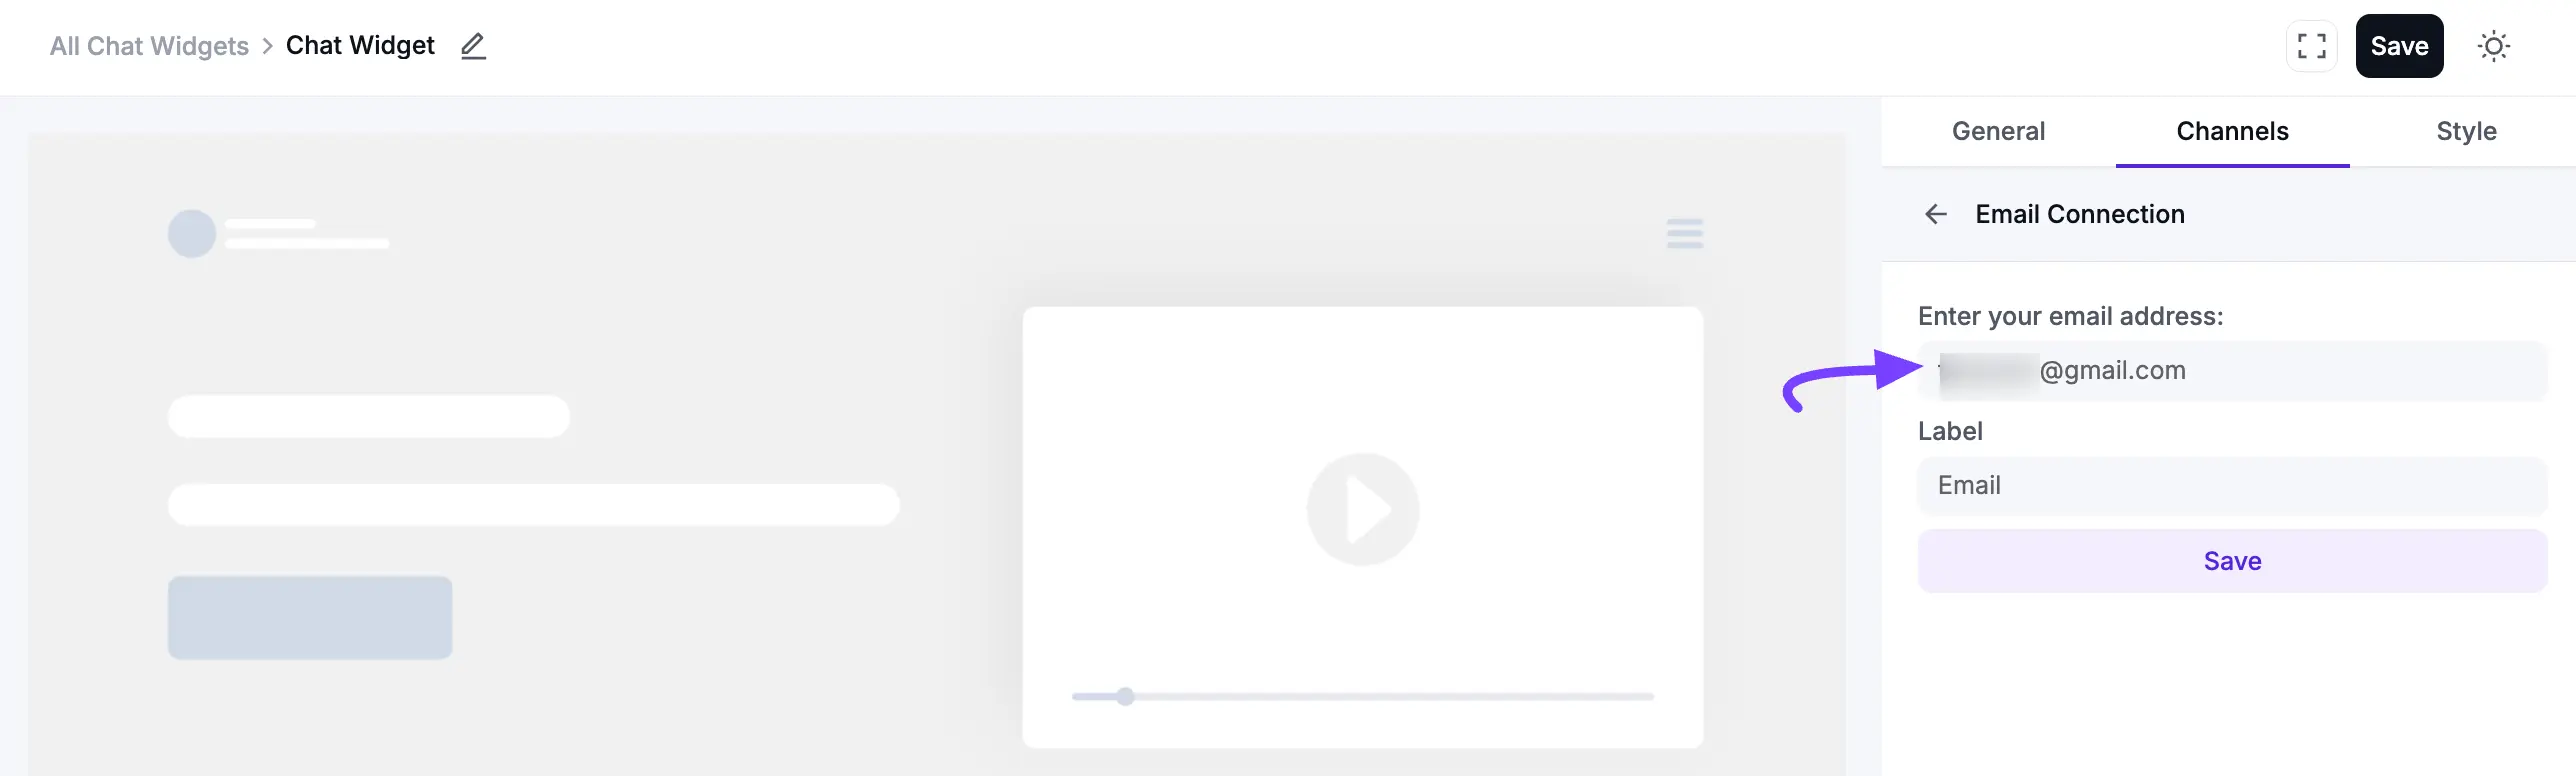
After saving, your Email chat button will appear on the website. When clicked, it will open the visitor's default email client with your email address pre-filled. You can edit or delete it at any time by clicking the Edit or Delete icon.
WeChat Configuration
If you want to communicate through WeChat, you can easily add it to your chat widget. First, click Add New Channel and select the WeChat icon.
Then, enter your WeChat User ID in the input field. If you want to customize the Label Name, enter your preferred name in the Label field and click Save.
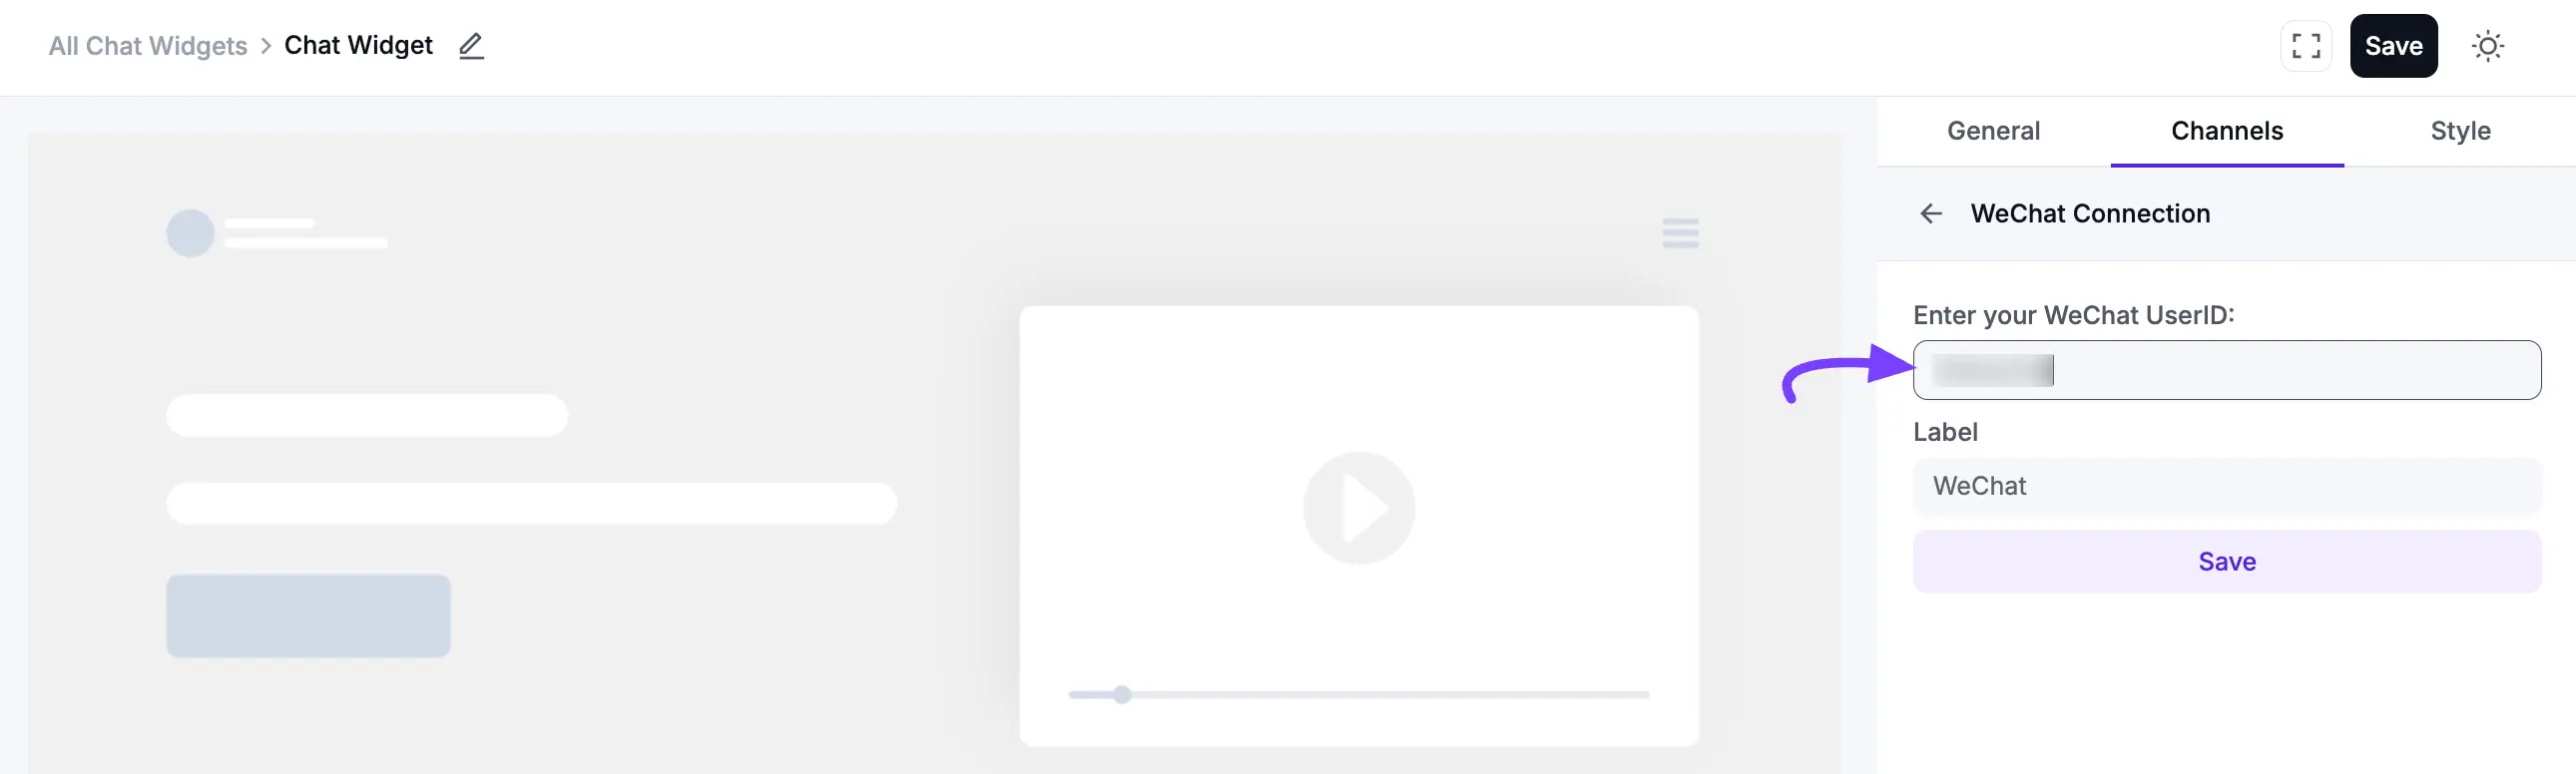
After saving, your WeChat chat button will appear on the website, allowing visitors to contact you directly through the WeChat app. You can edit or delete it at any time by clicking the Edit or Delete icon.
Line Configuration
If you want to communicate through Line, you can easily add it to your chat widget. First, click Add New Channel and select the Line icon.

Then, enter your Line ID or Link in the input field. If you want to customize the Label Name, enter your preferred name in the Label field and click Save.
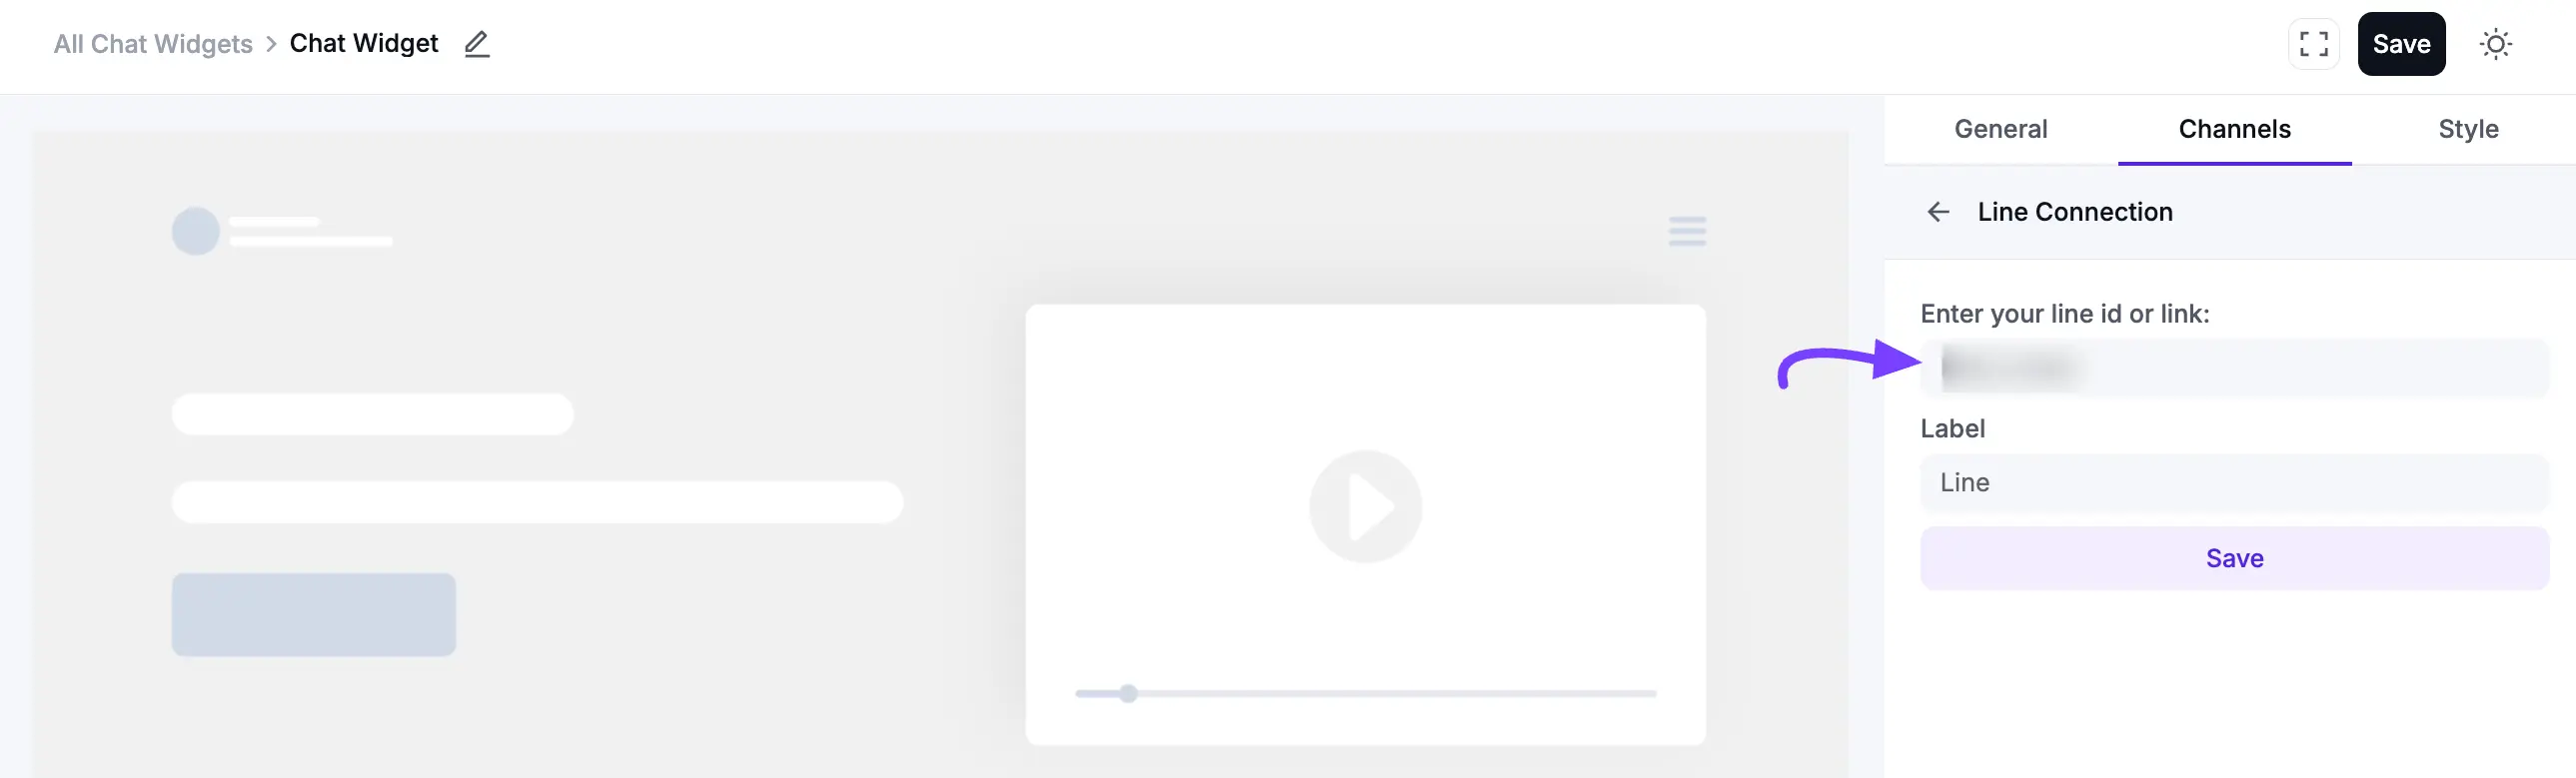
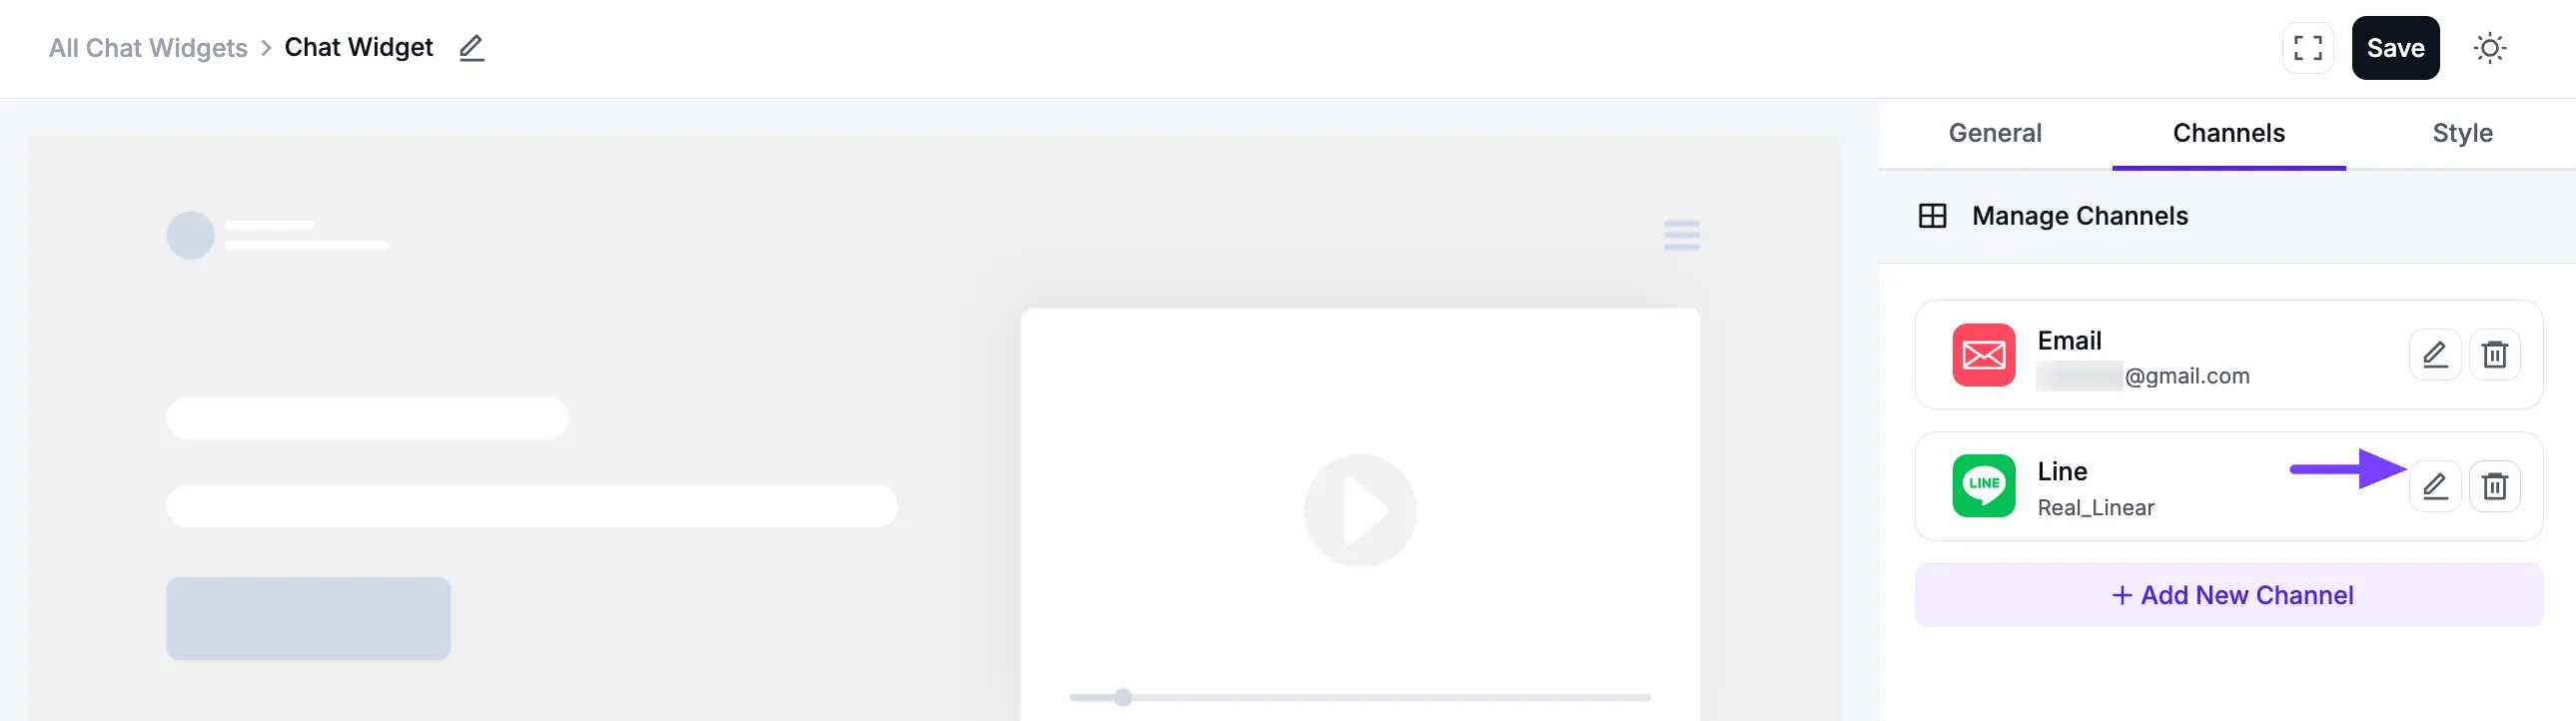
After saving, your Line chat button will appear on the website, allowing visitors to contact you directly through the Line app. You can edit or delete it at any time by clicking the Edit or Delete icon.
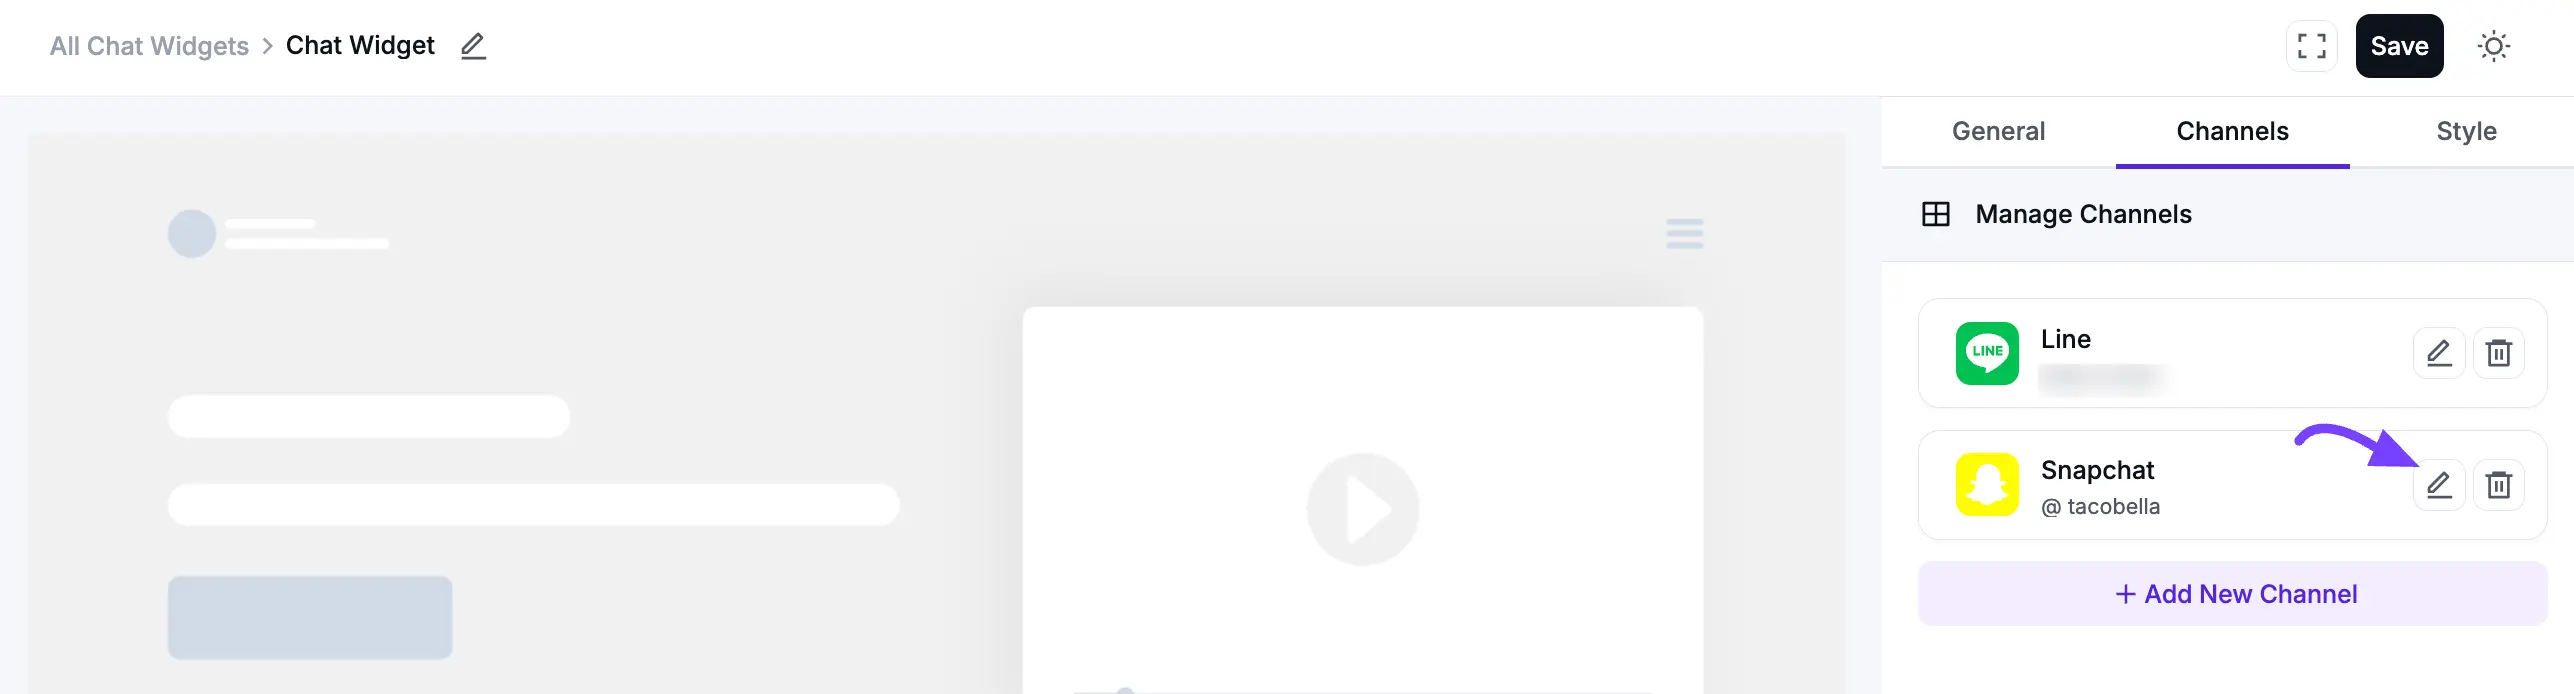
Snapchat Configuration
Connect your Snapchat account to let visitors add you or send you a message directly from the chat widget. First, click Add New Channel and select the Snapchat icon.
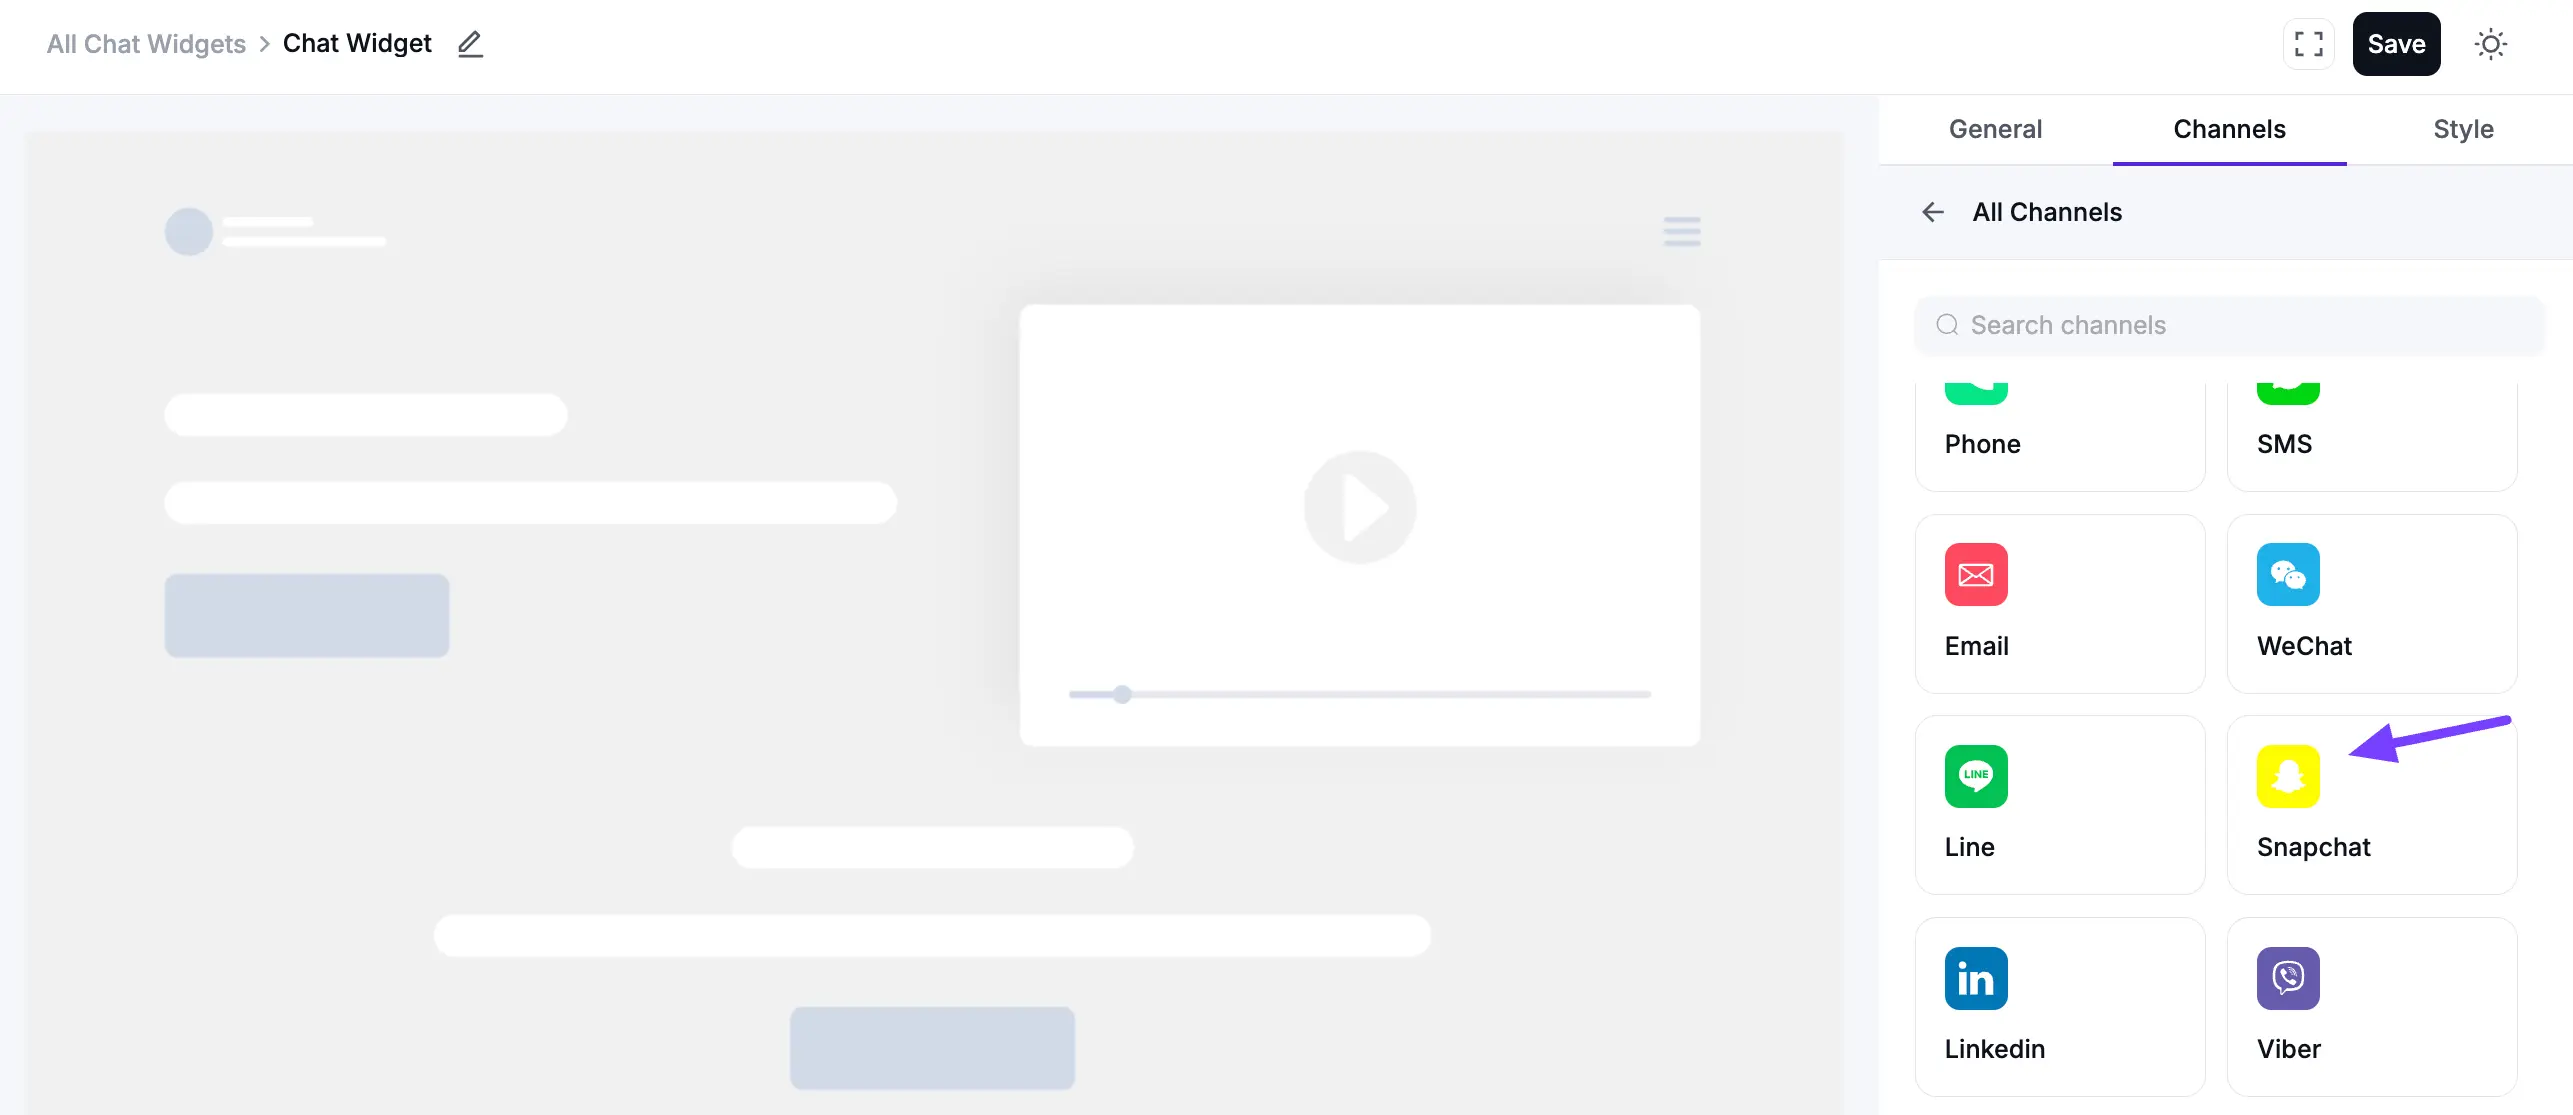
Then, enter your Snapchat Username in the input field. If you want to customize the Label Name, enter your preferred name in the Label field and click Save.

After saving, your Snapchat chat button will appear on the website, allowing visitors to connect with you on Snapchat. You can edit or delete it at any-time by clicking the Edit or Delete icon.
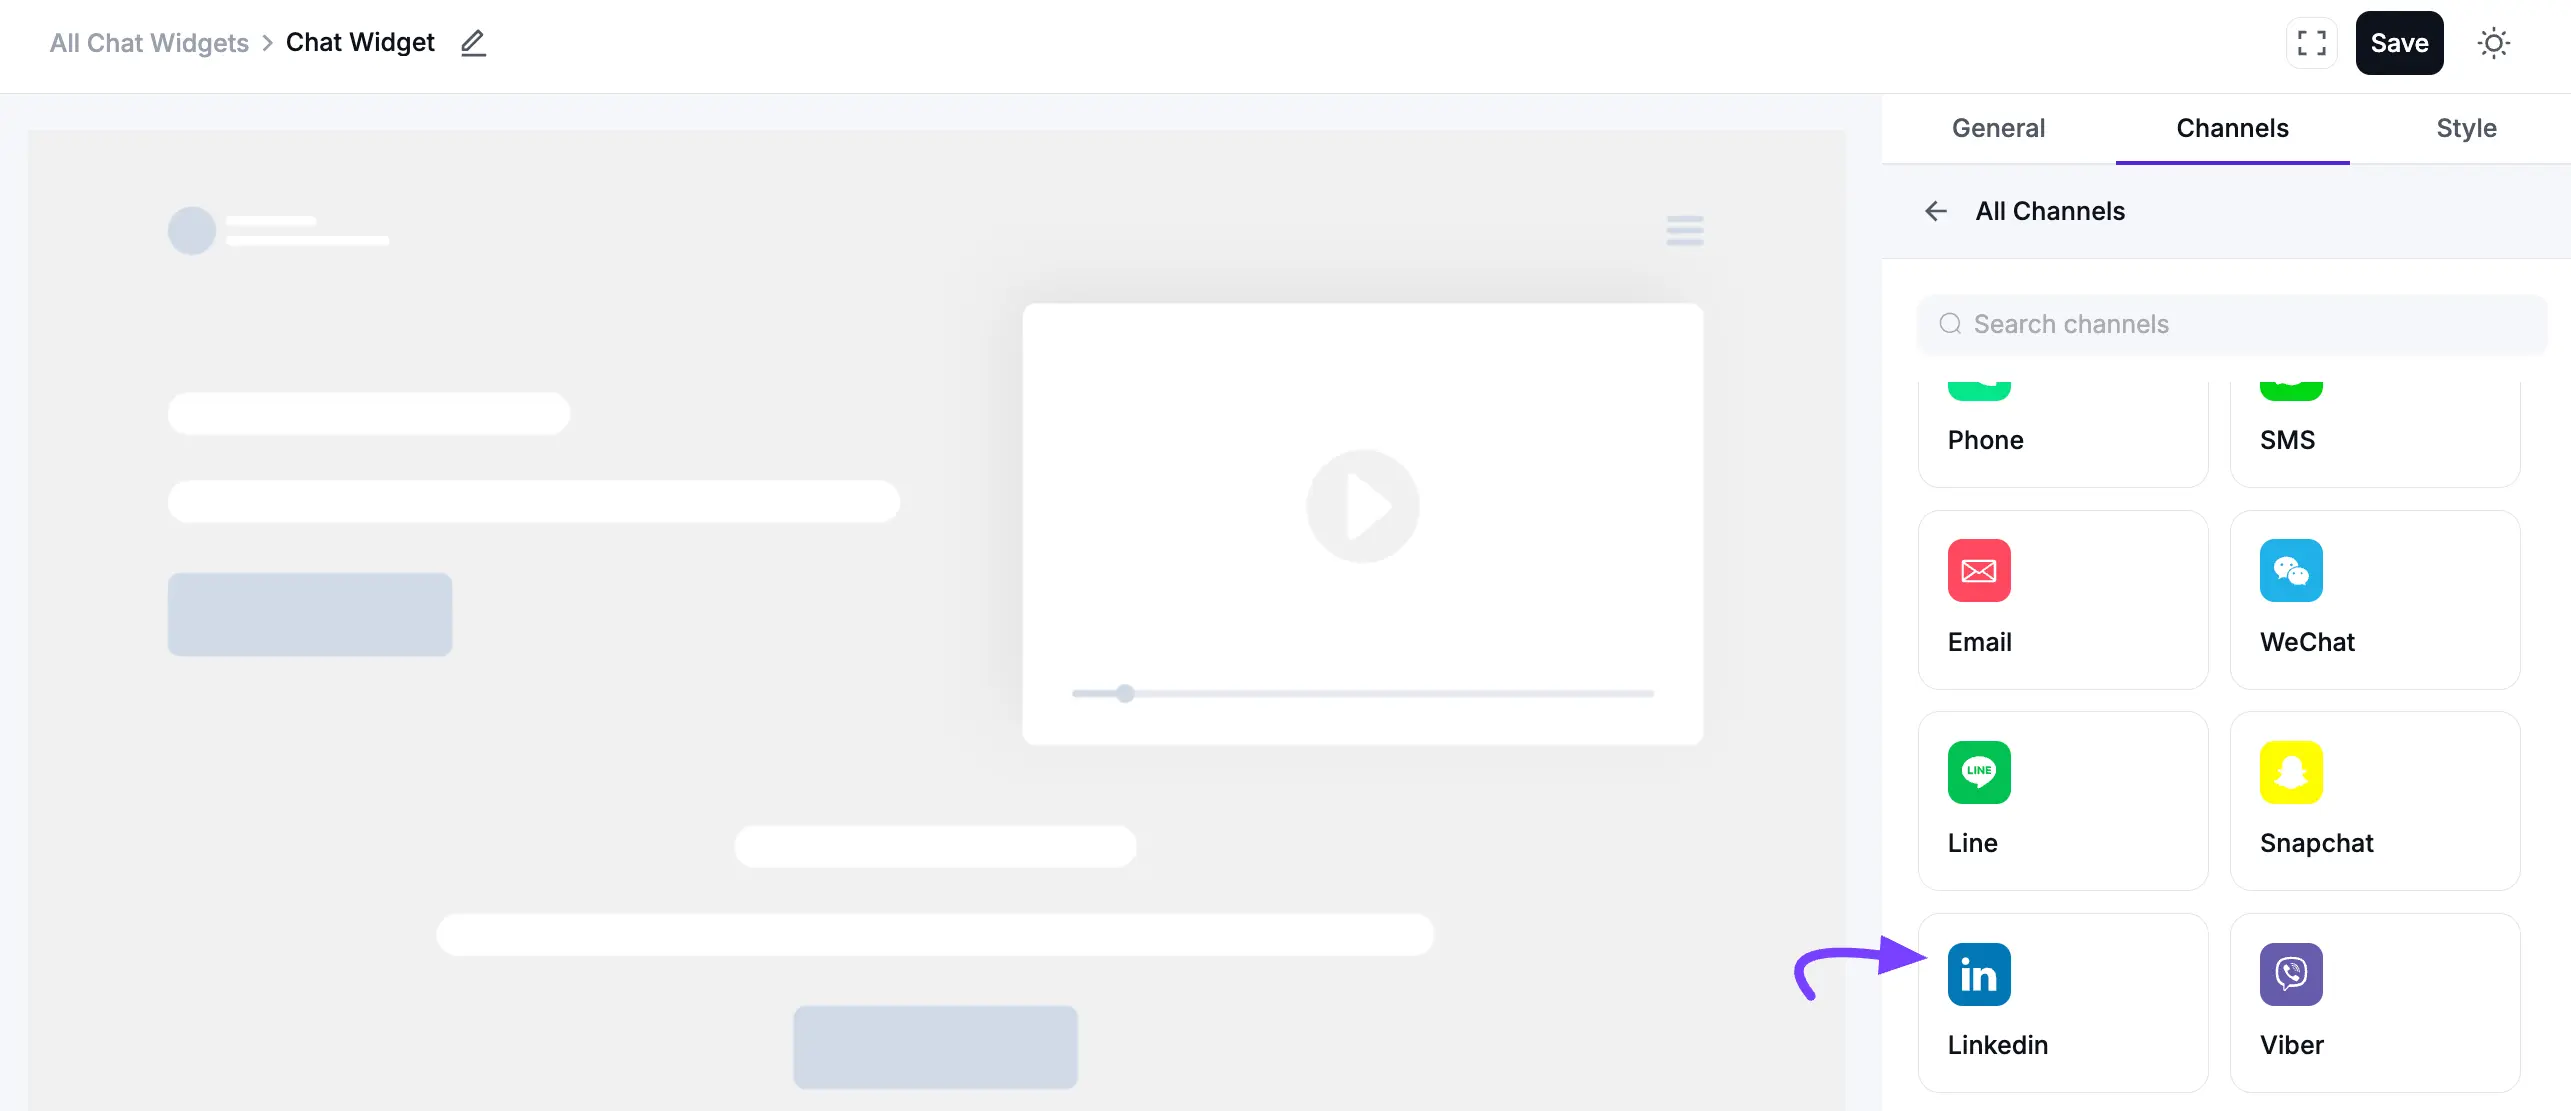
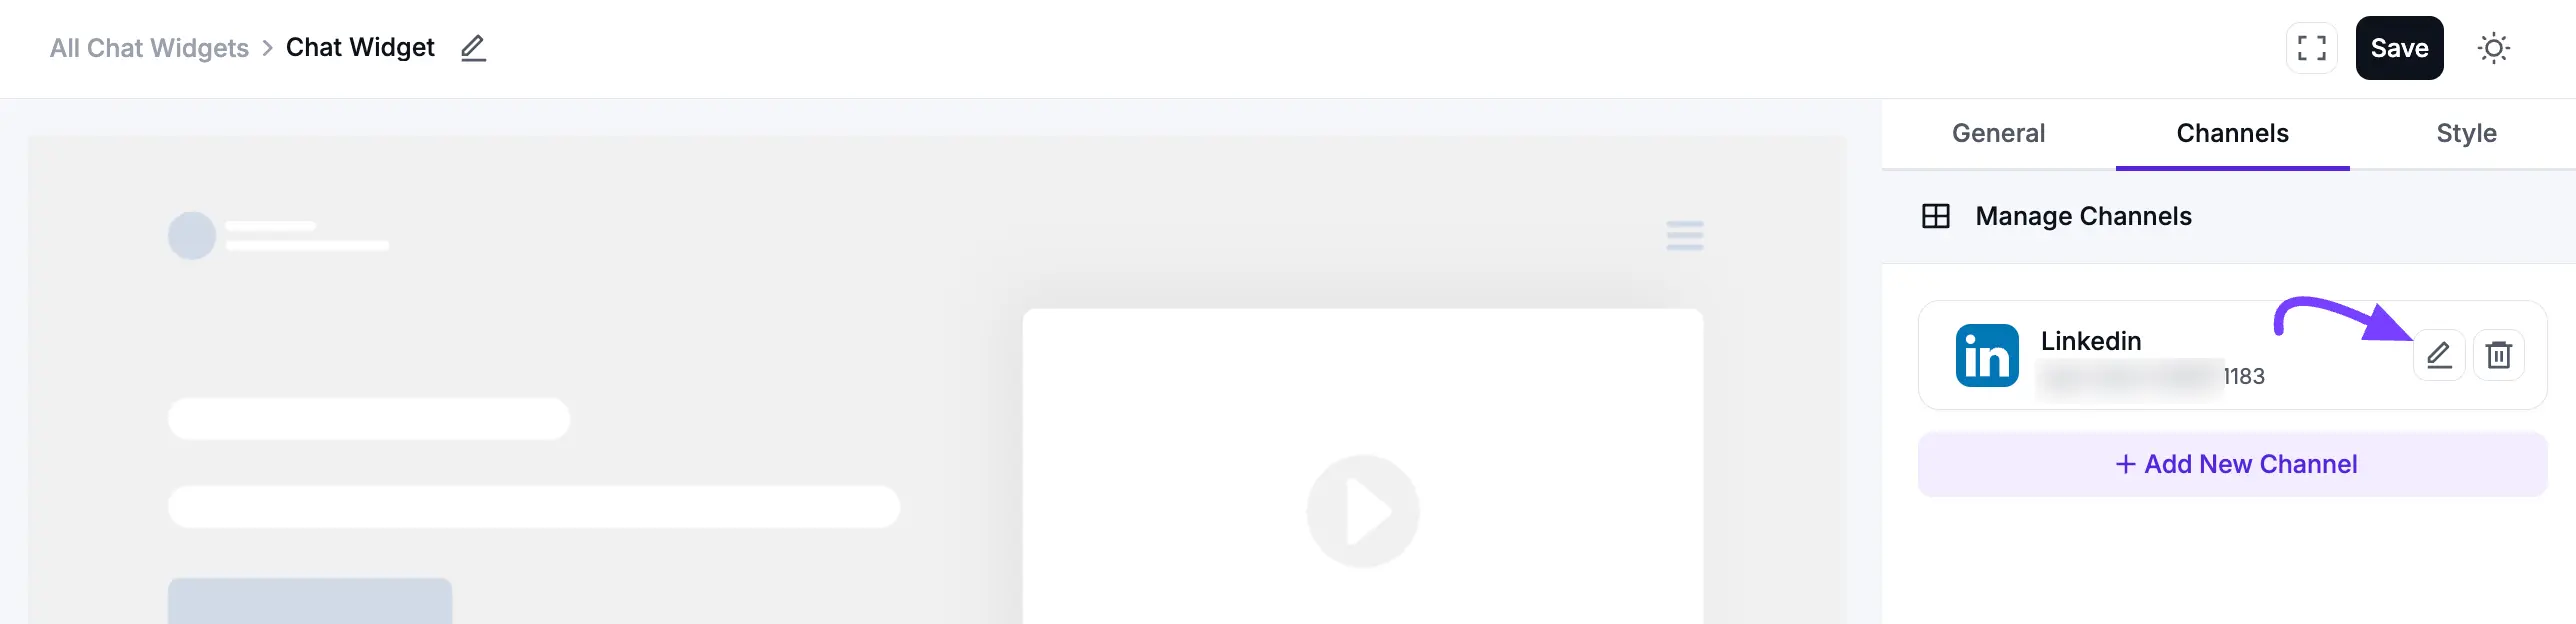
LinkedIn Configuration
To configure LinkedIn, you can easily add it to your chat widget to help build your professional network. First, click Add New Channel and select the LinkedIn icon.
Then, enter your LinkedIn username or Profile Link in the input field. If you want to customize the Label Name, enter your preferred name in the Label field and click Save.
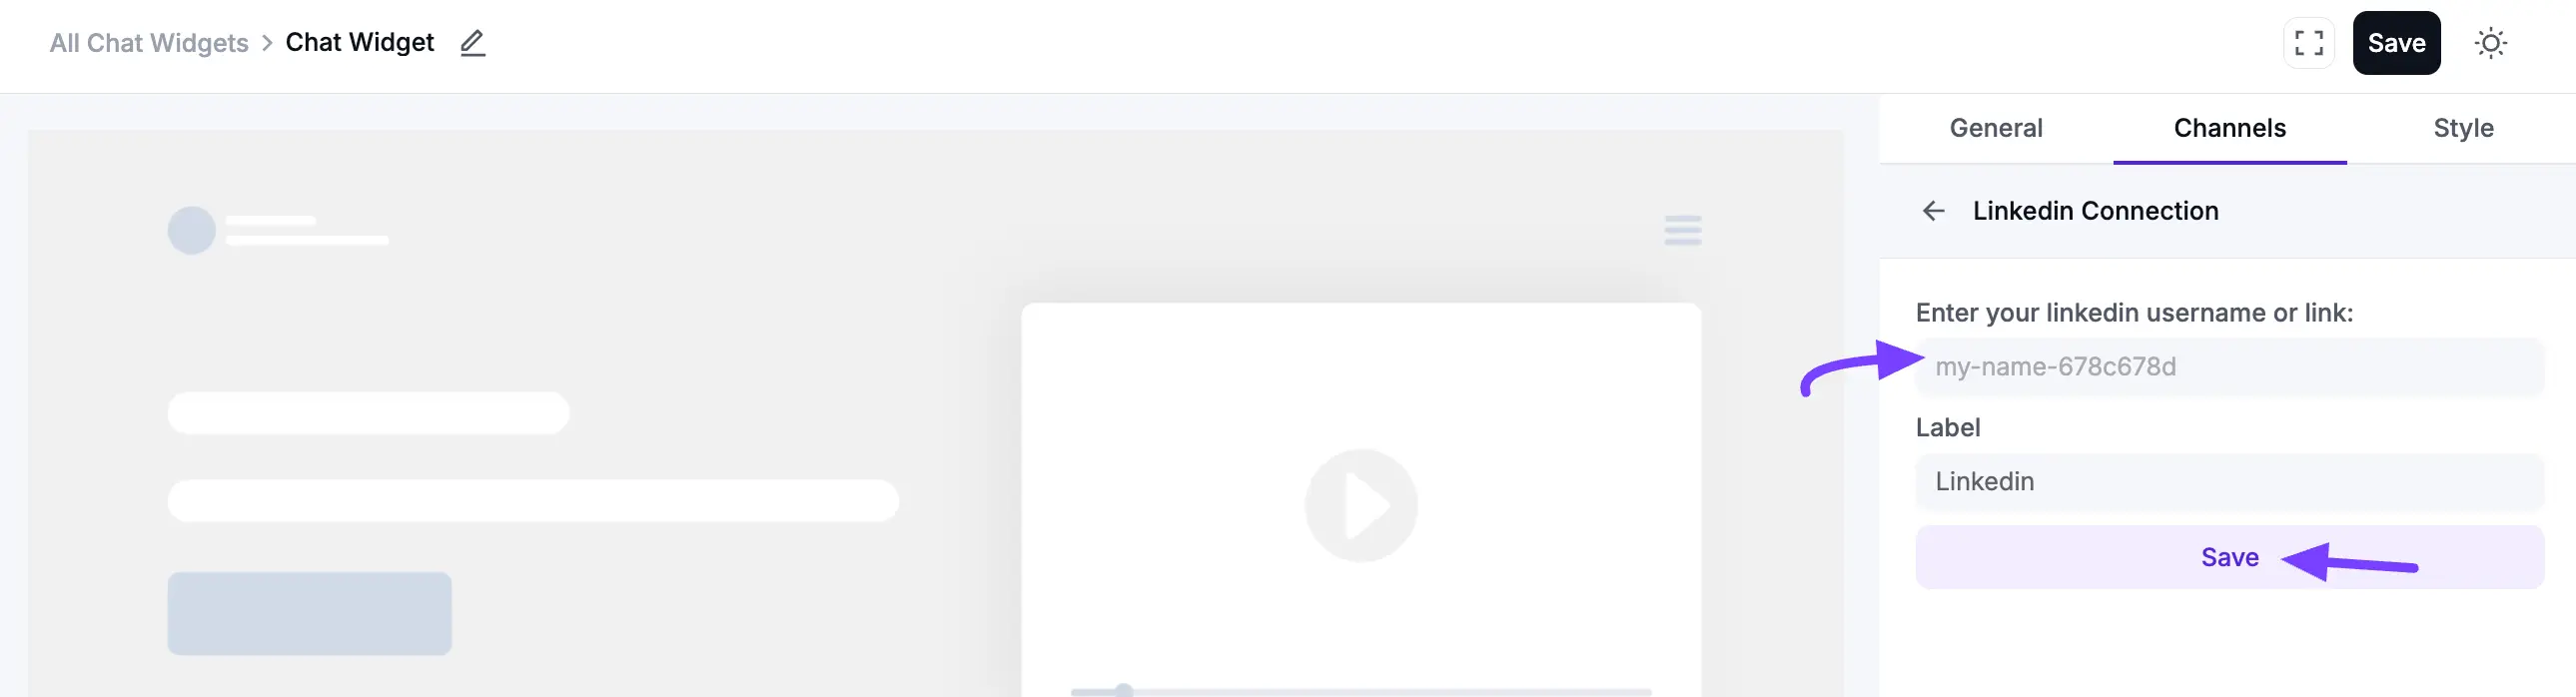
After saving, your LinkedIn chat button will appear on the website, allowing visitors to view your profile and connect. You can edit or delete it at any time by clicking the Edit or Delete icon.
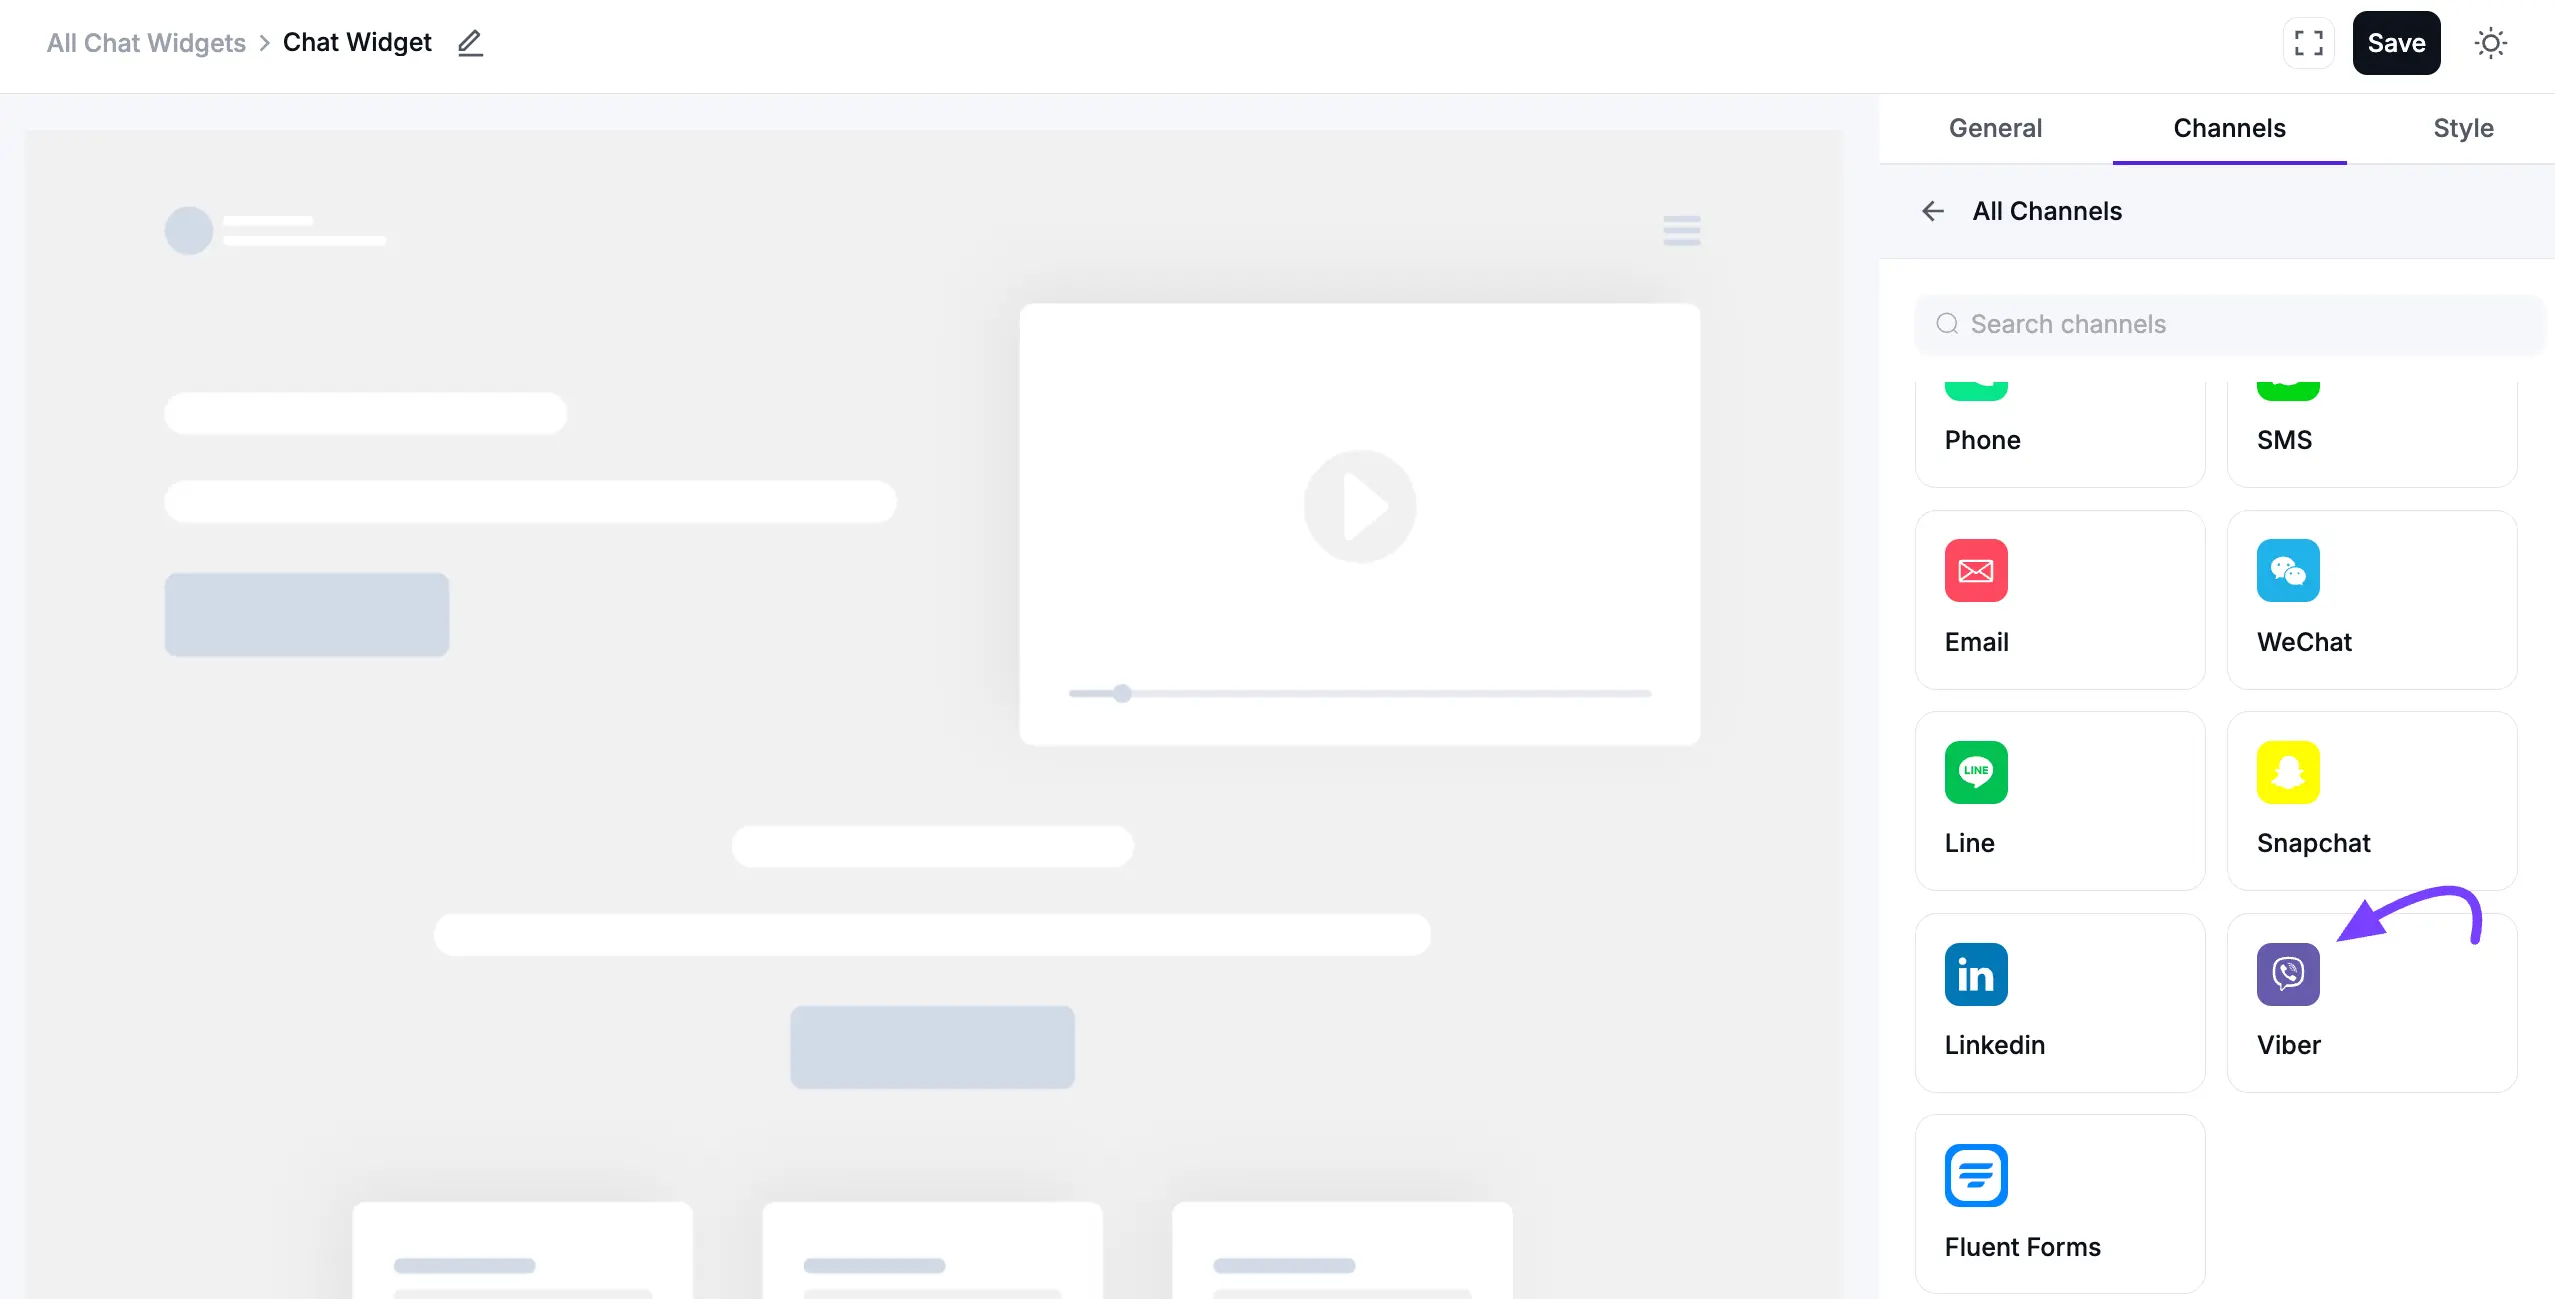
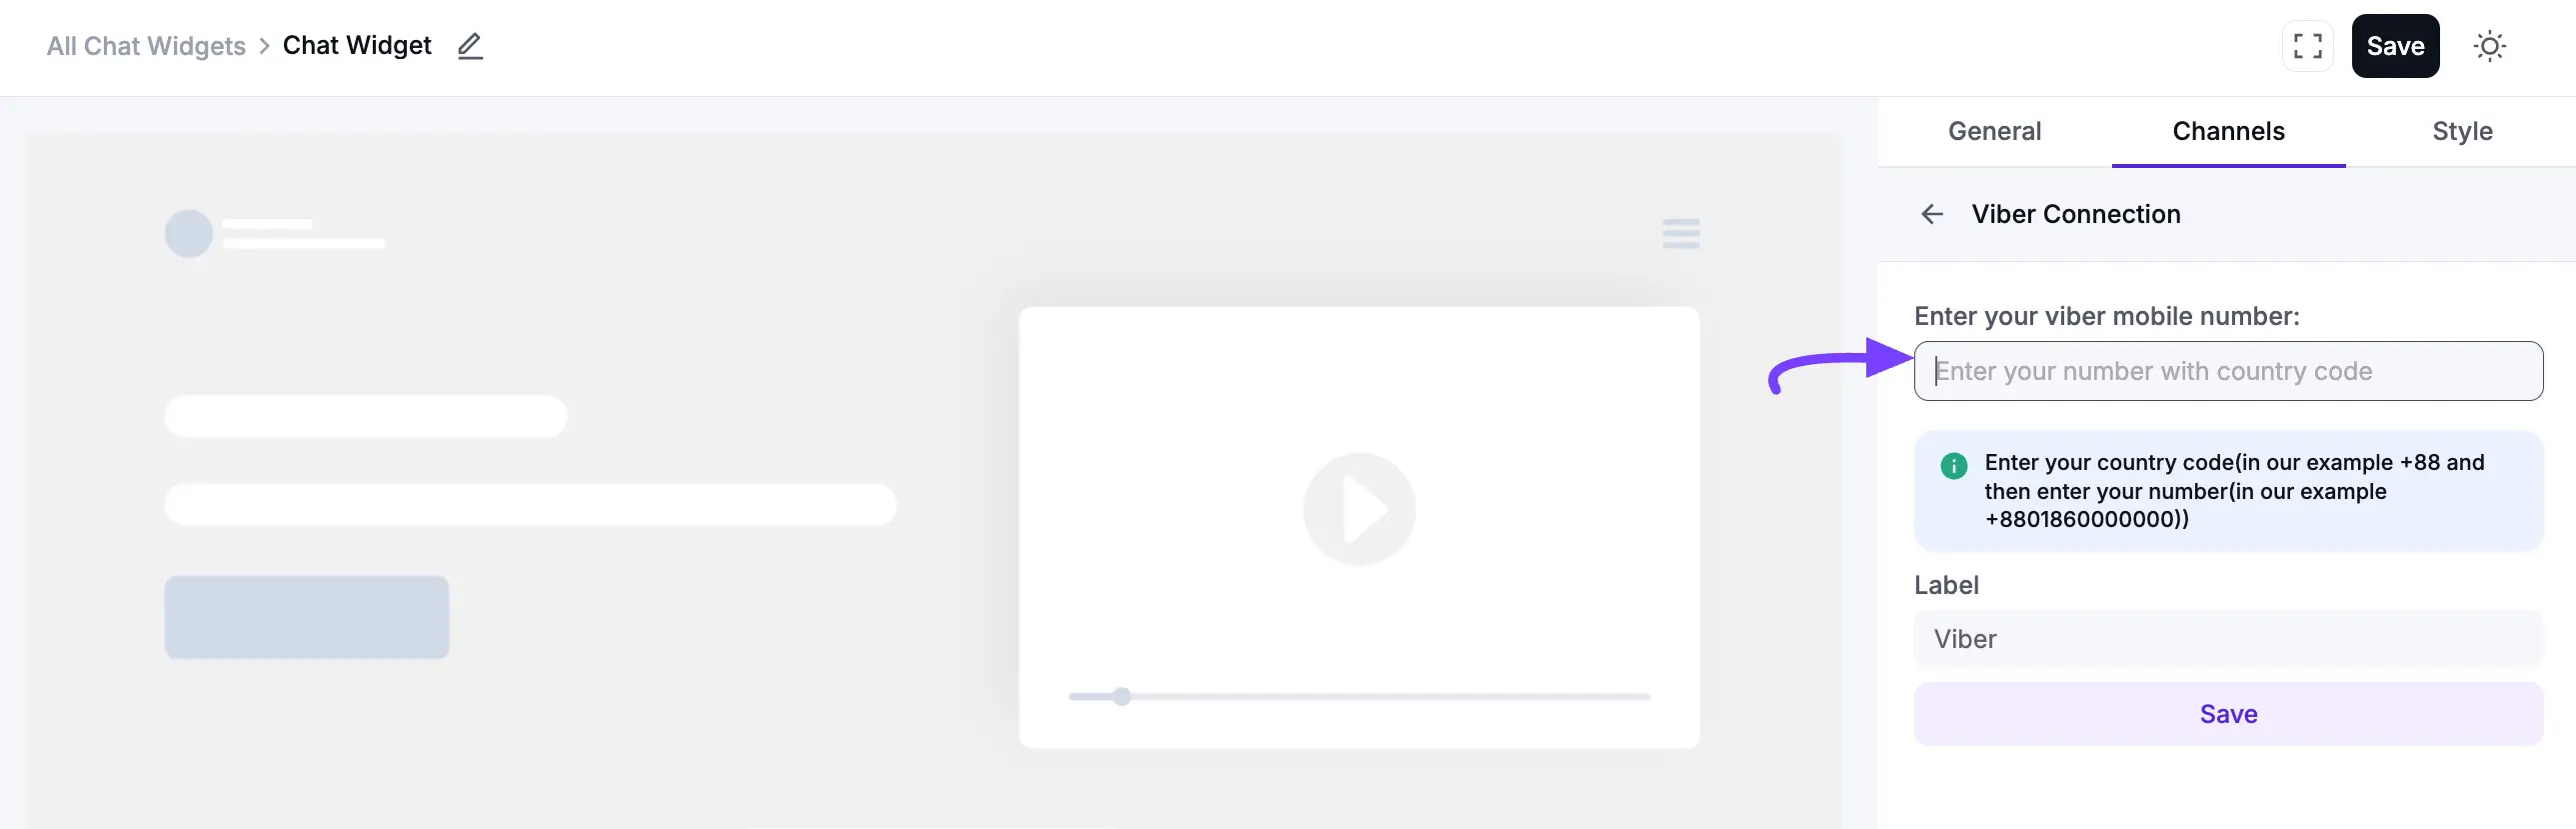
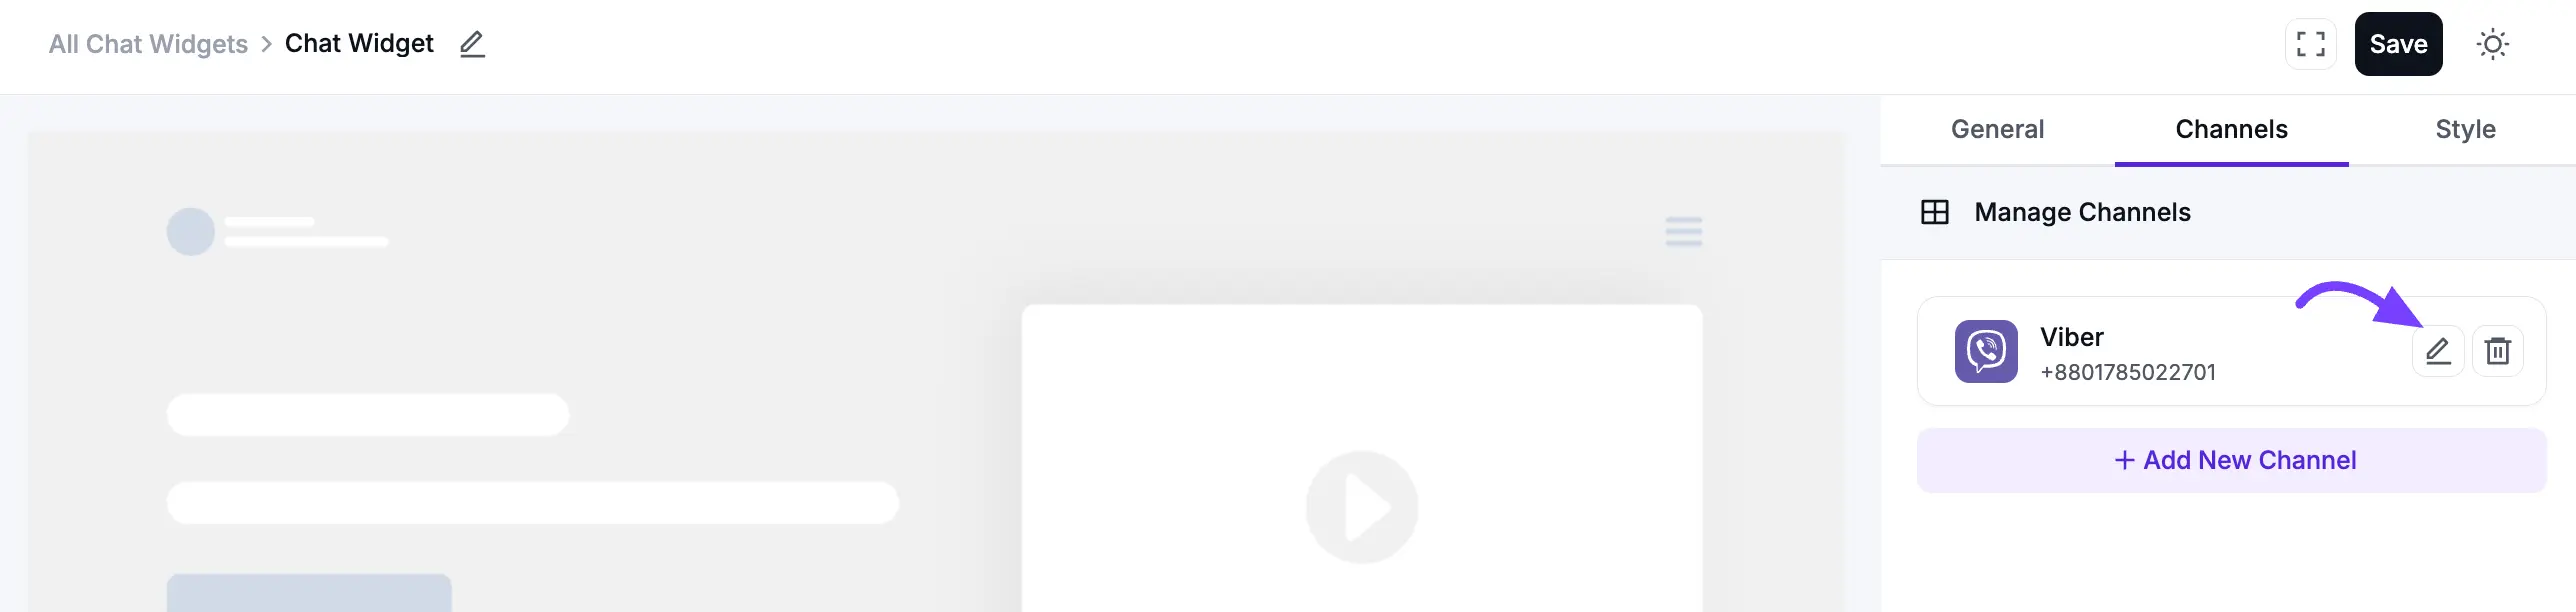
Viber Configuration
You can add your Viber chat easily, helping your business reach customers on this platform. To do this, click the Add New Channel button and select the Viber icon.
In the pop-up, enter your Viber mobile number, including your country code. If you want to customize the Label Name, enter your preferred name in the Label field. Then, click on the Save button.
Once connected, a Viber icon will appear on your website. When visitors click the icon, they will be redirected straight to a Viber chat with you. You can edit or delete it at any time by clicking the Edit or Delete icon.
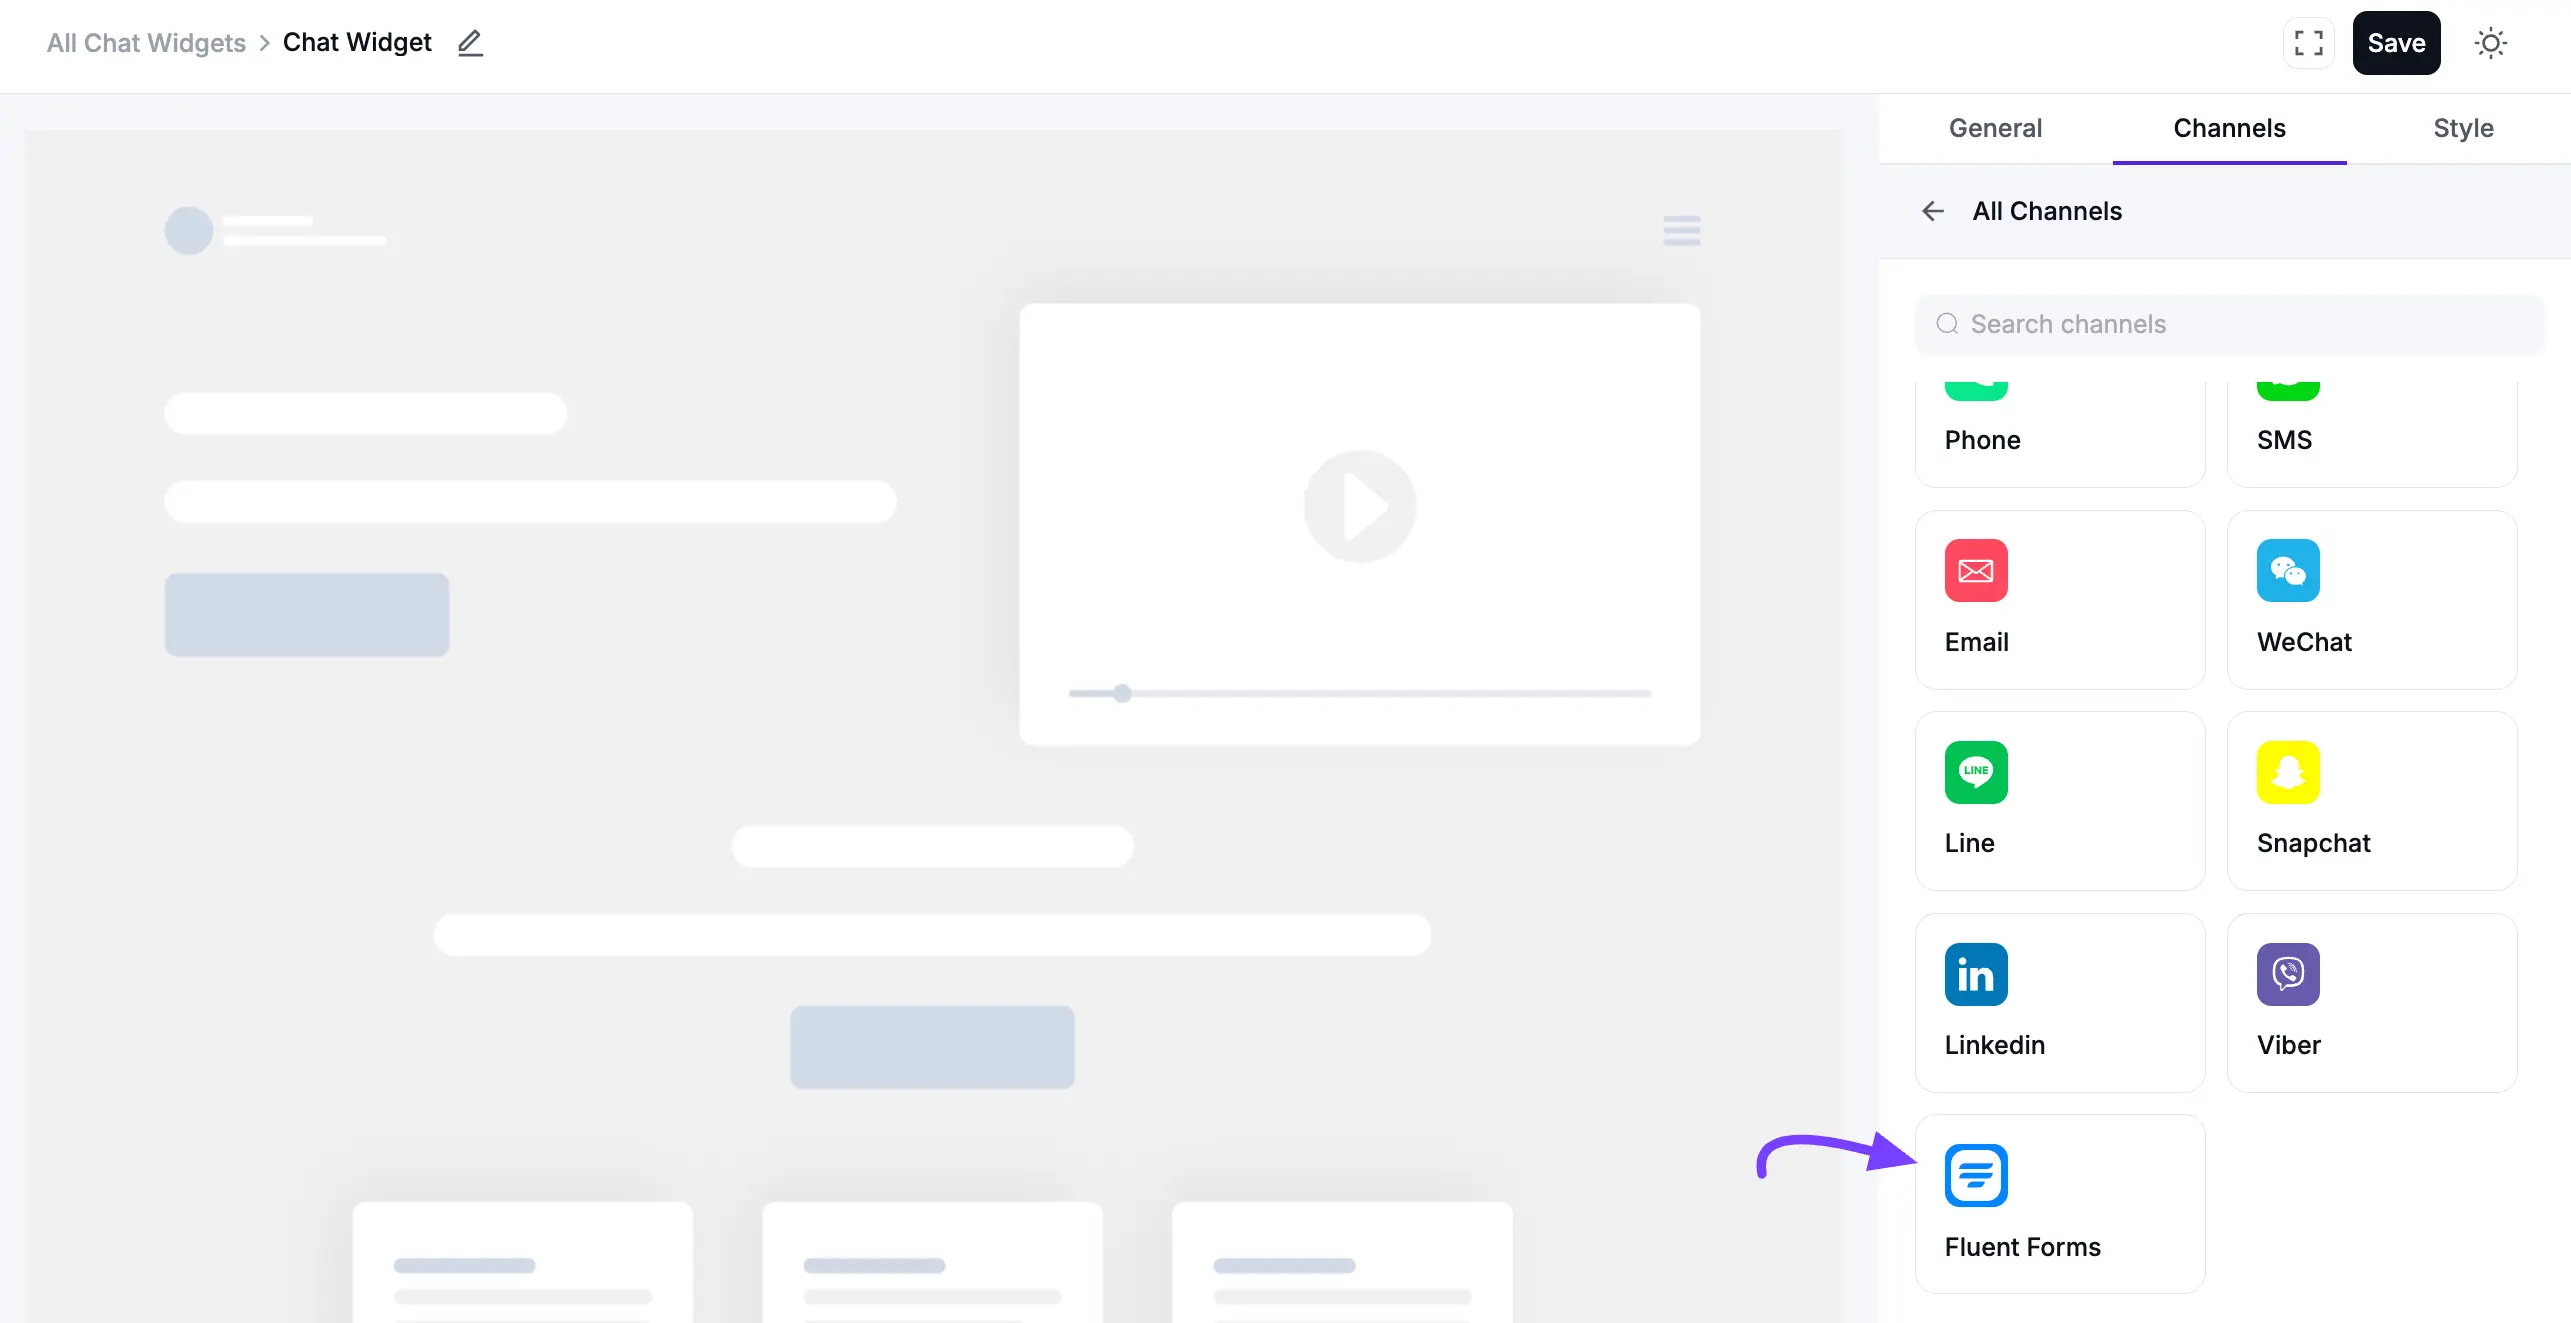
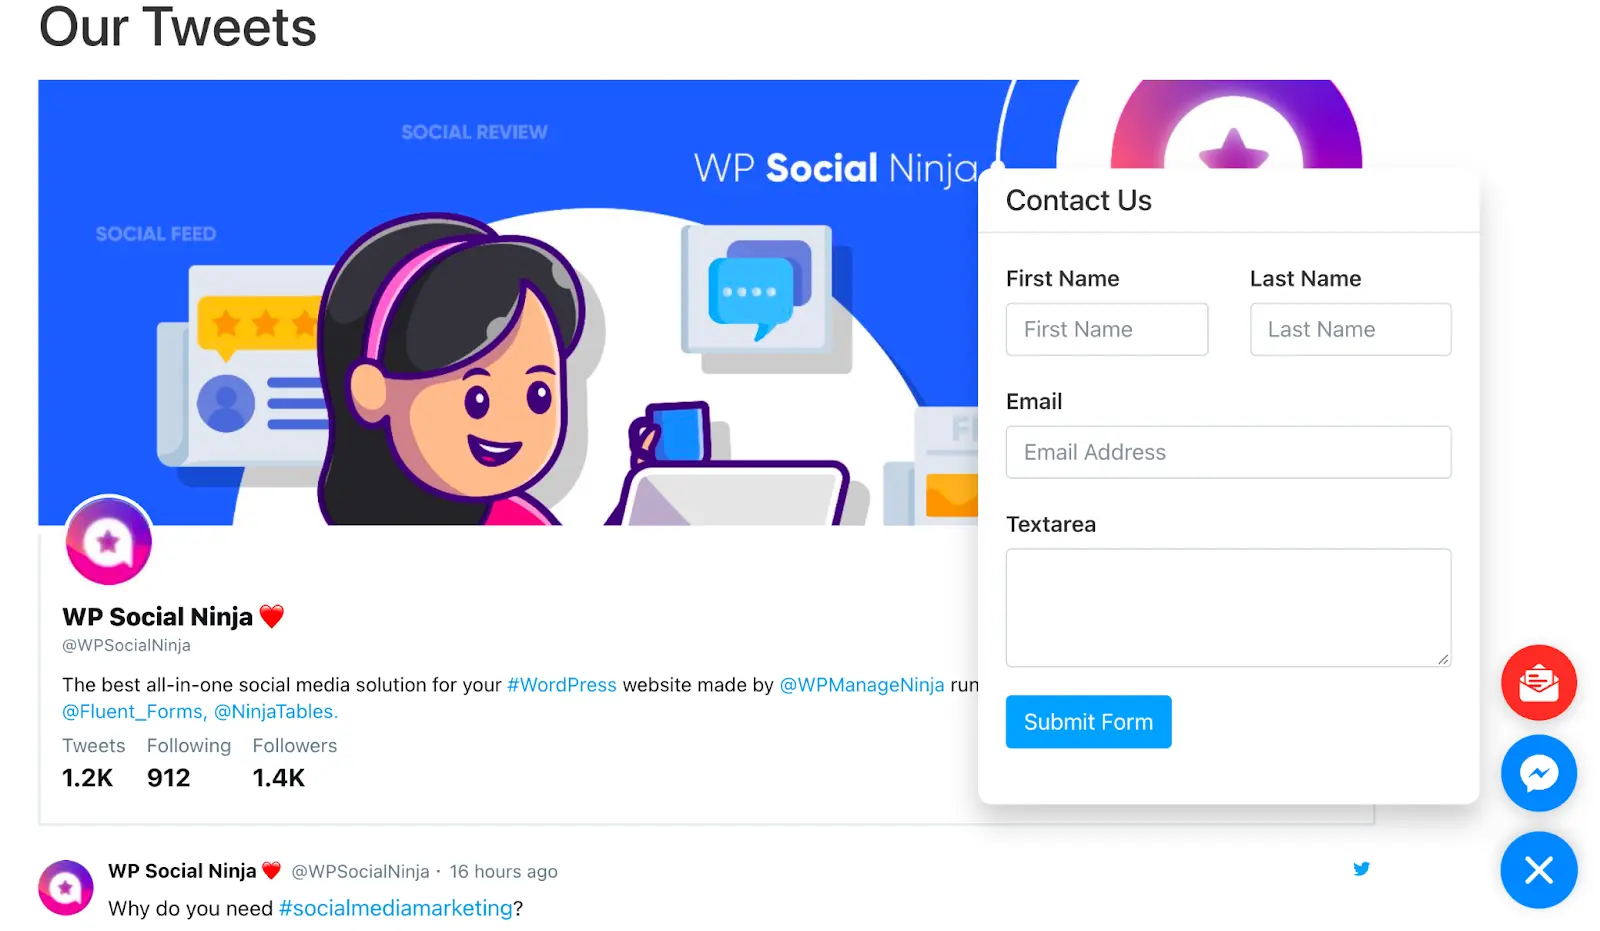
Fluent Forms Configuration
You can embed a contact form directly into your chat widget using the Fluent Forms integration. This allows you to collect visitor information right from the chat box.
First, you must have the Fluent Forms plugin installed and have already created a form.
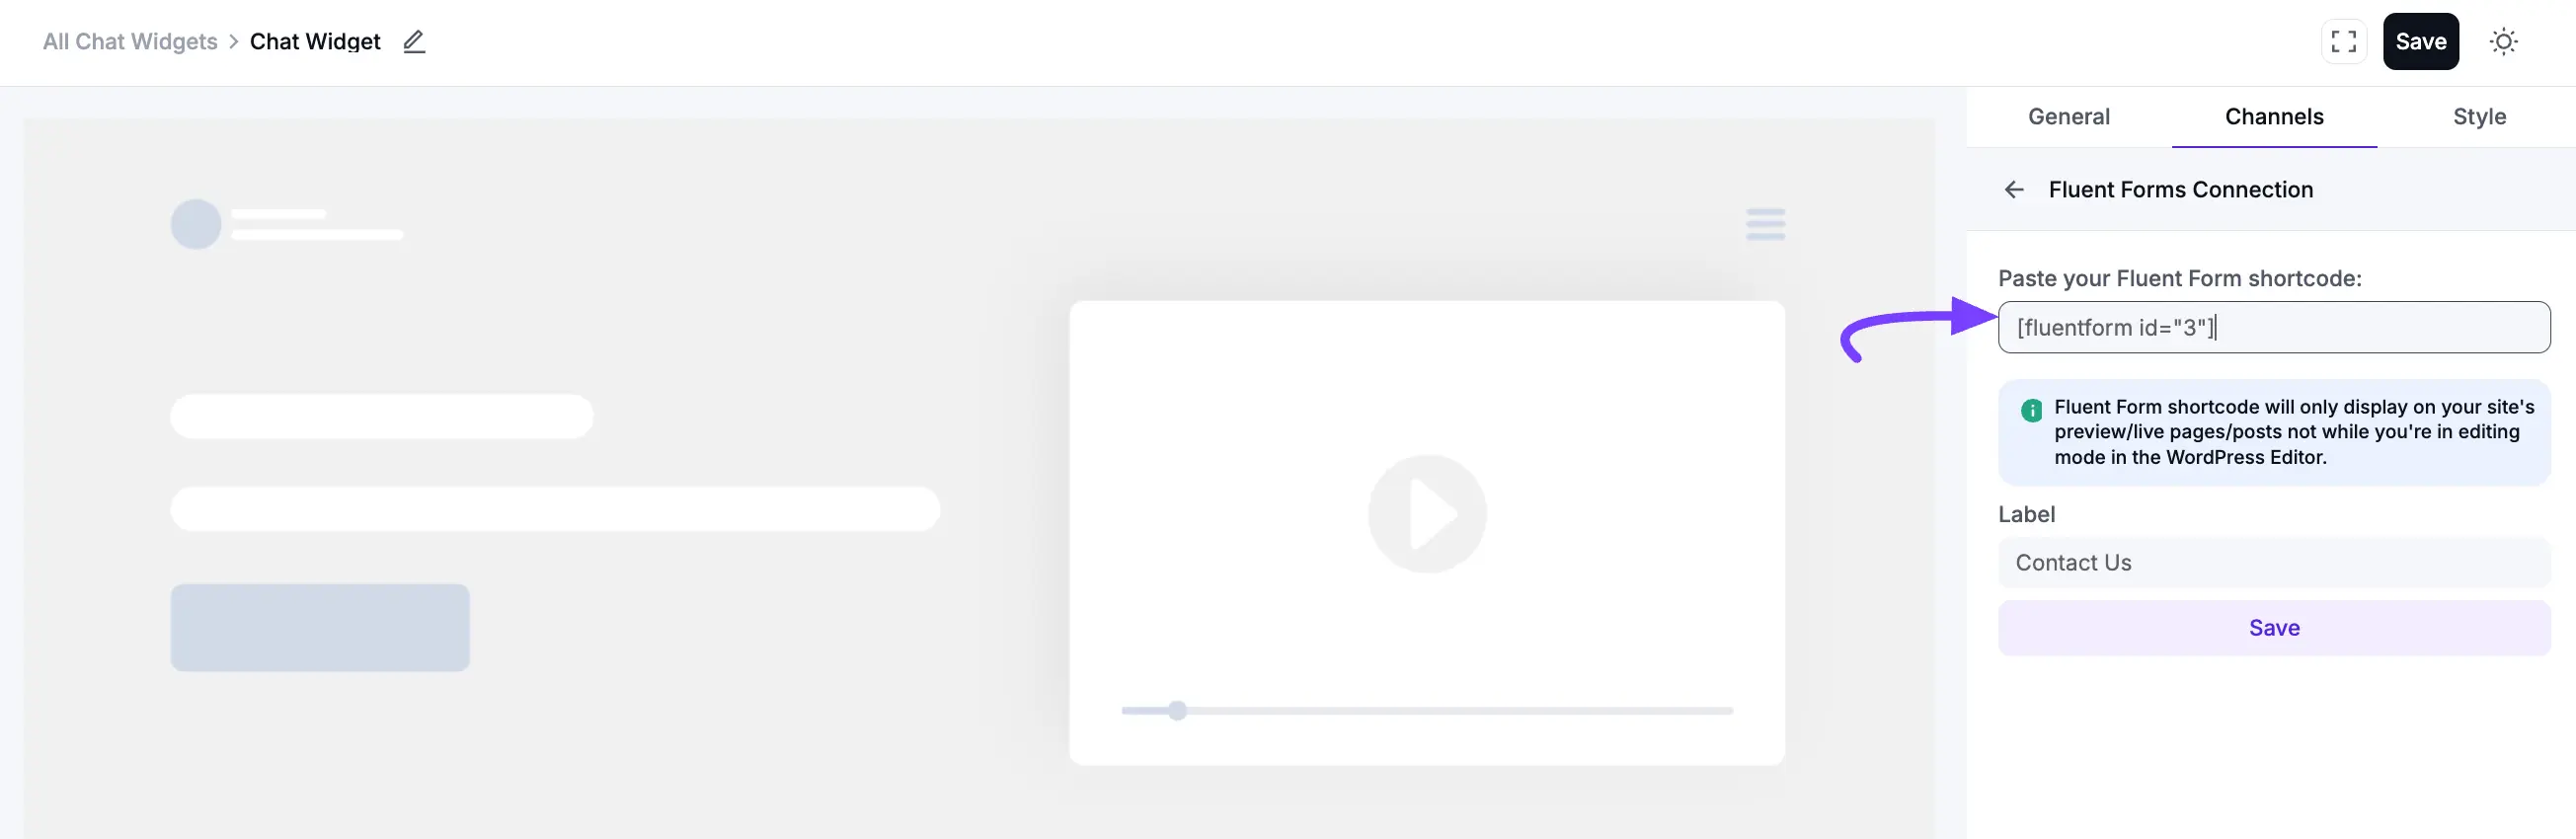
In your Fluent Forms plugin settings, find the form you want to use and copy its Shortcode (e.g., [fluentform id="3"]).

NOTE
In Fluent Forms Pro, you will find the Social Ninja Ratings field, which you can select for your website review.
Now, go to WP Social Ninja chat editor, click Add New Channel, and select the Fluent Forms icon.
In the pop-up, paste your copied Fluent Form shortcode into the input field. If you want to customize the Label Name (e.g., "Contact Us"), enter your preferred name in the Label field. Then, click the Save button.
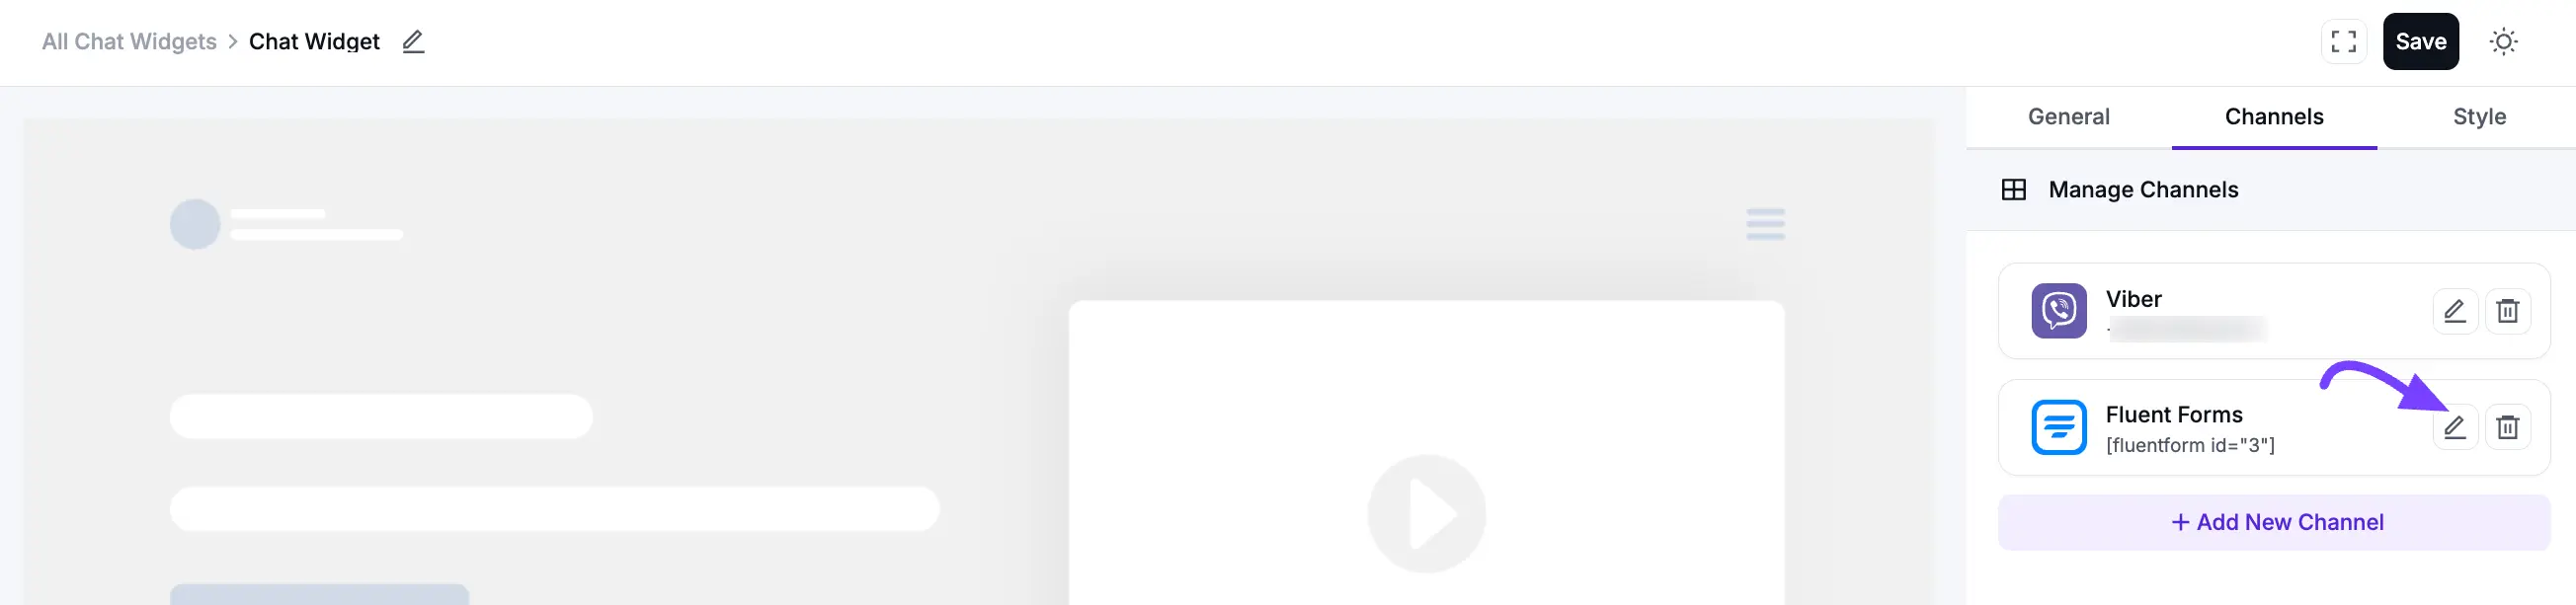
After saving, a Fluent Forms icon will appear in your chat widget. When a visitor clicks it, the form will open directly inside the chat box, allowing them to send you a message. You can edit or delete it at any time by clicking the Edit or Delete icon.
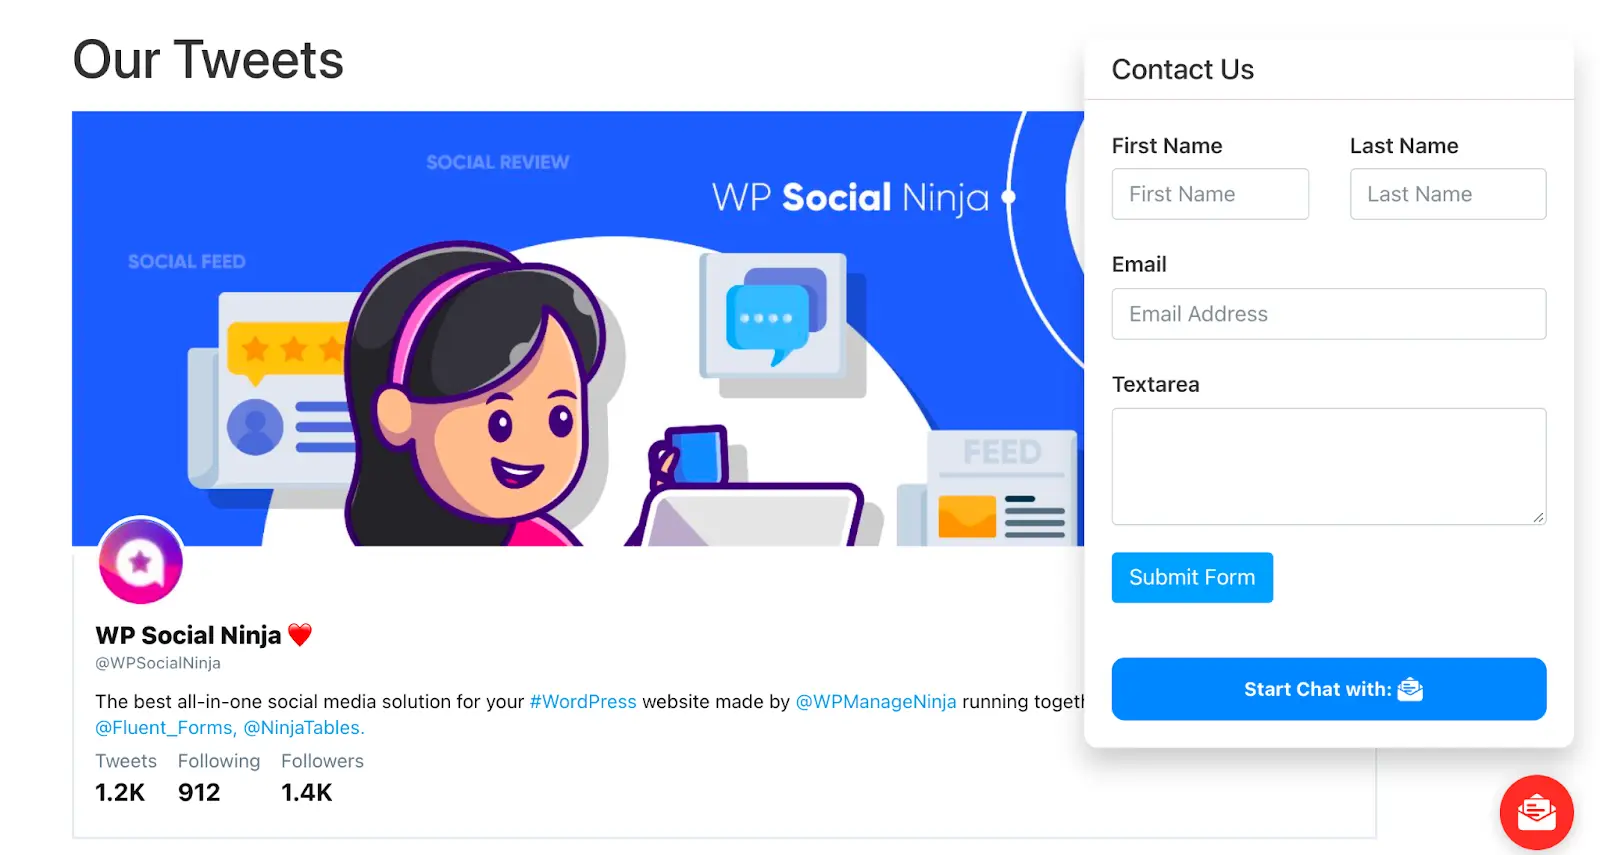
Now let’s look at how it looks on the front end if you pick Chatbox Layout Type. When you click on Chat Icon, a Chat Box will pop up. After that, when you click on the Fluent Forms icon, you will see a pop-up box named Contact Us.
Now, if you choose Only Icon Layout Type, you can only see the Chat Icon on the frontend. But once you click the Fluent Forms Icon, a Contact Us box will pop up.
This is how easy it is to configure all the Social Chat platforms with just a few clicks!