Appearance
Facebook Feed Template: General Settings
Once you have created a new template for your Facebook feed, you will land in the main Template Editor. This is the control center where you can customize every part of your feed's content and appearance.
The editor is organized into two main tabs:
- General (This Guide): This tab controls what content is shown (your source, filters, text) and how the feed functions (layouts, buttons, pagination).
- Style: This tab controls the visual design (colors, fonts, borders, spacing).
- Connection: This tab manages the specific API connection for this template. You will use this tab to add or update the required authentication keys, such as the Facebook Events Access Token, to ensure your feed can successfully fetch data from the platform.
This guide will provide a detailed, in-depth look at every single setting in the General tab.
Use Case: The General Settings allow for powerful combinations.
- A band could use the Source settings to only show Events.
- A photographer could only show Photos and use the Template settings to create a beautiful Masonry grid.
- A business could show its Timeline but use the Filters to hide any posts that mention a
#contestor#giveaway.
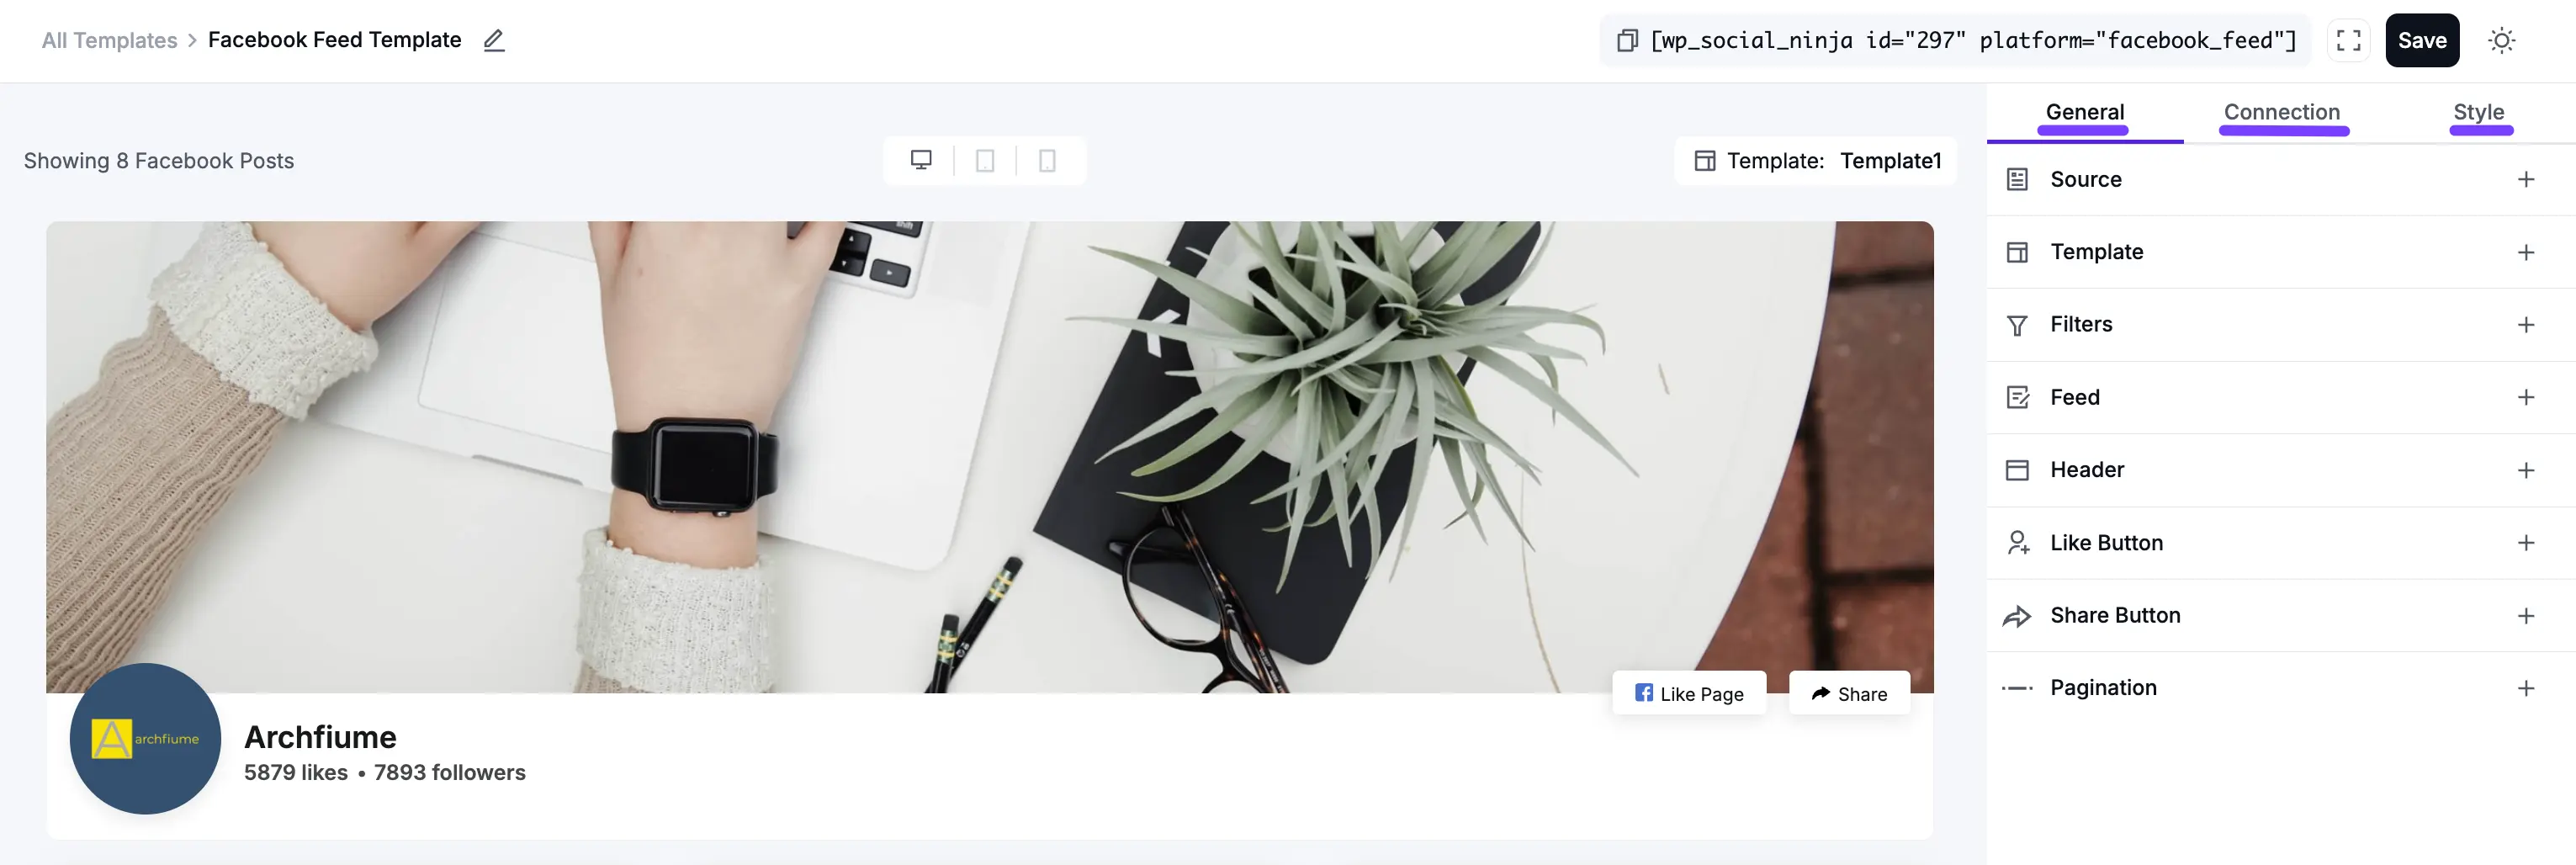
General Settings
Here is a breakdown of each section within the General tab.
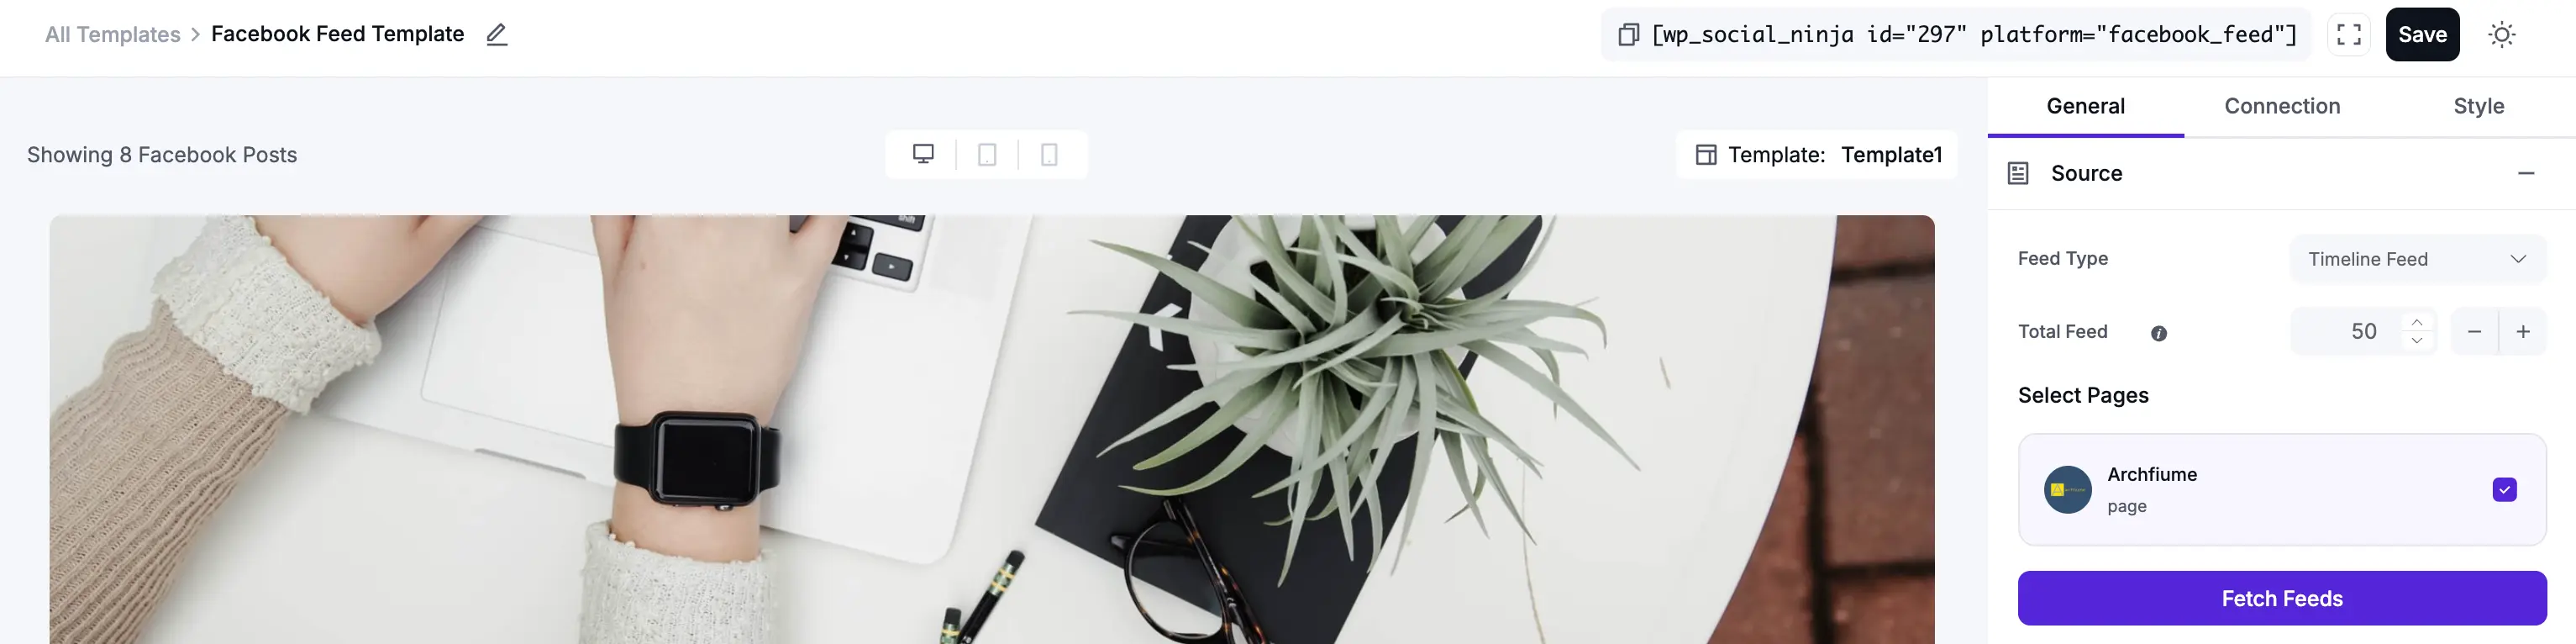
1. Source
This is the most important step. The Source settings determine which Facebook Page to connect to and what type of content to pull from it.
- Feed Type: This dropdown menu lets you choose the kind of content to display.
- Timeline: This is the most common option. It shows the standard posts from your Facebook Page's wall, just as visitors would normally see them.
- All Videos: This will only pull video posts from your page. This is perfect if you want to create a dedicated video gallery on your website.
- Specific Video Playlist: This will only pull the Video Playlist.
- Photos: Similar to Videos, this will only pull photo posts, ignoring any text-only or link posts.
- Events: This powerful feature will display a feed of your Page's upcoming or past events, including the event date, time, and title.
- Album: This allows you to spotlight a single, specific photo album from your Page.
- Single Album: This will only show the single album.
- Total Feed: This number tells WP Social Ninja the maximum number of posts to fetch (or pull) from Facebook. It's best to set this to a high number, like 50 or 100. (Note: This is different from the number of posts that load on the page initially, which is controlled by Pagination.)
- Select Page(s): If you have connected multiple Facebook Pages to WP Social Ninja, this dropdown is where you will select which Page you want to display in this specific template.
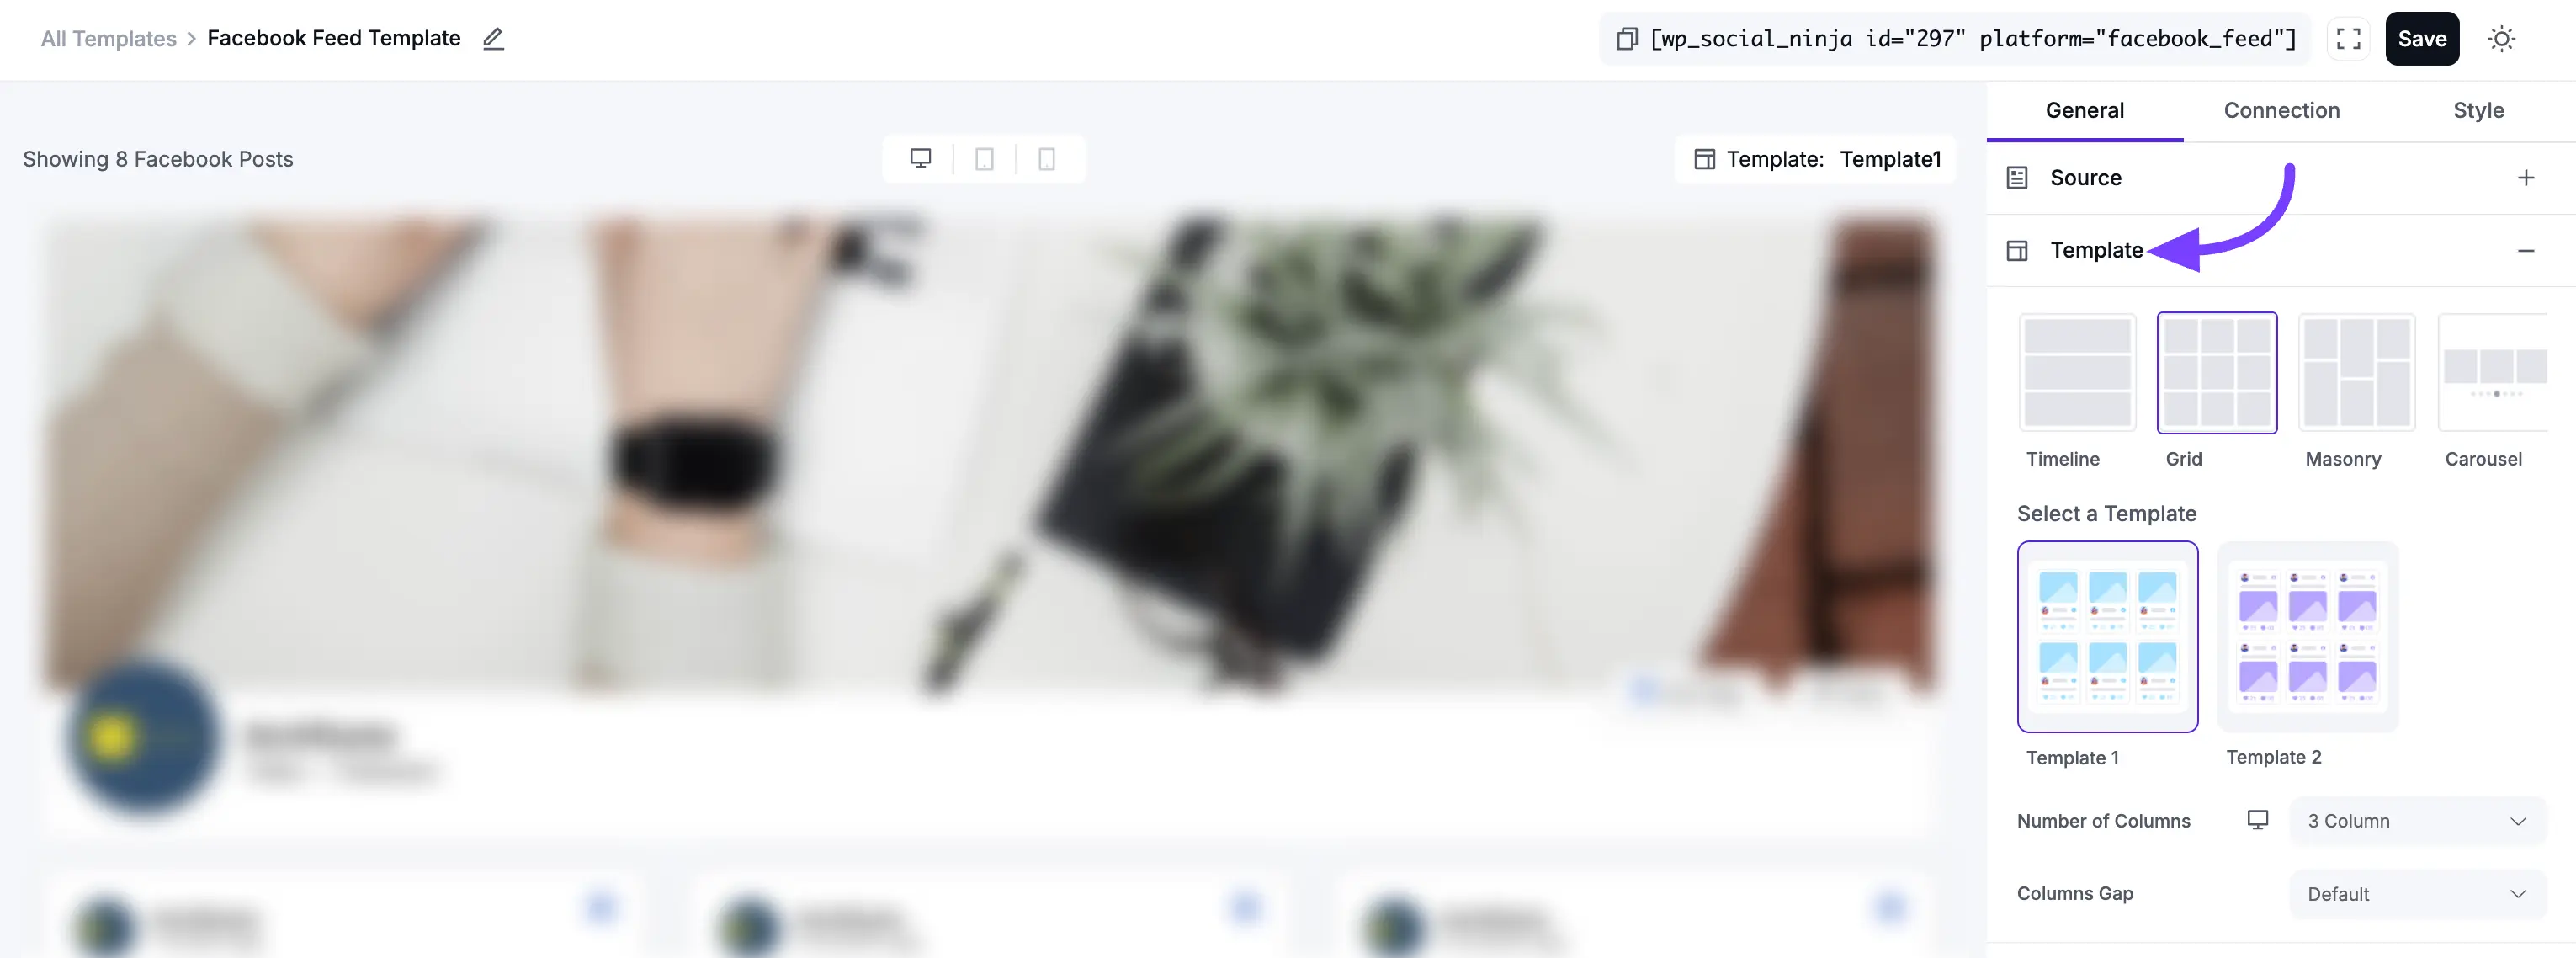
2. Template
This section controls the visual structure and arrangement of your posts.
- Layout Type: This is the foundational structure of your feed.
- Timeline: A classic, single-column feed that looks similar to the Facebook wall.
- Grid: A clean, organized, multi-column grid. All post boxes are forced to be the same height, which creates a very neat and symmetrical look.
- Masonry: A modern, "Pinterest-style" multi-column grid. Posts have variable heights based on their content (e.g., a long post will be taller, a short one will be shorter) and fit together like bricks.
- Carousel: A horizontal slider that lets you show many posts in a small amount of space. Visitors can click or swipe through your posts.
- Template: These are pre-designed visual "skins" for your feed. Each template (like Template 1, and Template 2.) changes the styling of the post boxes, fonts, and layout.
- Number of Columns: This is a crucial responsive setting. You can set the number of columns to show on Desktop, Tablet, and Mobile devices.
- Columns Gap: This controls the amount of "gutter" or empty space (in pixels) between each post in your feed. Increase this for a more spaced-out, airy look, or decrease it to make the posts tighter.
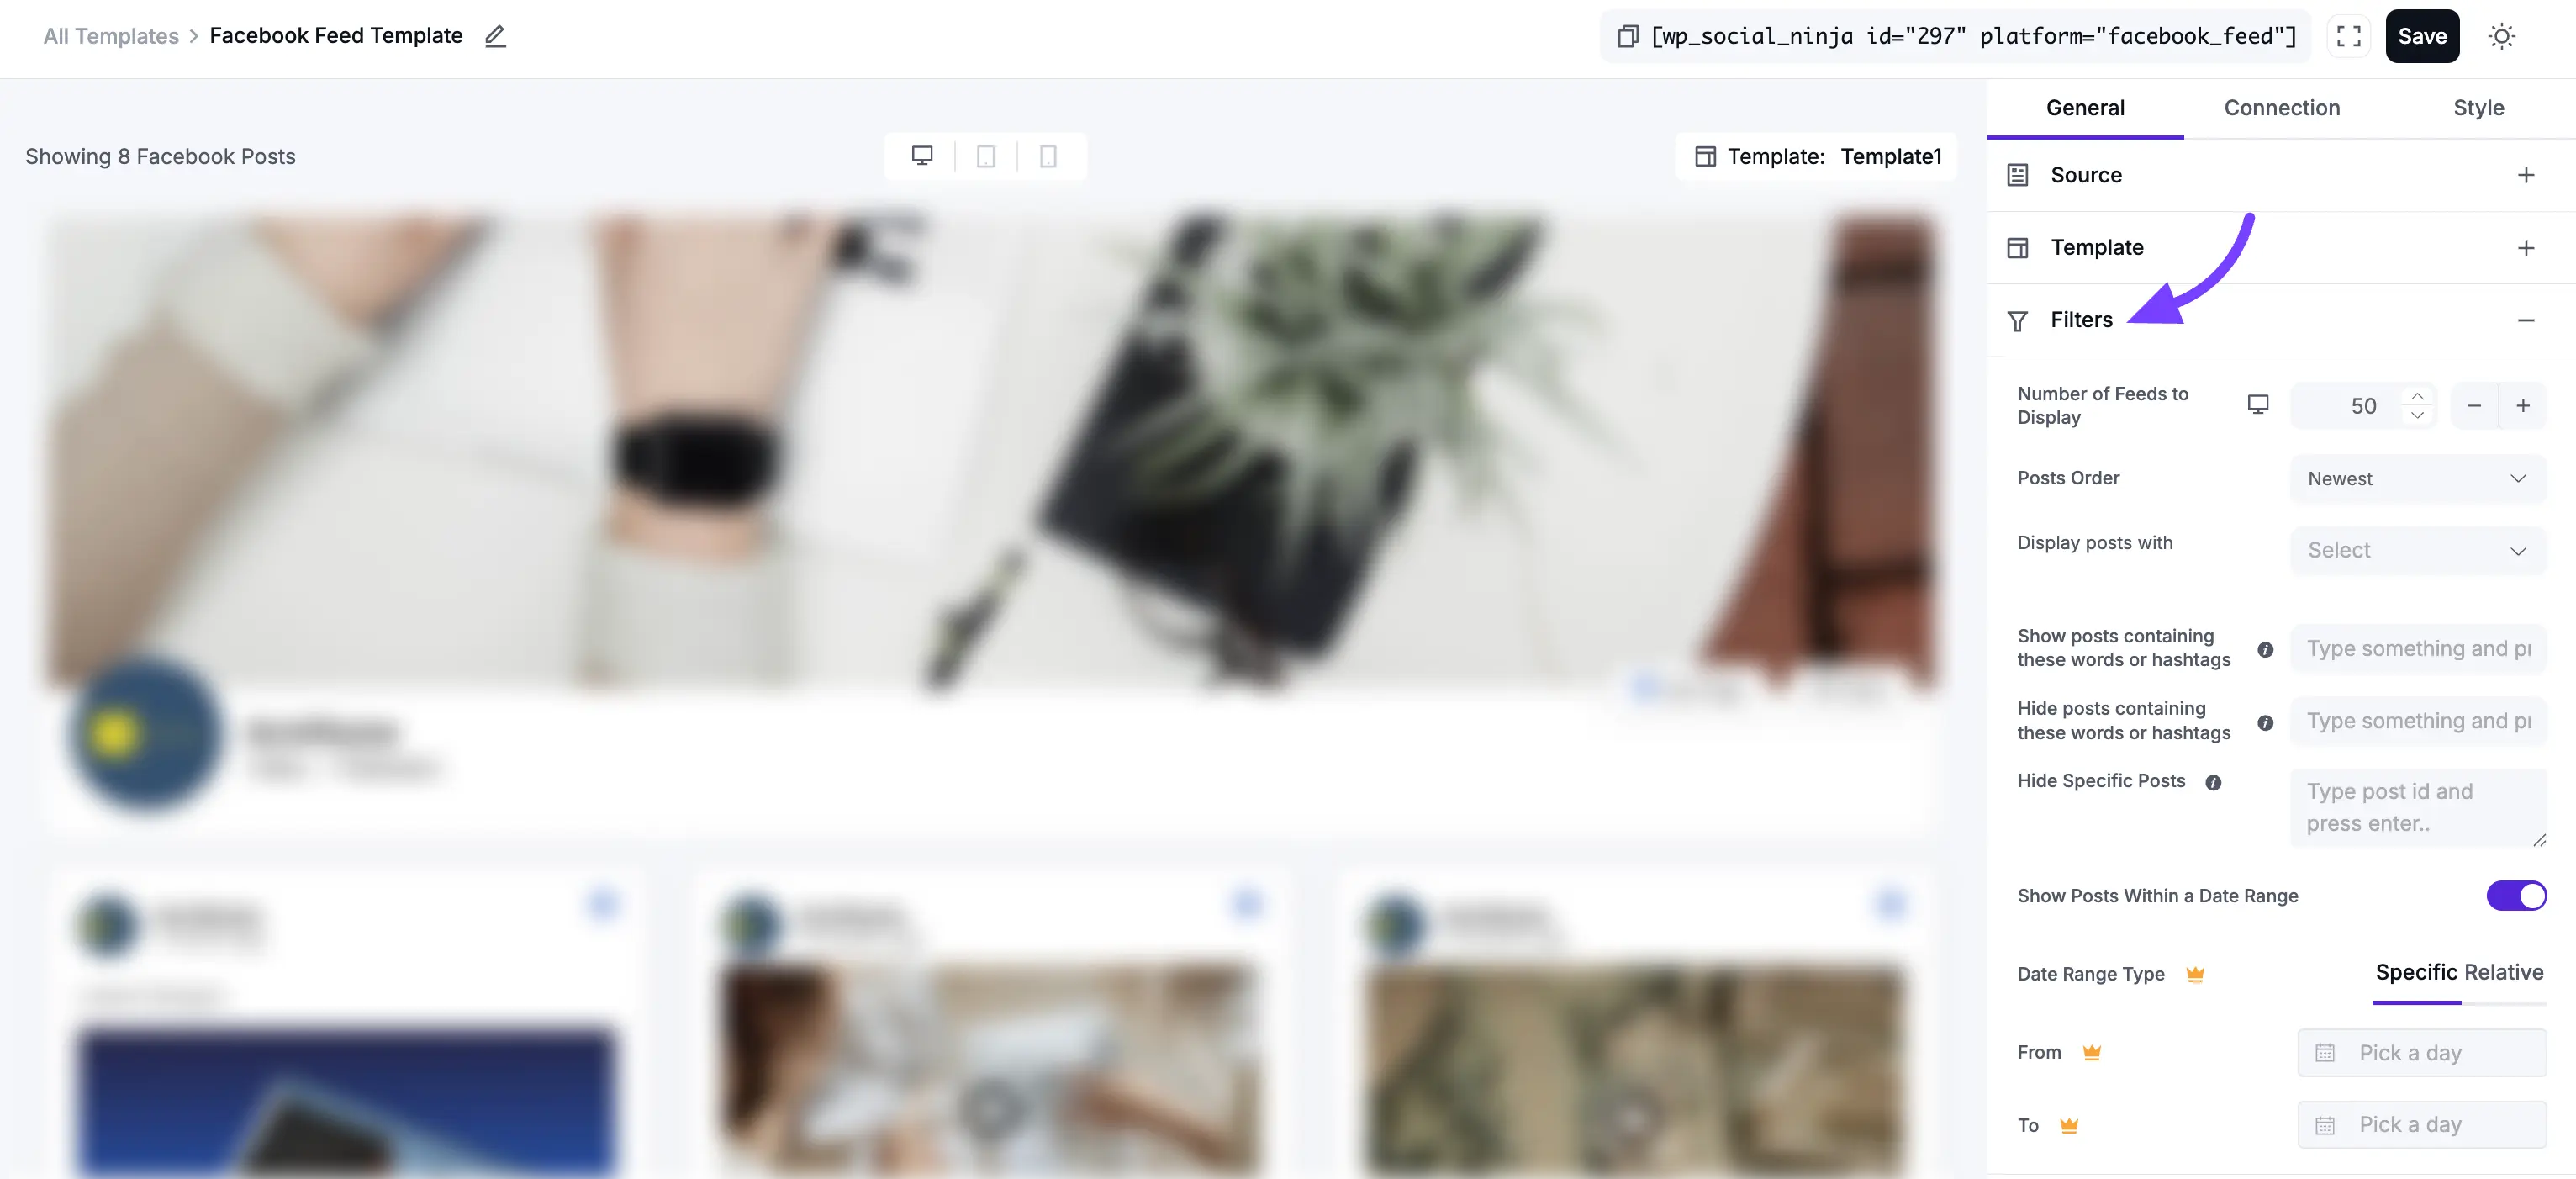
3. Filters
Filters are how you refine your feed to exclude content you don't want or only show content you do.
- Number of Feeds to Display: This is the number of posts a visitor will see when the page first loads. This is directly related to the Pagination setting.
- Post Order: This lets you sort your posts.
- Descending: Shows newest posts first (most common).
- Ascending: Shows oldest posts first.
- Random: Shuffles the posts in a new order every time the page loads.
- Display Post With: This feature, found in the Filters section, acts as a content-type filter. It allows you to select exactly which kind of posts you want to show in your feed. By default, it is set to All, which shows everything. However, you can select one of the following options from the dropdown menu:
- All: (Default) This shows all post types from your page.
- Text: This will only display posts that are text-only (status updates).
- Photos: This will only display posts where the main content is one or more photos.
- Videos: This will only display video posts.
- Links: This will only display posts that are primarily a shared link.
- Events: This will only display your Facebook Event posts.
- Albums: This will only display posts that are photo albums.
- Show/Hide Posts with Keywords/Hashtags: This is a very powerful filter. You can enter a comma-separated list of words or hashtags to either only show posts with those words, or hide posts with those words.
Example (Hide): You run many contests. You can enter
#contest, #giveaway, winto automatically hide all those posts from your website feed, keeping it focused on company news. - Hide Specific Feeds: This allows you to manually hide one or more specific posts. To get a post's ID, go to the post on Facebook, look at the URL, and copy the long string of numbers. Paste that ID here to hide it.
Date Range
This is one of the powerful features in the Facebook template editor, allowing you to create time-sensitive feeds that can be either fixed or dynamic. This filter is essential for creating "Recent News" feeds or "Year-in-Review" sections.
You have three options to choose from:
a. (Default)
This is the default setting. It simply means no date filter is applied. The feed will display posts based on your other settings (like Post Order).
b. Specific Date Range
This option allows you to select a fixed and permanent date range. When you select this, two new fields will appear: From and To.
- What it does: It will only show posts that were published between the two exact dates you select.
- Use Case: This is perfect for "archival" feeds. You can create a feed for a specific product launch ("Posts from June 2025"), a past event ("Our 2024 Conference"), or a holiday promotion ("Black Friday 2025 Highlights"). The content in this feed will never change, as it's locked to that specific timeframe.
c. Relative Date Range
This option is incredibly powerful because it is dynamic and automatic. When you select this, you can set a timeframe that is relative to the current date.
- What it does: It allows you to create feeds like "All posts from the last 30 days" or "All posts from the last 6 months."
- How it works: Unlike a Specific Date Range, a Relative one updates itself. If you set it to "Past 30 Days," you can leave it forever. Tomorrow, it will automatically include any posts from today and drop off any posts that are now 31 days old.
- Use Case: This is the best way to create a "Recent News" or "What's New" feed on your website. It ensures your feed is always fresh and relevant, showing only the most recent content without you ever having to manually update the filter.
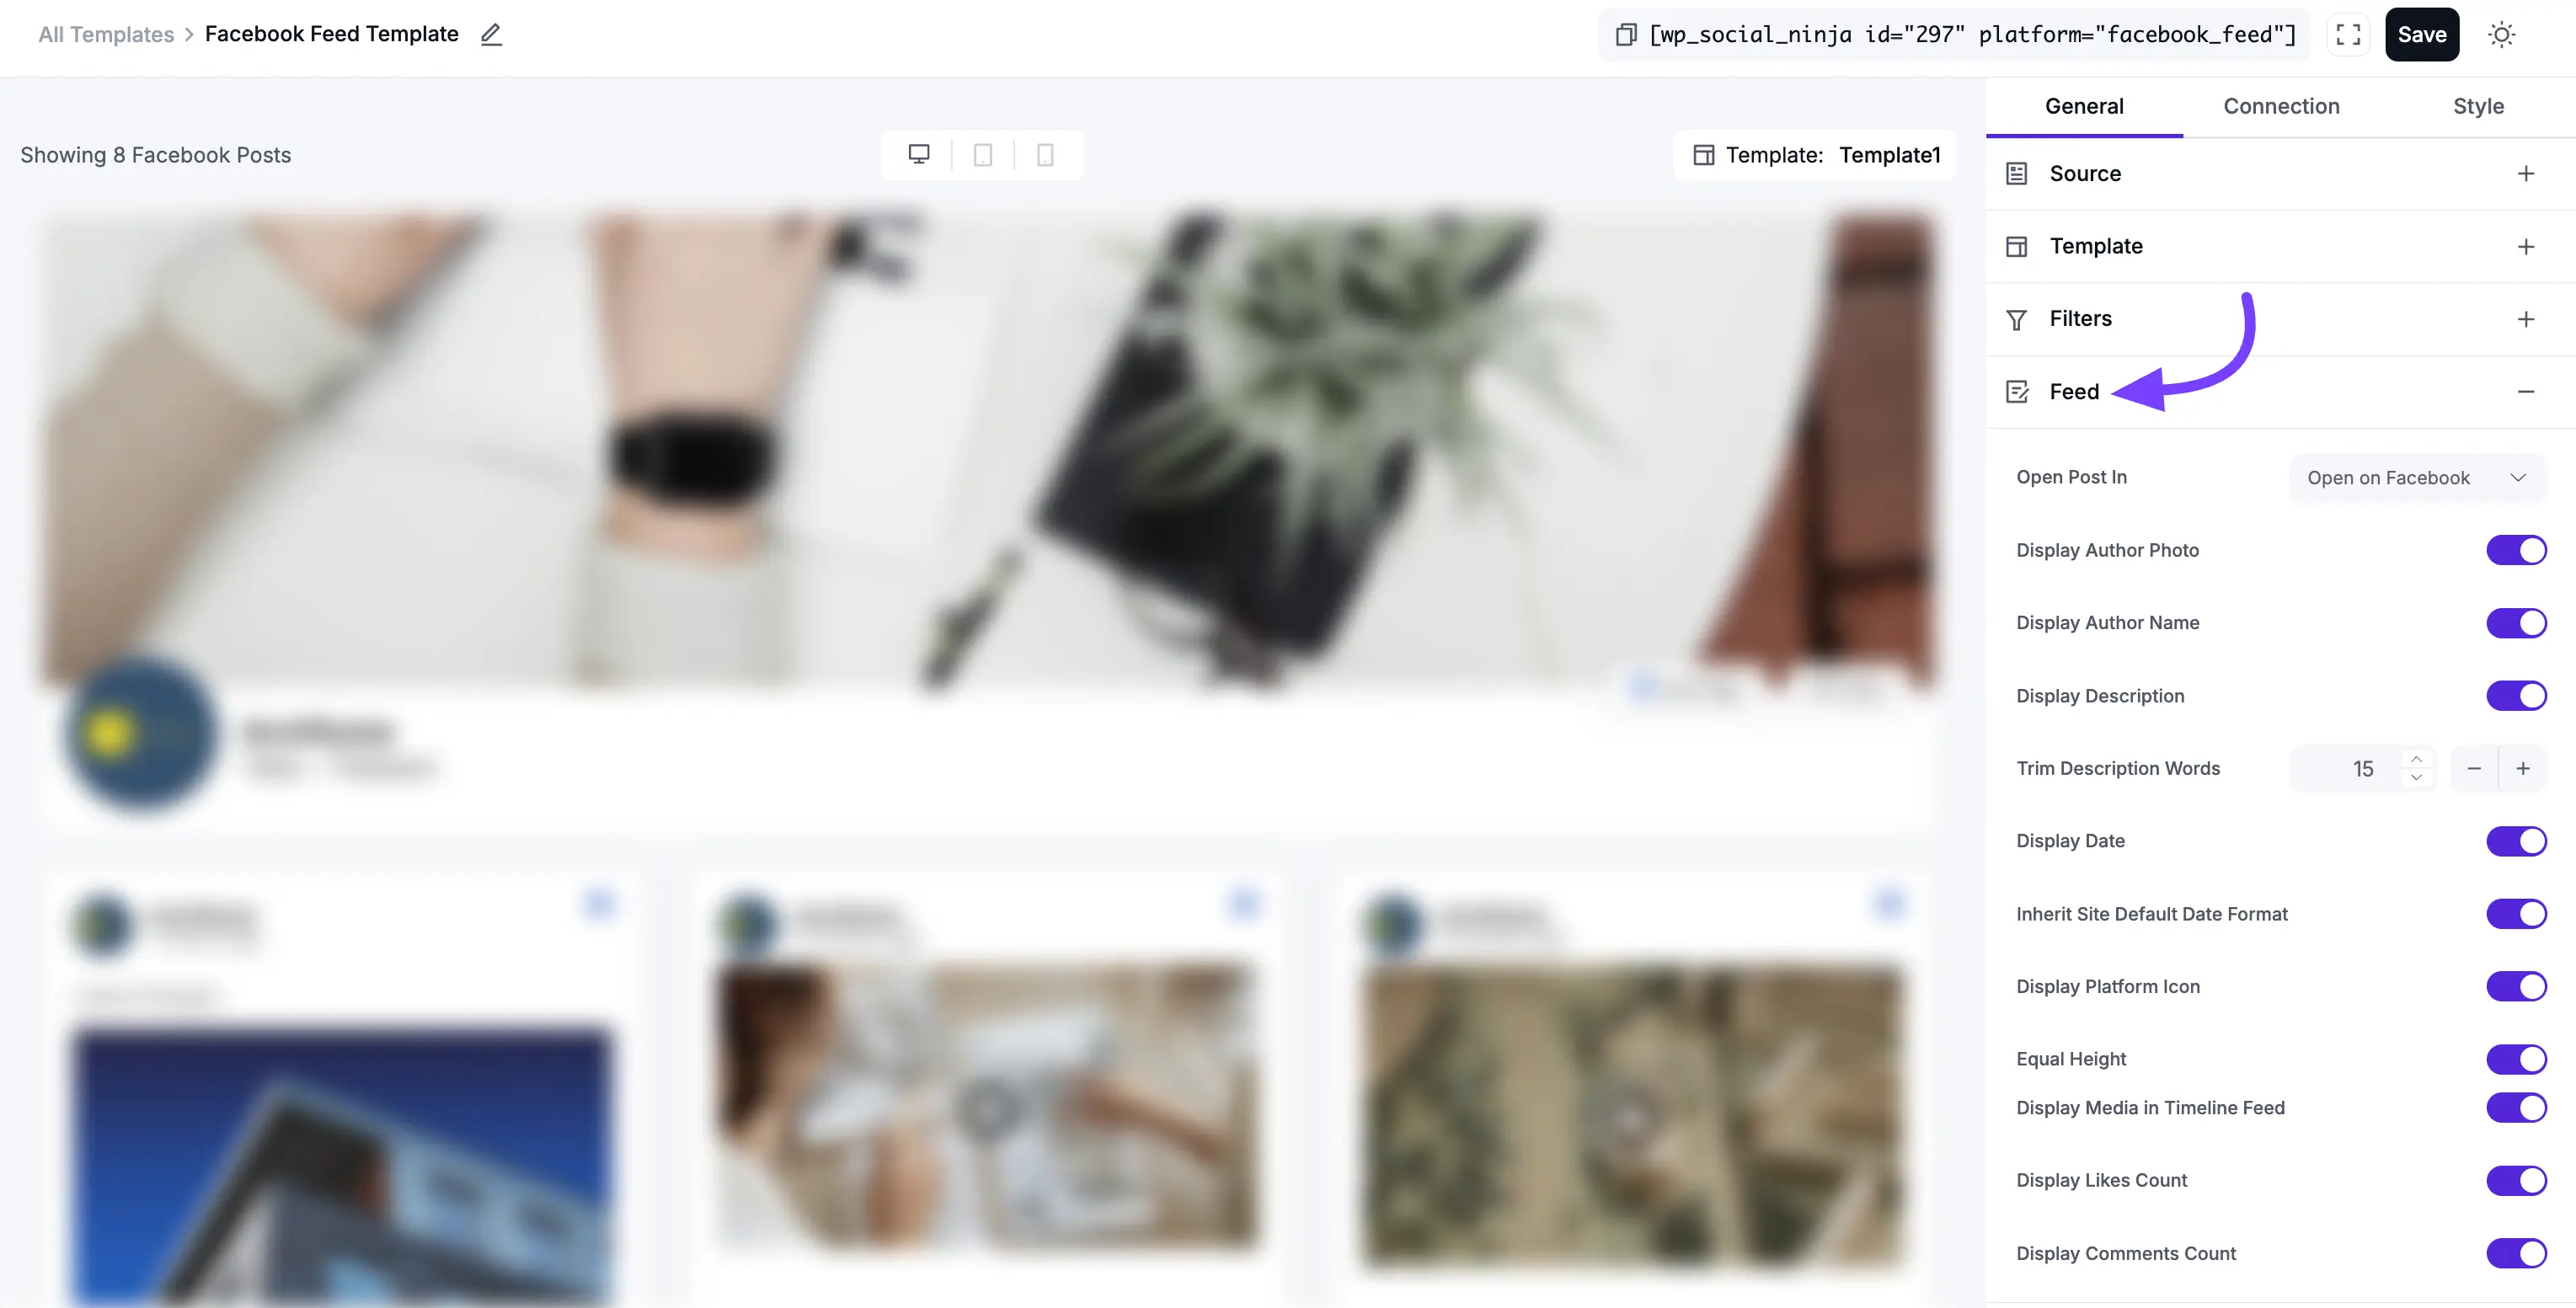
4. Feed
This section controls the content and links inside each individual post card.
- Open Post in: This determines what happens when a visitor clicks on a post in your feed.
- None: The post is not clickable. It's for display only.
- Facebook: The visitor will be taken to the original post on Facebook.com in a new browser tab.
- Popup / Lightbox: This is often the best user experience. The post's details (including text and comments) will open in a beautiful pop-up box on your own website, keeping the visitor engaged on your page.
- Display Author Photo: A toggle to show or hide your Page's profile picture on each post.
- Display Author Name: A toggle to show or hide your Page's name on each post.
- Display Date: A toggle to show or hide the date and time the post was published.
- Display Description: A toggle to show or hide the text caption for each post.
- Trim Description Words: Sets a maximum word count for the post text. If the post is longer, it will be shortened with a "Read More" link.
- Inherit Site Default Date Format: When enabled, this matches the date's format (e.g.,
mm/dd/yyyy) to your main WordPress settings. - Display Platform Icon: A toggle to show or hide the small Facebook "f" icon on each post.
- Equal Height: This toggle is very important for the Grid layout. When toggled on, all post boxes are forced to the same height (based on the tallest post), creating a perfect grid. When toggled off, boxes will have different heights, which can look messy in a Grid layout.
- Display Media in Timeline Feed: A toggle to show or hide the images or videos in your posts. If turned off, the feed will only display text.
- Display Likes Count: A toggle to show or hide the number of likes and reactions for each individual post.
- Display Comments Count: A toggle to show or hide the number of comments for each individual post.
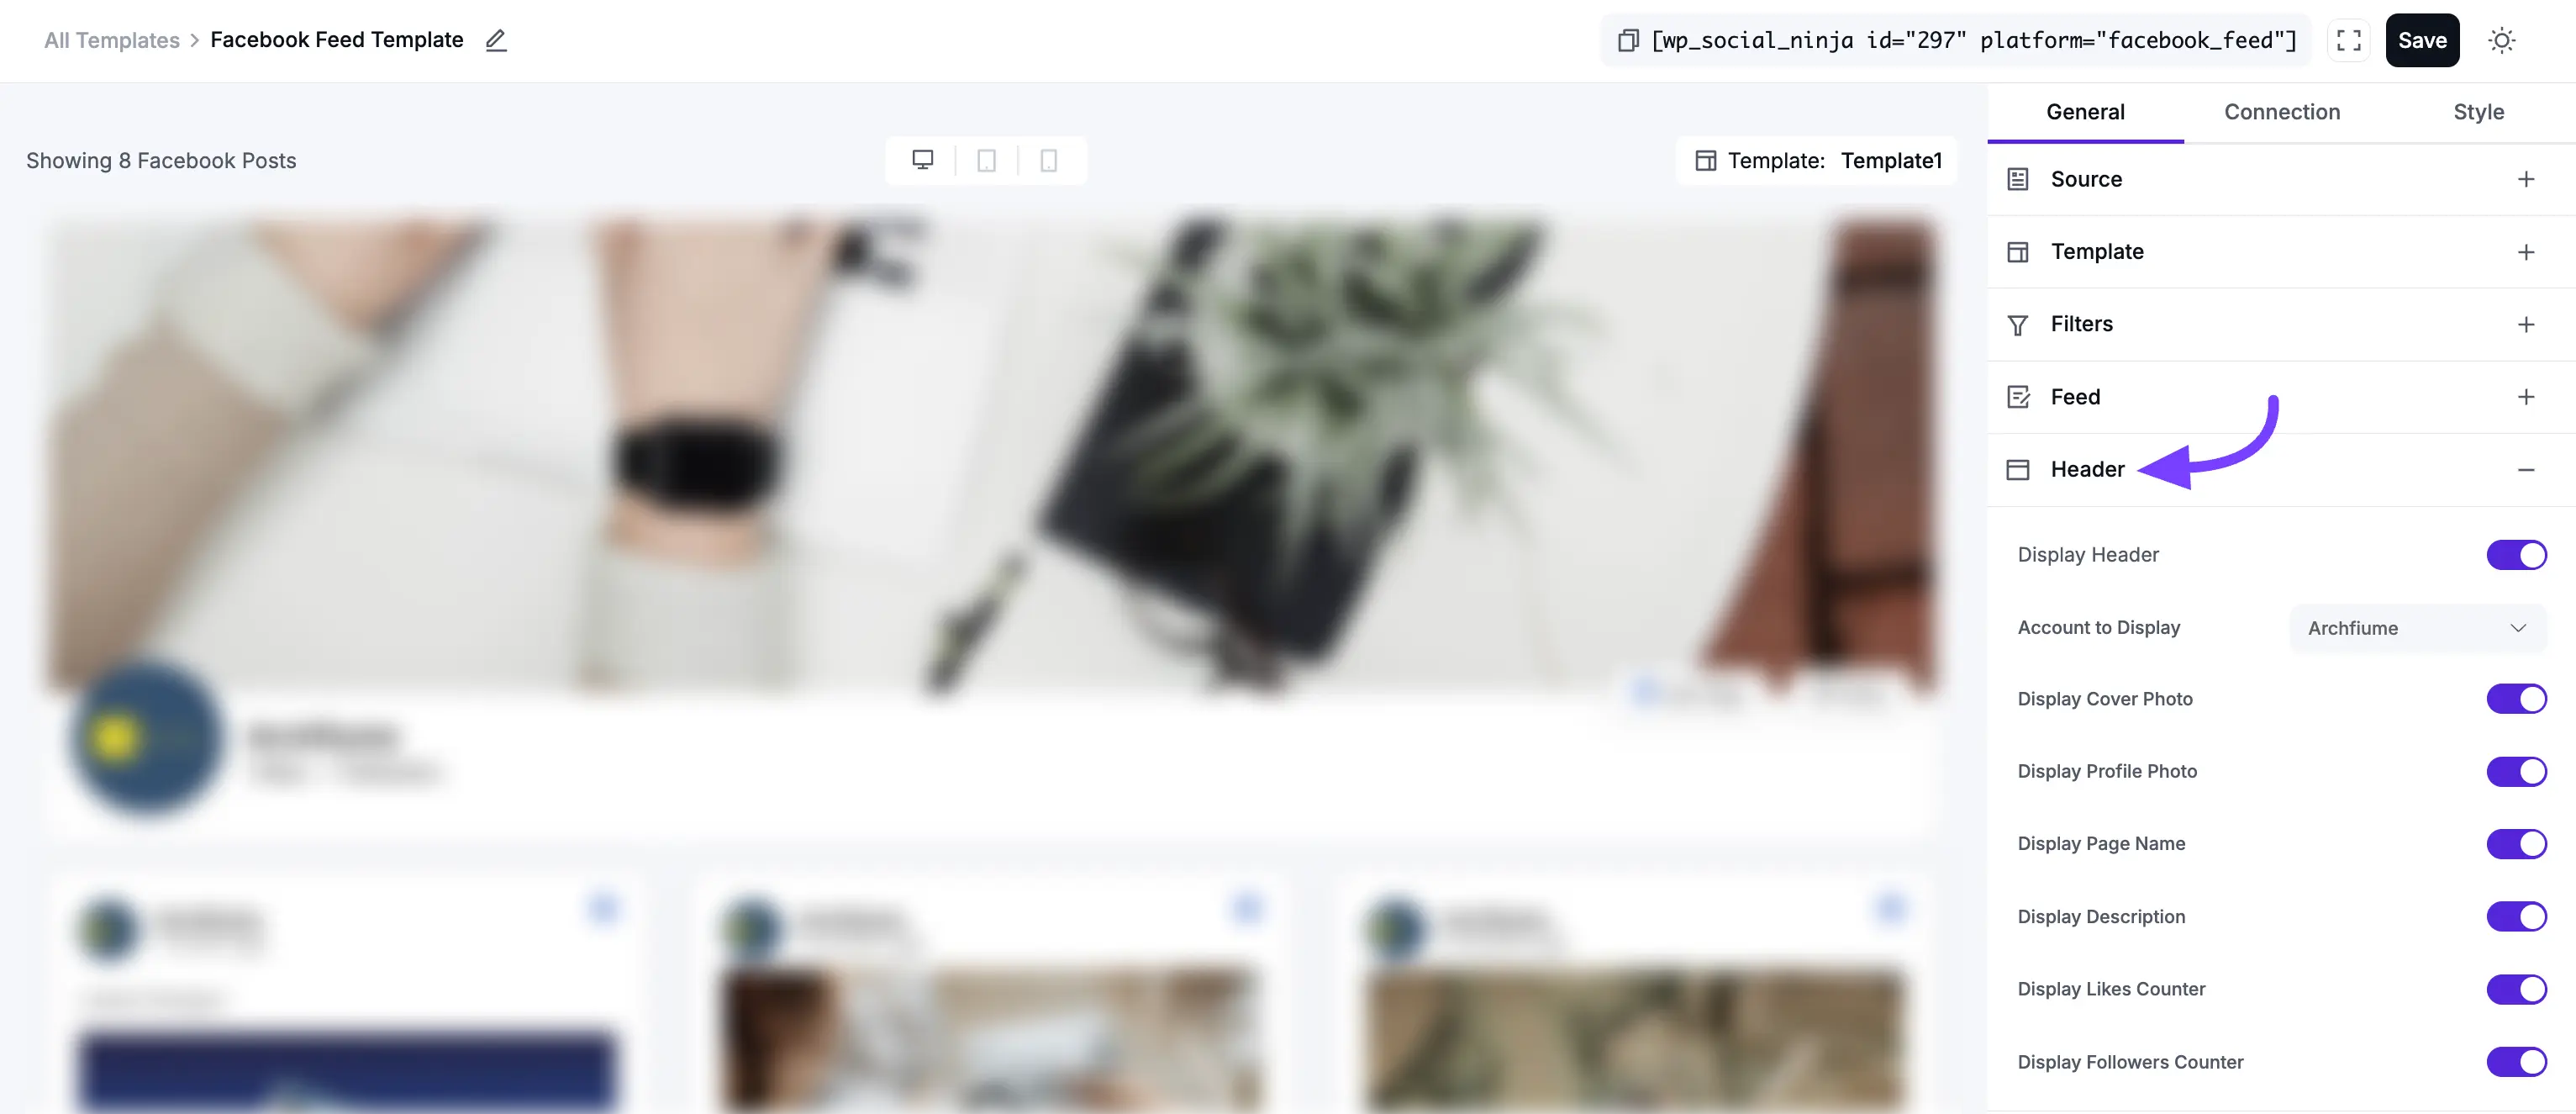
5. Header
This section controls the large banner at the top of your entire feed, which displays your main Page information.
- Display Header: This is the master on/off switch for the entire header section. Toggle it off if you want a minimal feed with no title.
- Account to Display: If your feed is set up to show posts from multiple Pages at once, this setting lets you choose which one Page's info (cover photo, name, etc.) to show in the header.
- Display Toggles: These let you show or hide the different parts of the header:
- Display Cover Photo (Your Page's large banner image)
- Display Profile Photo (Your Page's square logo/picture)
- Display Page Name
- Display Description (Your Page's "About" info)
- Display Likes Counter (The total number of likes your Page has)
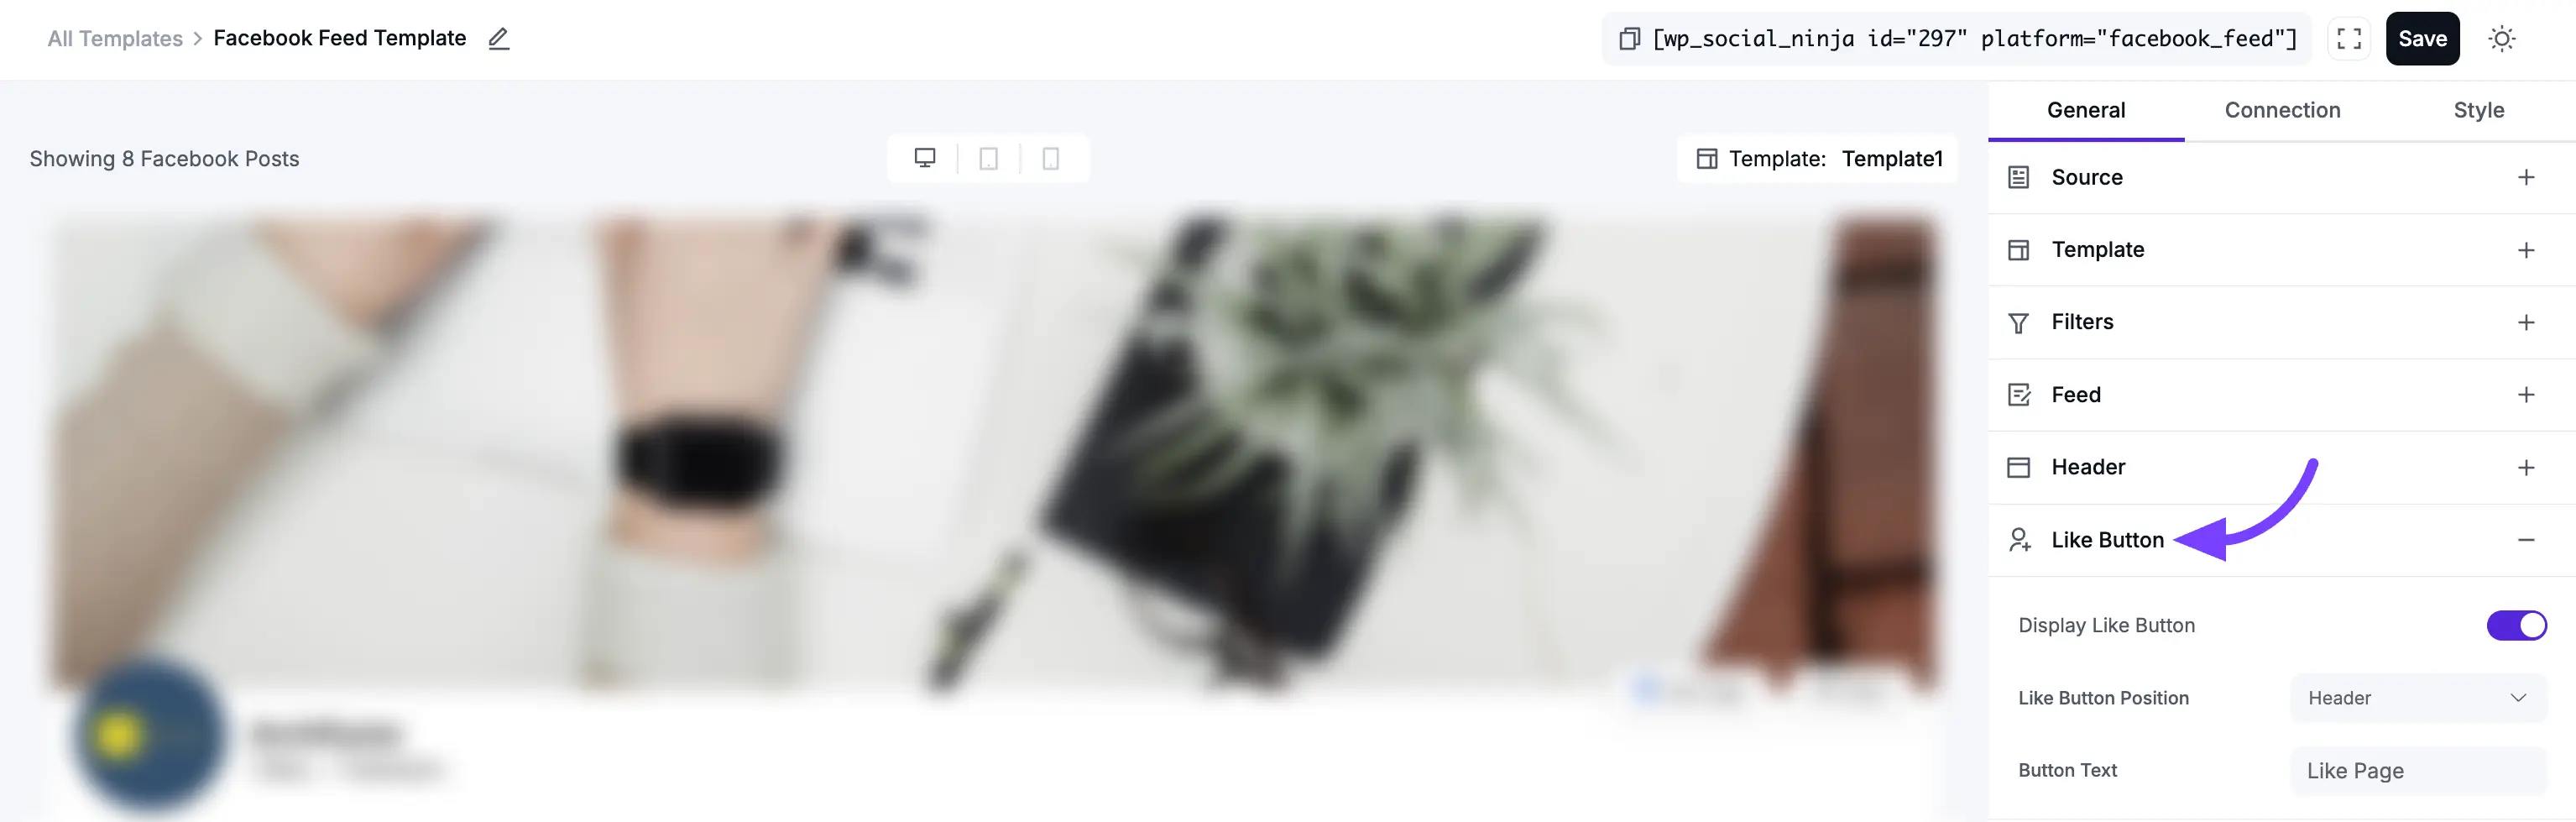
6. Like Button
This adds a "Like Page" call-to-action button to your feed, helping you get more Facebook followers from your website traffic.
- Display Like Button: Toggles the button on or off.
- Like Button Position: You can place the button in the Header (at the top of the feed) or the Footer (at the bottom).
- Button Text: You can customize the text on the button. For example, instead of "Like Page," you could change it to "Follow Us on Facebook."
7. Share Button
This adds a button that allows your website visitors to easily share your feed with their friends.
- Display Share Button: Toggles the button on or off.
- Share Button Position: Place it in the Header or Footer.
- Button Text: Customize the call-to-action text, such as "Share This Feed."

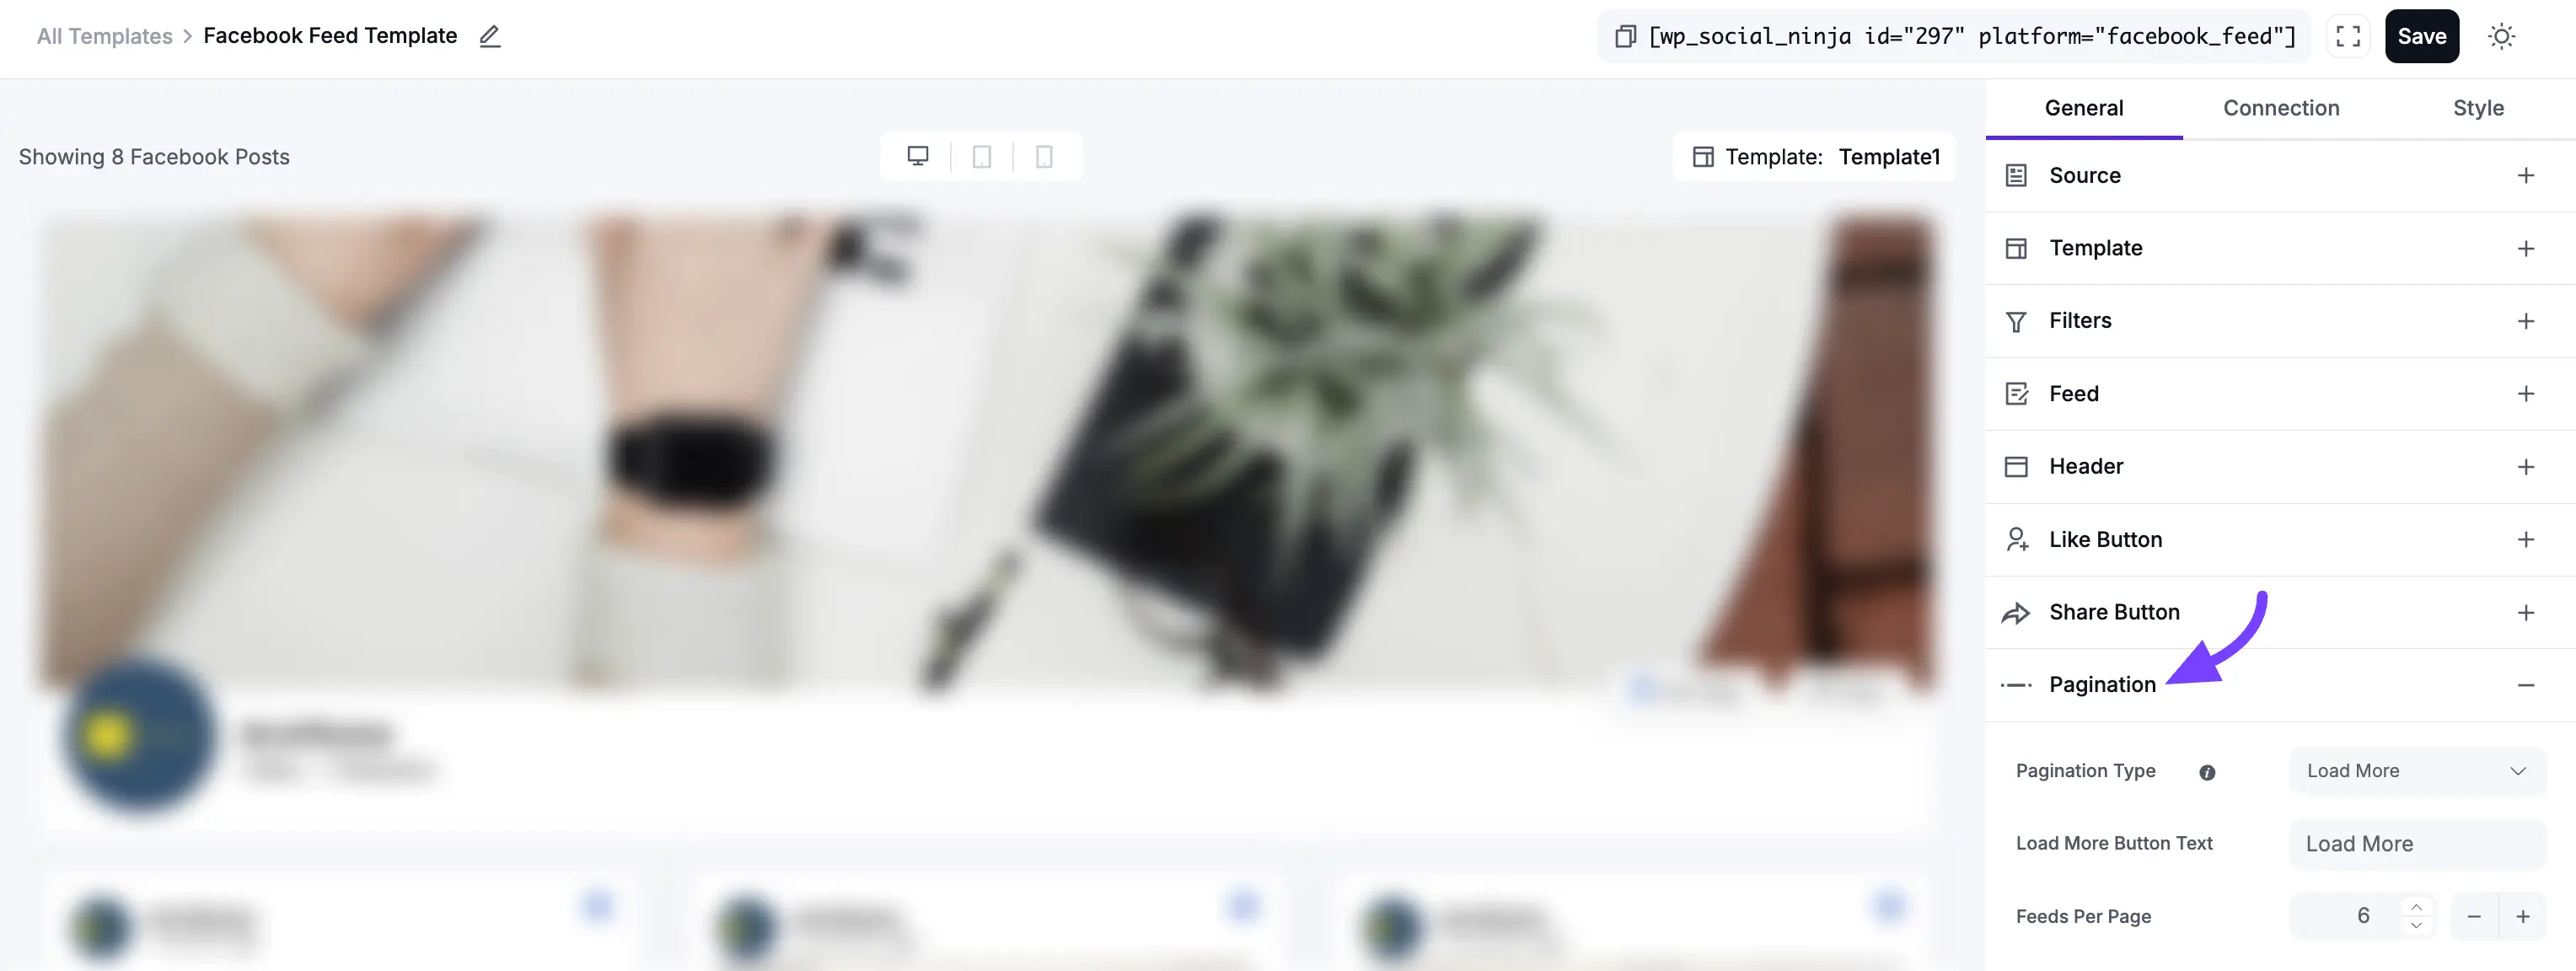
8. Pagination
Pagination controls what happens when a visitor scrolls to the bottom of the initial set of posts (which you set in the Filters section).
- Pagination Type:
- None: The feed will only show the "Number of Feeds to Display" and nothing else. There will be no way to load more posts.
- Load More: This will add a button at the bottom of your feed. When clicked, it will load the next set of posts. This is the most popular and user-friendly option.
- Load More Button Text: You can change the text from "Load More" to something like "See More Posts" or "Show Me More."
- Feeds Per Page: This is very important. This number controls how many new posts are loaded each time the "Load More" button is clicked.
Example: You set Number of Feeds to Display (in Filters) to 8. You set Feeds Per Page (here) to 4.
- Your page loads, and visitors see 8 posts.
- They click "Load More."
- 4 new posts appear (total of 12).
- They click "Load More" again.
- 4 more posts appear (total of 16).
Next Steps
Now that you have configured all the General settings, your next step is to make your feed beautiful!
Click on the Style tab (as shown in Screenshot 10) to customize the Colors, Fonts, Borders, and Spacing of your header, content, and buttons.
When you are finished, click the Save Template button at the bottom.