Appearance
Customiz Instagram Feed Template: General Settings
This is your control center where you can design your Instagram feed to perfectly match your website's style and needs.
When you first open the editor, you'll see three main tabs at the top:
- General (This Guide): This tab controls what content is shown (your source, filters, text) and how the feed functions (layouts, buttons, pagination).
- Style: This tab controls the visual design—all the colors, fonts, borders, and spacing.
- Connection: This tab is for managing the API connection for this specific template.
This guide will walk you through every single setting in the General tab, one by one.
What can you do with these settings?
- You could create a feed of only your most recent posts, sorted with the newest first.
- You could create a "portfolio" of your work using a Masonry layout and hiding all the text captions, likes, and comments.
- You could even create a special feed that only shows posts from a public Hashtag (like for a contest or event), displaying them in a sliding Carousel.
General Settings
Let's explore each section in the order you'll find it.
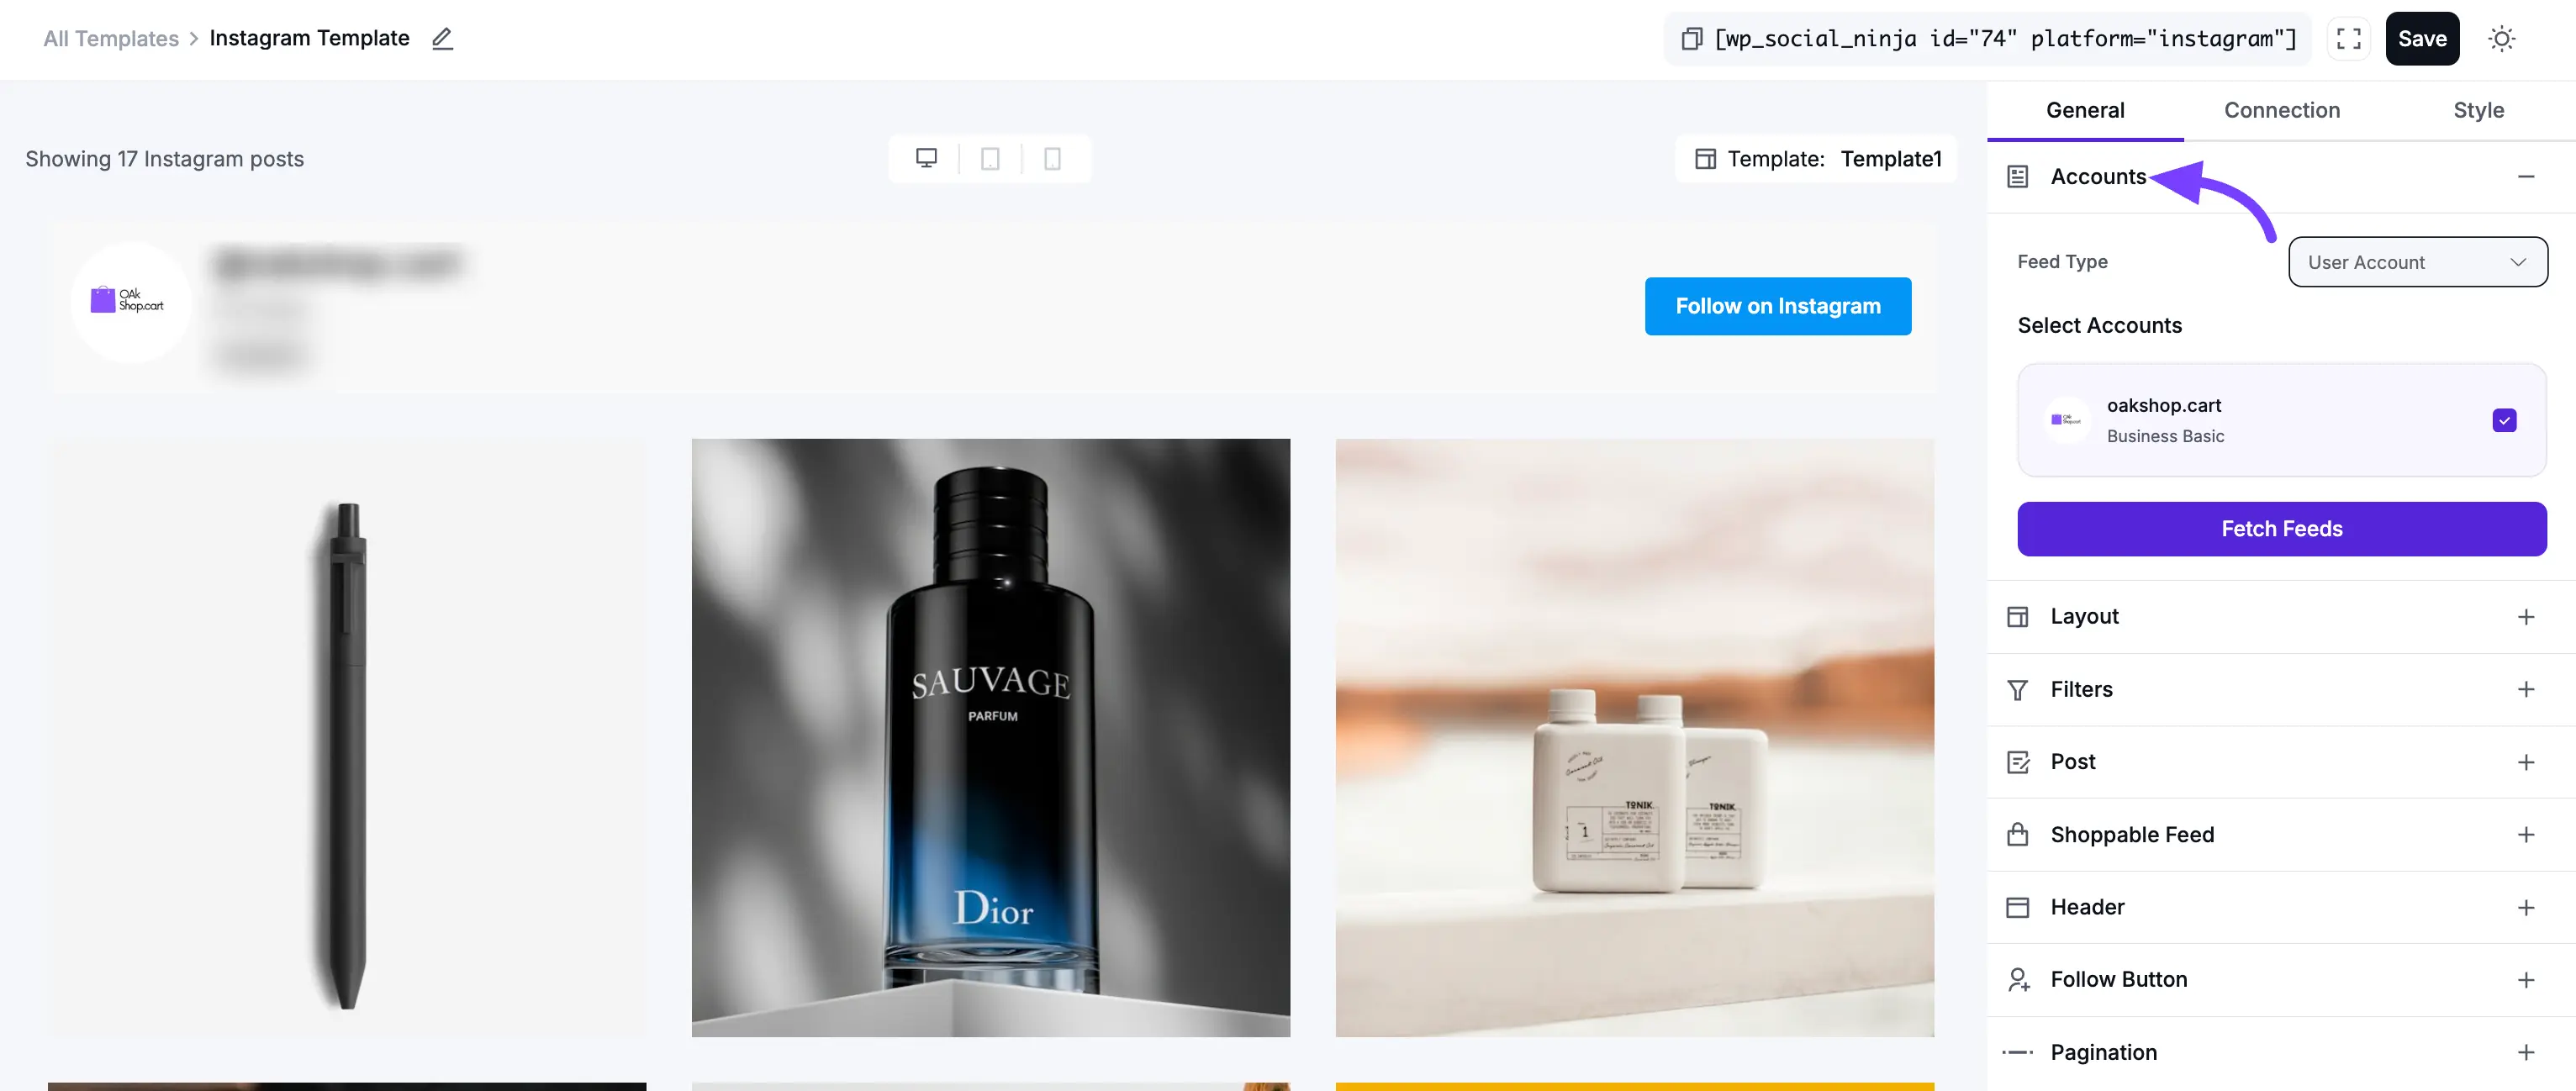
1. Accounts
This is the most important step. The Accounts settings tell WP Social Ninja from where to get the Instagram posts.
- Feed Type: This dropdown menu lets you choose the kind of feed you want to create.
- User Account Feed: This is the most common choice. It will display the photos and videos from your own Instagram profile that you've connected to the plugin.
- Hashtag Feed: This is a powerful feature that lets you display public posts from all over Instagram that use a specific hashtag. For example, you could type in
#MyAwesomeProductto show photos from all your customers.
- Select Account(s): If you've connected more than one Instagram account to WP Social Ninja, this dropdown is where you'll pick the one you want to use for this template.
- Fetch Feeds: This is a refresh button. If you've just made a new post on Instagram and want to see it in the preview right away, click this button to force the plugin to check for new content.
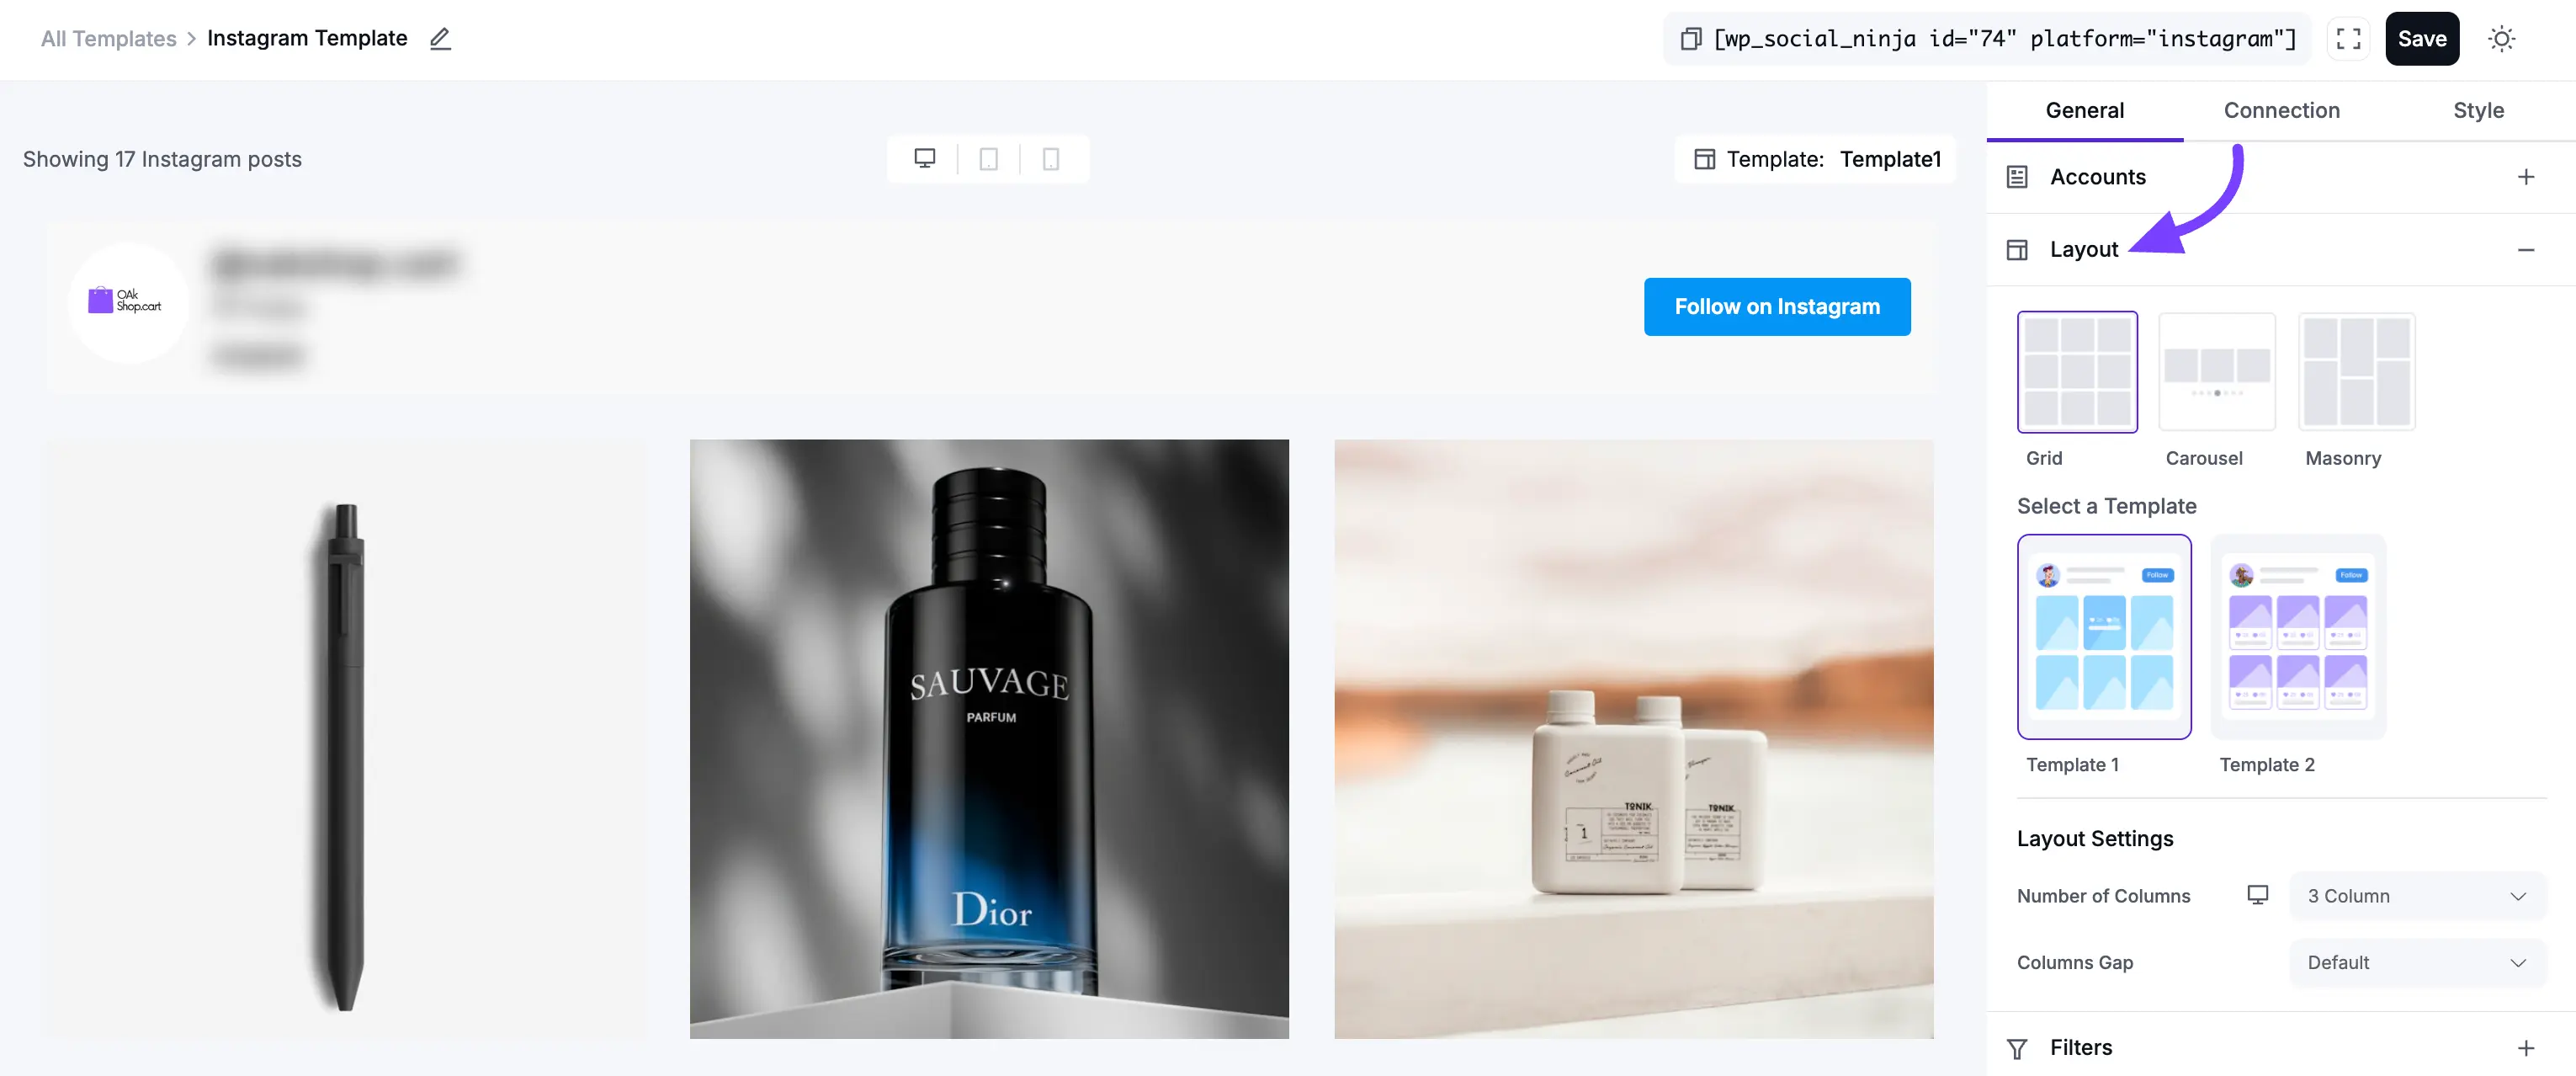
2. Layout
This section controls the visual structure and arrangement of your posts.
- Layout Type: This is the foundational structure of your feed.
- Grid: This creates a clean, organized, multi-column grid (like the standard Instagram profile). All post boxes are forced to be the same height, which creates a very neat and symmetrical look.
- Carousel: This displays your posts in a horizontal slider. Visitors can click or swipe through your posts one by one. This is perfect for saving space on a homepage.
- Masonry: This is a "Pinterest-style" multi-column grid. Posts will have different heights based on their content (e.g., if you show the text caption). This creates a modern, stylish look that fits posts together like bricks.
- Template: These are pre-designed visual "skins" for your feed. Each template changes the styling of the post boxes, fonts, and layout. Try clicking through them to see which one you like best!
- Number of Columns: This is a crucial setting for making your feed look good on all devices. You can set the number of columns you want to show on Desktops, Tablets, and Mobile phones.
- Example: You might choose 4 columns for Desktop, 3 for Tablet, and 2 for Mobile. This ensures your feed always looks great and is easy to read.
- Columns Gap: This controls the amount of empty space (in pixels) between each post. Increase this number to give your posts more "breathing room," or set it to
0to have them all touch.
3. Filters
Filters are how you refine your feed to exclude content you don't want or only show content you do.
- Number of Feeds to Display: This is the number of posts a visitor will see when the page first loads. (More posts can be loaded later using the "Pagination" settings).
- Post Order: This lets you sort your posts. For example:
- Newest: Shows newest posts first (this is the most common setting).
- Oldest: Shows oldest posts first.
- Random: Shuffles the posts in a new order every time the page loads.
- Show/Hide Posts with Keywords/Hashtags: This is a very powerful filter. You can enter a comma-separated list of words or hashtags to either only show posts with those words, or hide posts with those words.
- Example (Hide): You run a lot of giveaways. You could enter
#giveaway, #contest, #adinto the "Hide" field to automatically hide all those posts from your website feed.
- Example (Hide): You run a lot of giveaways. You could enter
- Hide Specific Feeds: This allows you to manually hide one or more specific posts by pasting in their unique Post ID (a long string of numbers you can get from the post's URL).

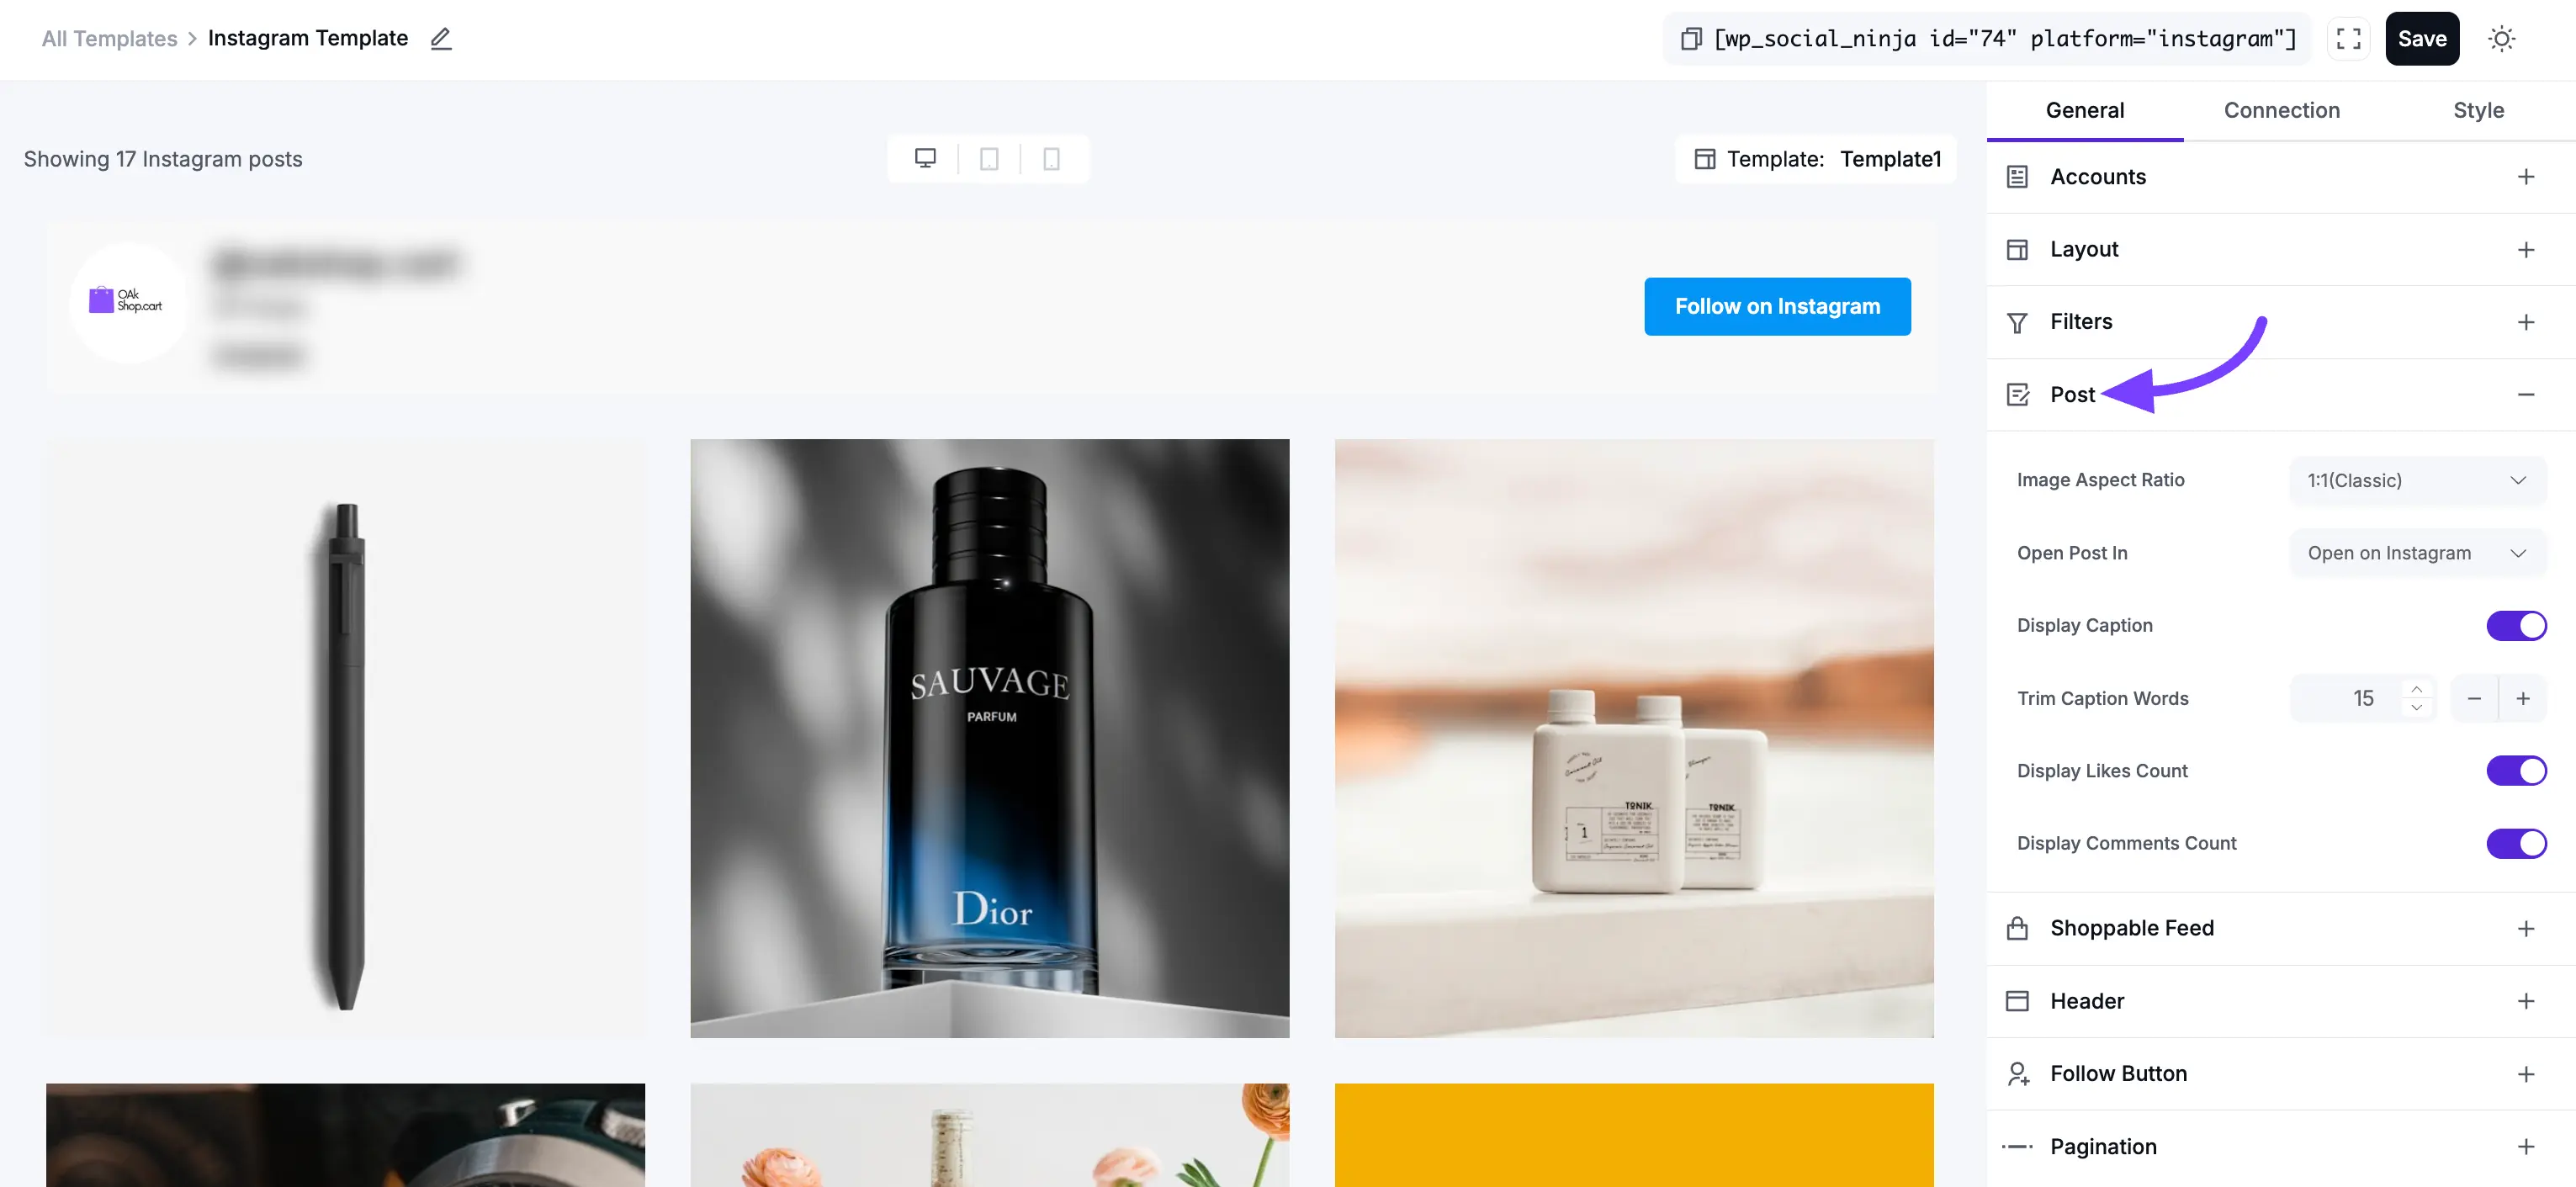
4. Post
This section controls the content and links inside each individual post card.
- Image Aspect Ratio: This setting controls the shape of your images in the feed. You can choose from options like Original, Square (1:1), Landscape (16:9), or Portrait (4:5).
- Open Post In: This dropdown menu determines what happens when a visitor clicks on an individual post.
- None: The post is not clickable.
- Instagram: The visitor is taken to the original post on Instagram.com.
- Popup / Lightbox: The post opens in a pop-up window on your own website, so the visitor never leaves your site.
- Display Caption: This is a simple On/Off toggle. When On, it will show the text caption (the description) that you wrote for that post on Instagram. When Off, only the image will be shown.
- Trim Caption Words: This feature lets you set a maximum word count for your post captions. If a caption is longer than the number you set (e.g., 30 words), it will be automatically shortened and a "Read More..." link will appear.
- Display Likes Count: This is an On/Off toggle to show or hide the total number of "likes" for each post.
- Display Comments Count: This is an On/Off toggle to show or hide the total number of comments for each post.
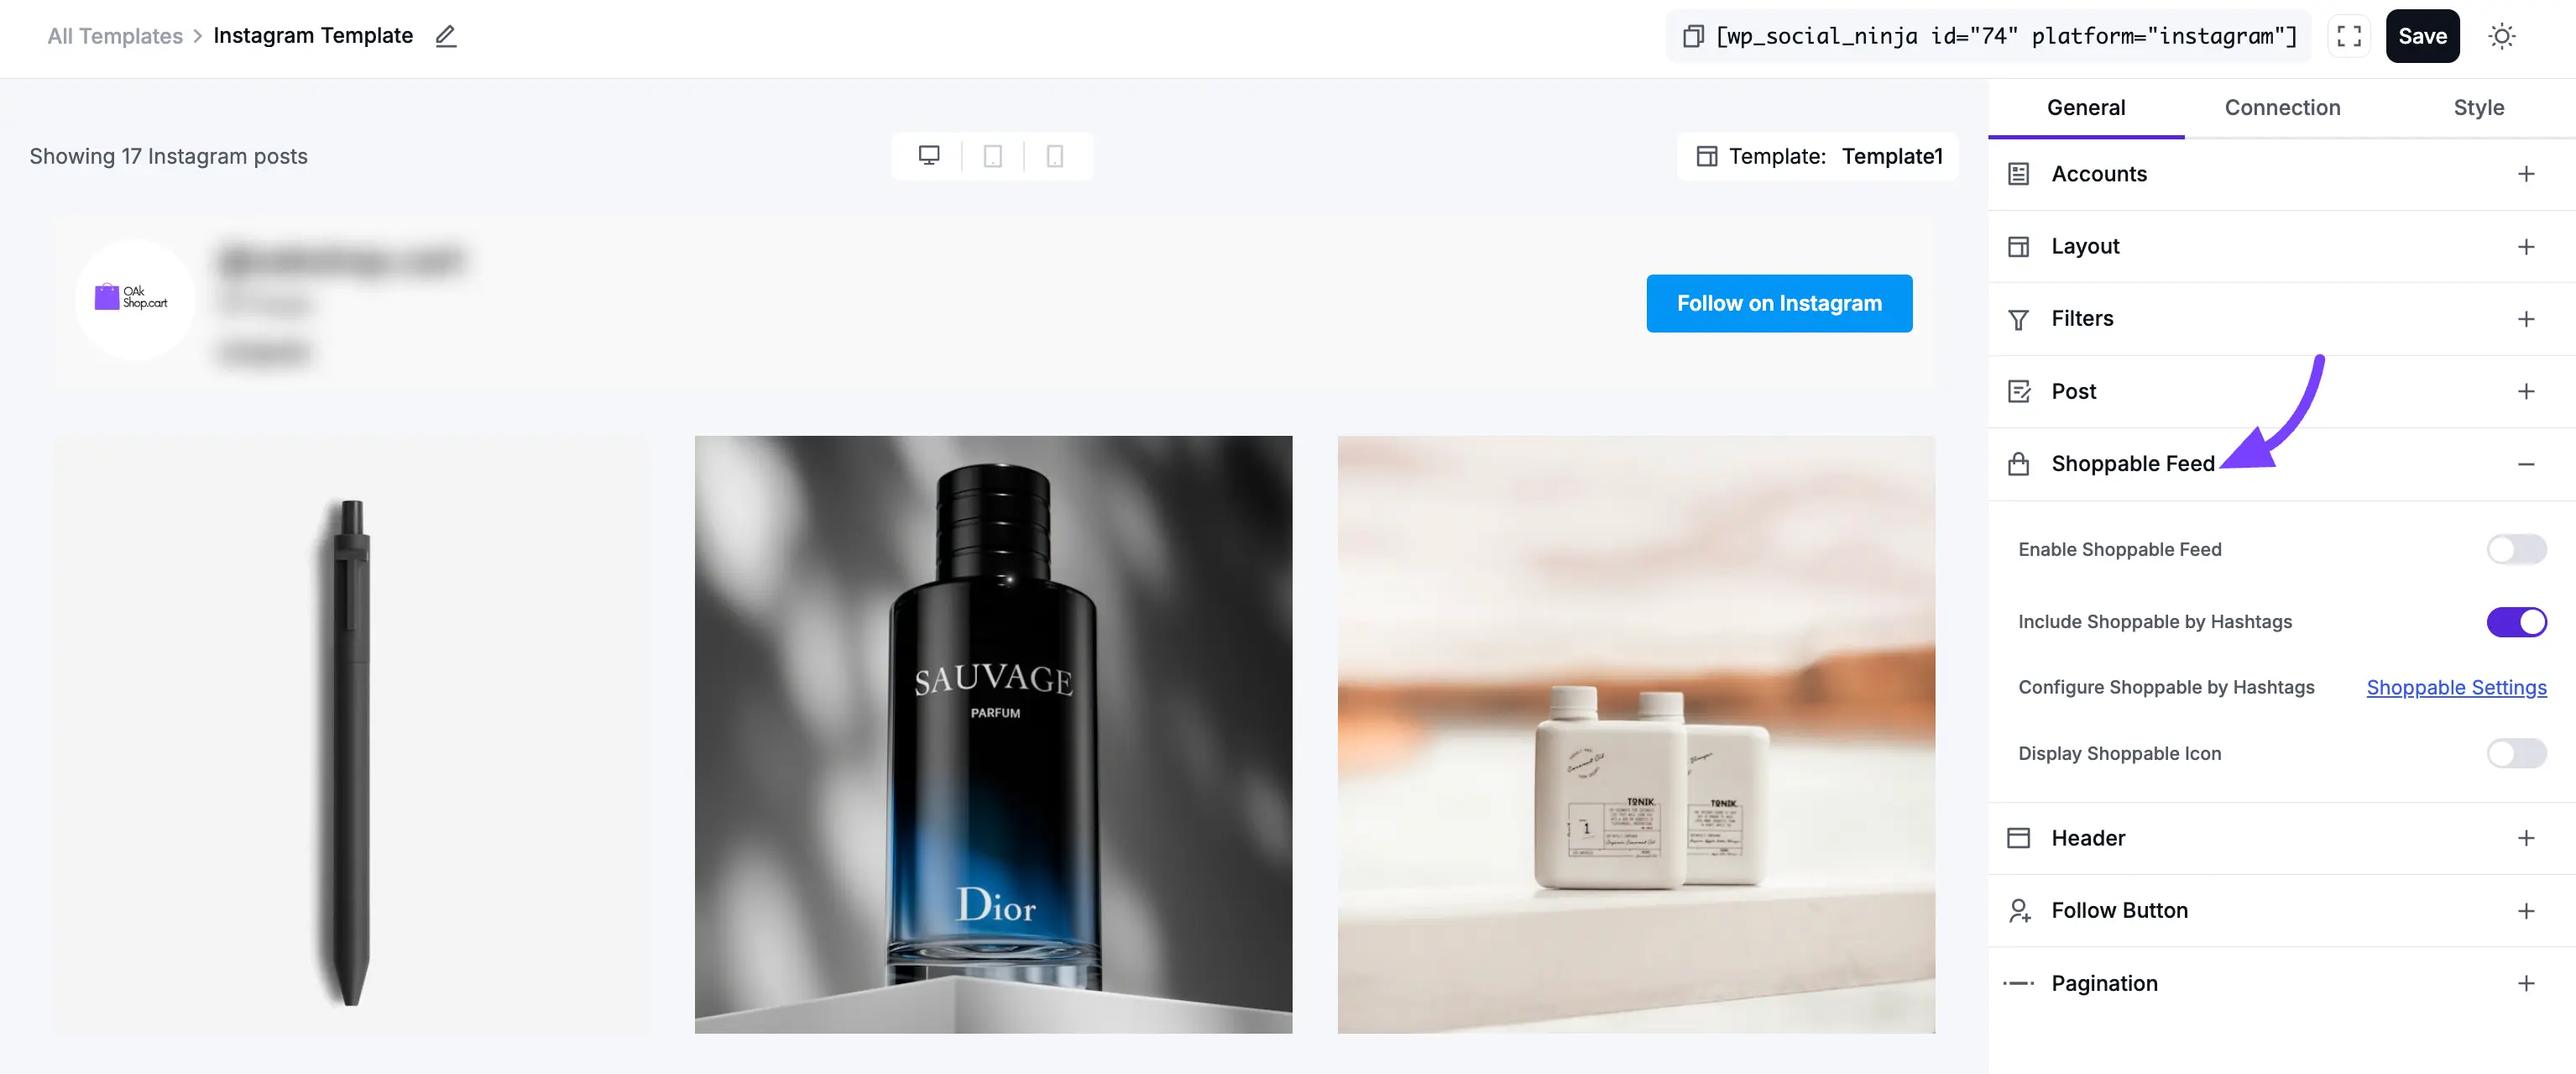
5. Shoppable Feed Settings
The Shoppable Feed section turns your Instagram feed into a powerful e-commerce tool. It allows you to add clickable links to your posts, sending visitors directly to your product pages. This is one of the best ways to turn your social proof into direct sales.
- Enable Shoppable Feed: This is the main On/Off toggle for the entire feature. You must turn this On to activate all other shoppable settings.
- How it works: When enabled, you can add custom links to your Instagram posts. When a visitor clicks the post, they will be taken to the product page you set, rather than the default "Popup / Lightbox" or "Instagram" action you set in the Post section.
- Include Shoppable by Hashtags: This enables a powerful, automatic way to create shoppable links. When this is toggled On, the plugin will scan your post captions for specific hashtags that you have pre-configured.
- Use Case: Imagine you have a WooCommerce store. Instead of manually adding a link to every post, you can set up a rule that says: "Any time a post has the hashtag
#blueshirt25, automatically link it to my 'Blue T-Shirt' product page." This is a huge time-saver!
- Use Case: Imagine you have a WooCommerce store. Instead of manually adding a link to every post, you can set up a rule that says: "Any time a post has the hashtag
- Configure Shoppable by Hashtags: This link is where you set up the "rules" for the feature above. This will likely take you to a Global Settings page in WP Social Ninja.
- How it works: On this configuration page, you will create your list of hashtag-to-URL mappings.
- Example:
- Hashtag:
#blueshirt25→ URL:yourstore.com/products/blue-shirt - Hashtag:
#redhat01→ URL:yourstore.com/products/red-hat
- Hashtag:
- Once you set this up, the "Include Shoppable by Hashtags" toggle will use these rules to automatically create your links.
- Display Shoppable Icon: This is a simple visual toggle. When turned On, a small "shopping bag" icon will appear over any post in your feed that has a shoppable link attached to it.
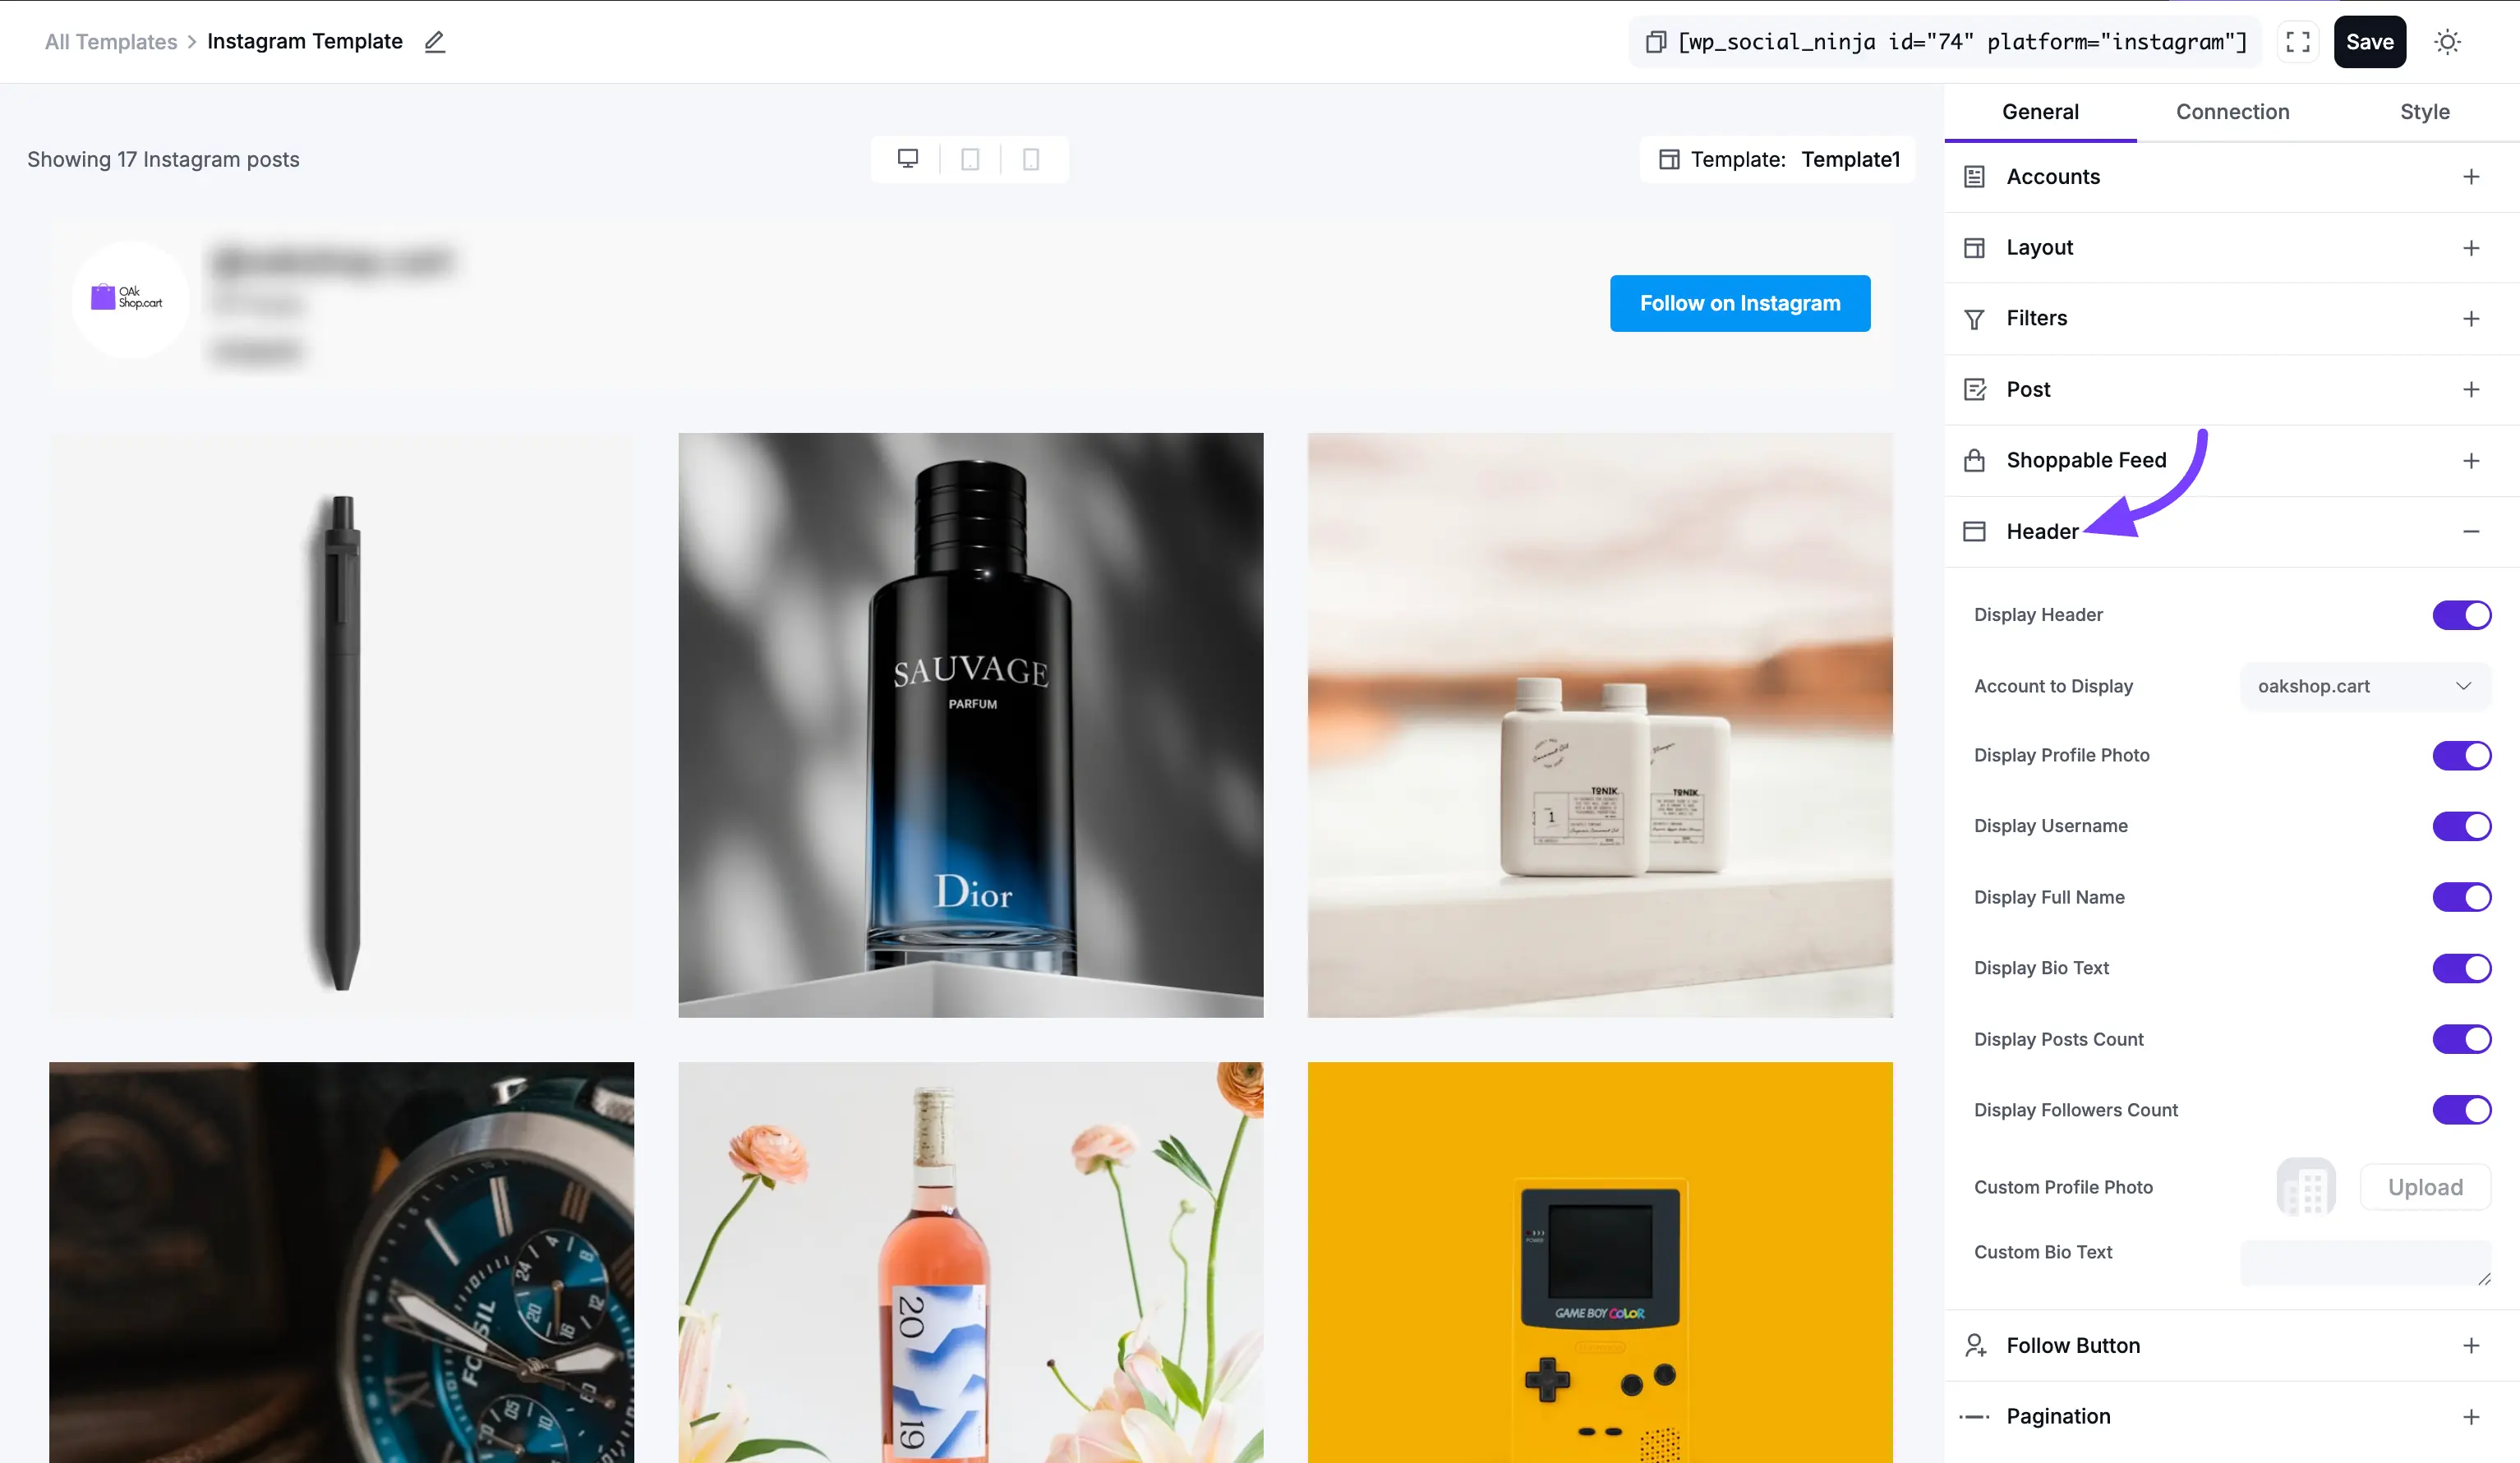
6. Header
This section controls the large banner at the top of your entire feed, which displays your main Instagram profile information.
- Display Header: This is the master on/off switch for the entire header section. Toggle it off if you just want to show the posts and nothing else.
- Account to Display: If your feed is showing posts from multiple accounts, this lets you choose which one account's info to show in the header.
- Display Toggles: These let you show or hide the different parts of your profile. This is great for creating a "mini-profile" on your website.
- Display Profile Photo: Display your profile photo in the feed
- Display User Name (Your @username)
- Display Full Name: Show your full name in the field
- Display Bio Text (Your Instagram profile biography)
- Display Posts Count (Total posts you've made)
- Display Followers Count (How many followers you have)
- Custom Profile Photo: Upload a custom image to use as your profile photo in the feed header.
- Custom Bio Text: Write custom text to use as your bio in the feed header.
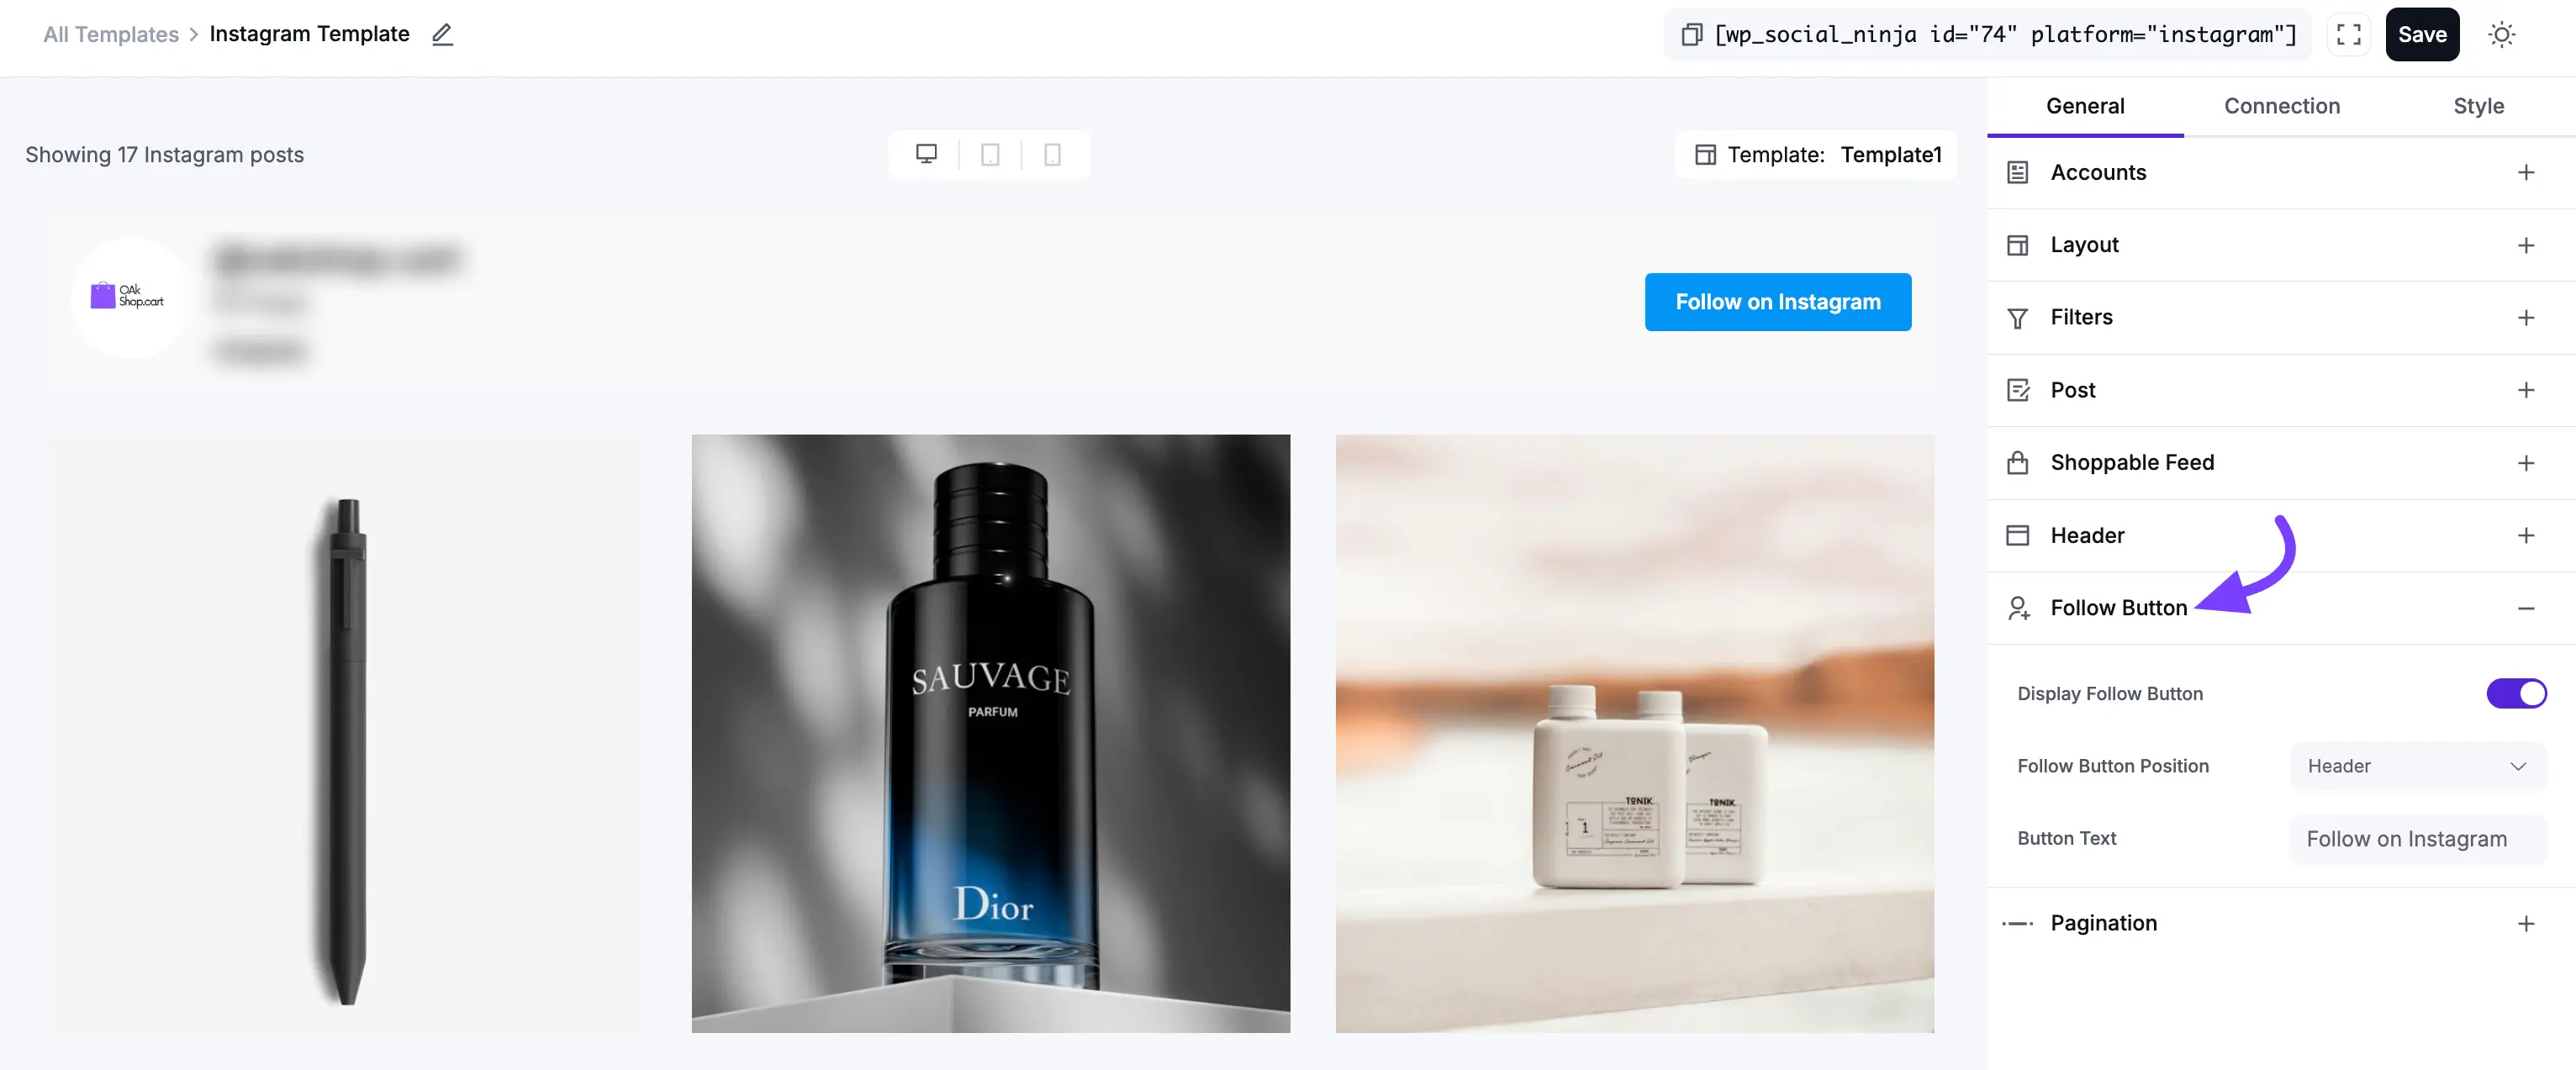
7. Follow Button
This adds a "Follow" call-to-action button to your feed, helping you get more Instagram followers directly from your website visitors.
- Display Follow Button: Toggles the button on or off.
- Follow Button Position: You can place the button in the Header (at the top of the feed) or the Footer (at the bottom, after all the posts).
- Button Text: You can customize the text on the button. For example, instead of "Follow," you could change it to "Follow Us on Instagram."
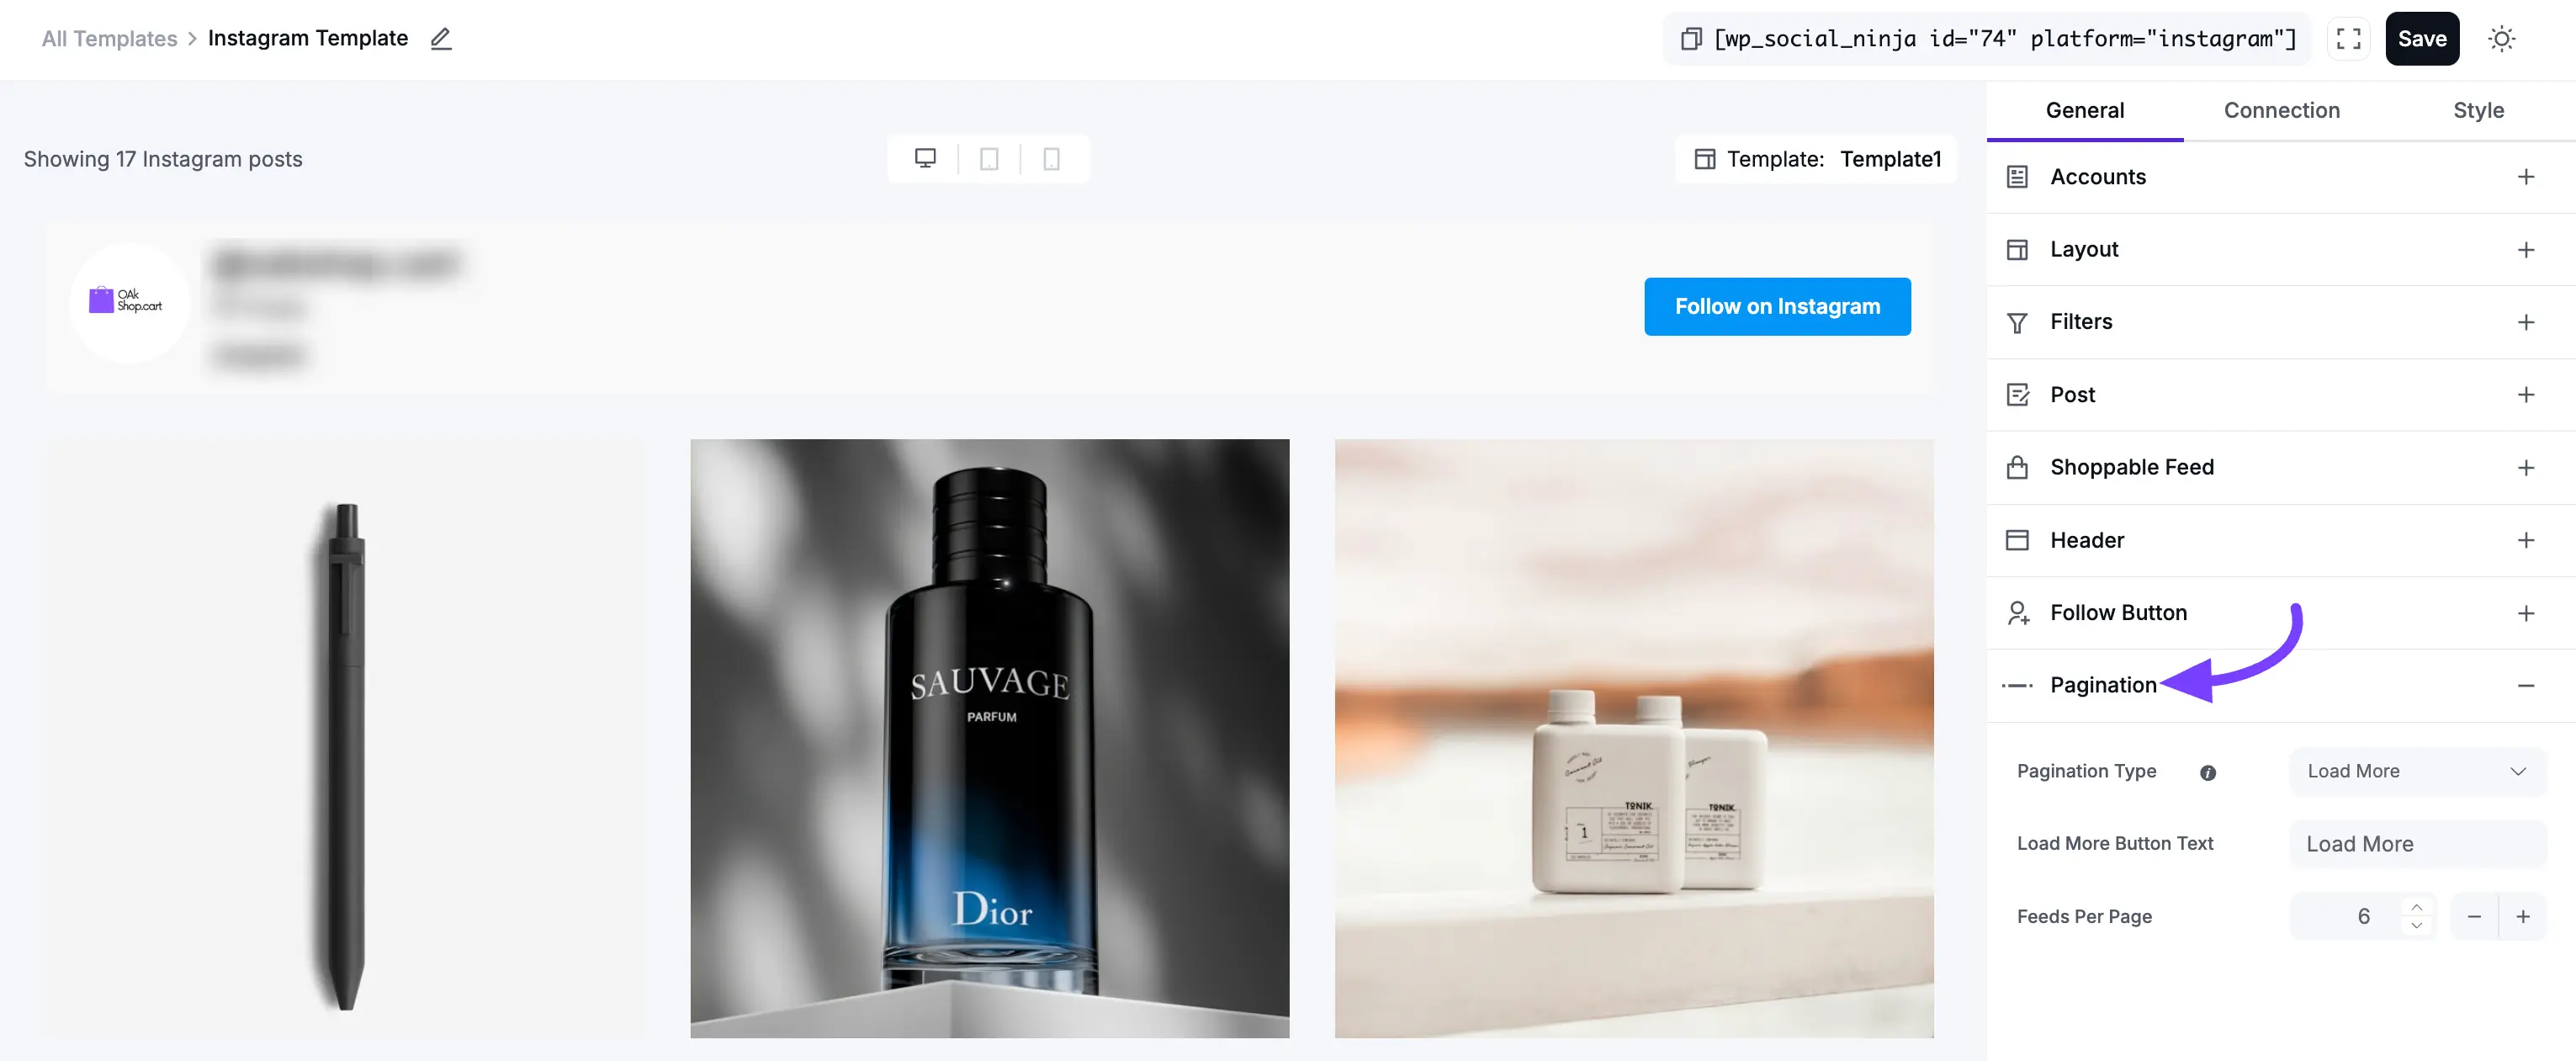
8. Pagination
Pagination controls what happens when a visitor gets to the bottom of the initial set of posts.
- Pagination Type:
- None: The feed will only show the "Number of Feeds to Display" (from the Filters section) and nothing else. There will be no way to load more posts.
- Load More: This will add a button at the bottom of your feed. When clicked, it will load the next set of posts. This is the most popular and user-friendly option.
- Load More Button Text: You can change the text from "Load More" to something like "See More Posts."
- Feeds Per Page: This is very important. This number controls how many new posts are loaded each time the "Load More" button is clicked.
- Example:
- You set Number of Feeds to Display (in Filters) to 9.
- You set Feeds Per Page (here) to 3.
- Your page loads, and visitors see 9 posts.
- They click "Load More."
Next Steps
Now that you have configured all the General settings for what your feed shows, your next step is to make it beautiful!
Click on the Style tab to customize all the colors, fonts, and borders.